
The day I realized my apartment had more wall space than floor space, everything changed. I was living in a cramped studio, barely 400 square feet, with enough outdoor gear to stock a small REI. My hiking boots lived under the coffee table, my climbing gear hung from hooks by the door, and my camping equipment colonized every closet. There was literally no floor space left for plants.
Then I looked up.
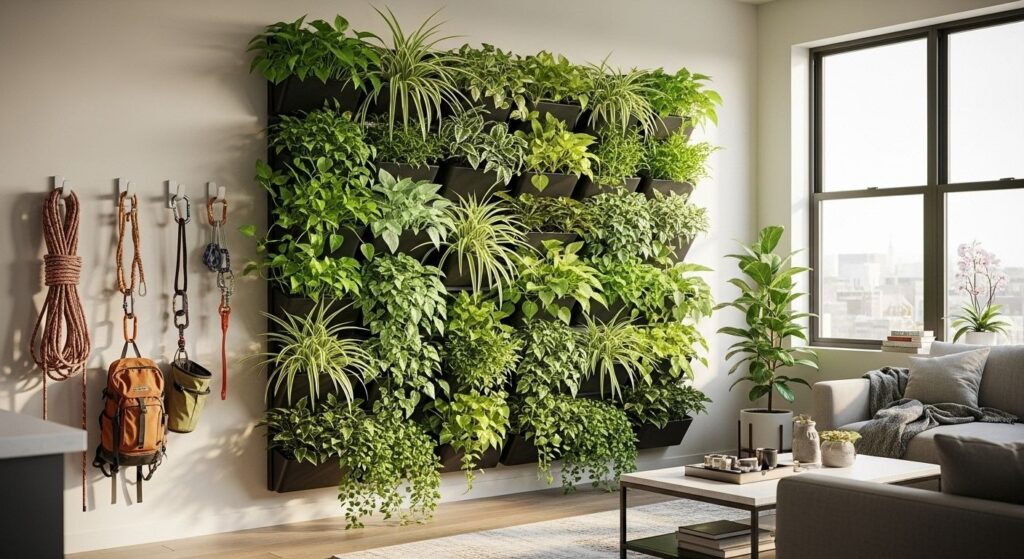
My walls were blank canvases—vertical real estate I’d completely ignored. That weekend, I mounted my first wall planter and added a trailing pothos. Within six months, I had a living wall that covered an entire section of my apartment, producing fresh herbs for trail cooking and transforming my cramped space into a green sanctuary.
If you’re an outdoor enthusiast living in tight quarters, or you just want to maximize your growing space without sacrificing floor area, wall plants are the answer. They’re space-efficient, visually stunning, and bring the vertical dimension of forests and cliffs right into your home.
Why Vertical Indoor Gardens Work
Wall plants aren’t just about saving floor space—they fundamentally change how you experience your home. Instead of a few plants scattered on surfaces, you create a living feature that draws the eye upward and makes rooms feel larger and more dynamic.
For those of us who spend weekends scrambling up rock faces or hiking through vertical terrain, bringing that verticality indoors feels natural. Trailing plants cascading down walls mimic the way vegetation drapes over cliffs. Climbing plants reaching upward echo the forest canopy. It’s a slice of the wild, oriented the way nature often grows—vertically.
The practical benefits are significant too. Vertical gardens increase your growing capacity dramatically without taking up valuable floor space. A wall that’s 6 feet tall and 4 feet wide provides 24 square feet of growing area—enough space for dozens of plants. That same floor footprint would hold maybe 2-3 medium containers.
Wall plants also improve air quality more effectively than scattered floor plants because you can pack more greenery into the same room. More plant surface area means more photosynthesis, more oxygen production, and more toxin filtration.
Best Plants for Indoor Walls
Not every plant works well vertically. You need species that either trail naturally, tolerate being mounted, or grow compactly enough to thrive in wall planters.
Trailing Plants: The Wall Garden Workhorses
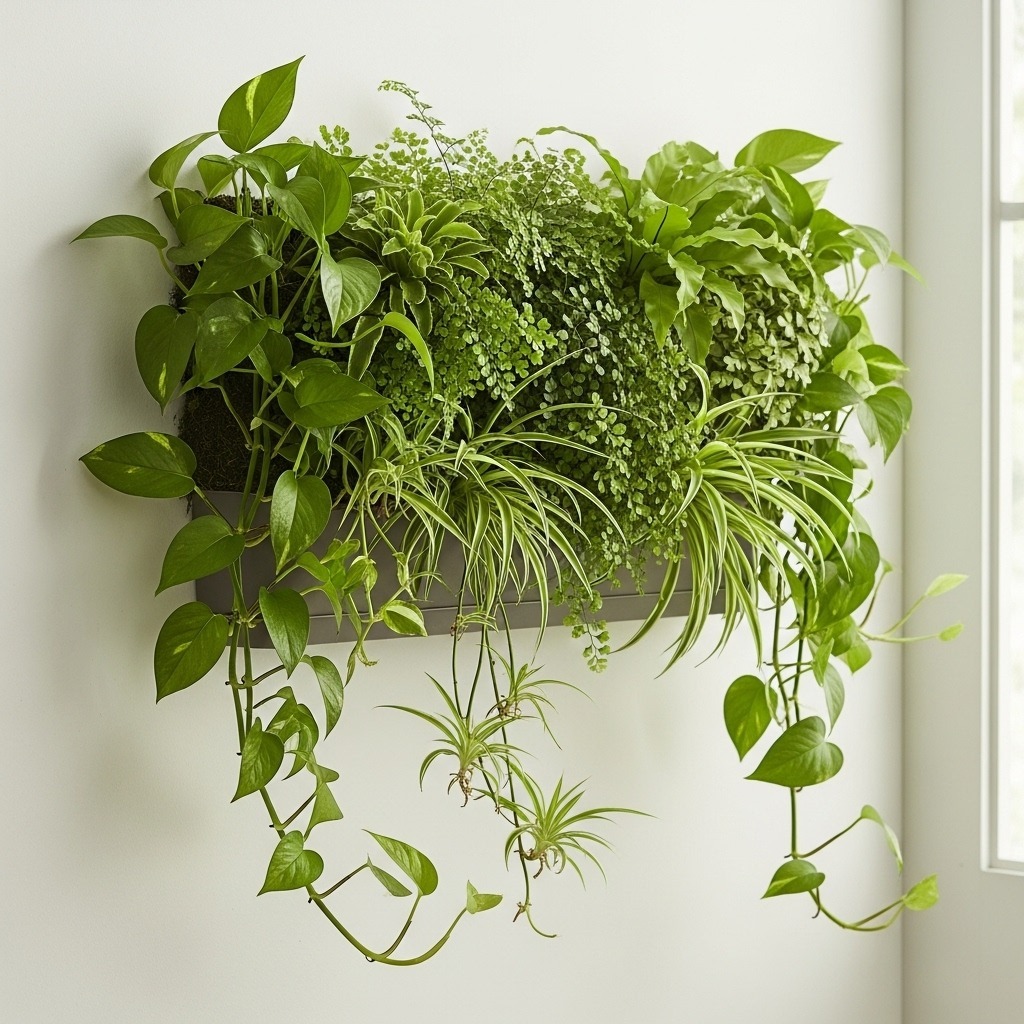
Pothos (Devil’s Ivy)
The absolute best wall plant for beginners. Pothos trails beautifully, grows fast, tolerates low light, and survives neglect. The vines can grow 10+ feet long, creating dramatic cascades down your wall. Varieties like golden pothos, marble queen, and neon pothos offer different colors and patterns.
I have pothos on three different walls, all started from cuttings of my original plant. They’re virtually indestructible and grow so fast you can actually watch your wall garden expand week by week.
String of Pearls / String of Hearts
These succulents produce delicate trailing strands covered in bead-like leaves. They’re more finicky than pothos but absolutely stunning. They need bright light and infrequent watering—perfect for sunny walls where you want something unique.
Philodendron
Similar to pothos but with larger, more dramatic leaves. Heartleaf philodendron trails beautifully, while varieties like Brasil add colorful variegation. They’re just as easy to care for as pothos and create a lusher, more tropical look.
Spider Plants
Their arching leaves and dangling plantlets create natural movement and visual interest on walls. They’re incredibly forgiving and produce those adorable baby plants that you can propagate and share. Display them in hanging plant baskets mounted at different heights.
Upright Wall Plants
Snake Plants
While typically floor plants, snake plants work surprisingly well in wall-mounted planters. Their vertical growth habit and low water needs make them ideal for wall displays where watering access might be limited. Group several small snake plants together for architectural impact.
Air Plants (Tillandsia)
These don’t need soil at all—just periodic misting or soaking. Mount them directly to wall-mounted driftwood, attach them to decorative frames, or display them in wall-hung terrariums. They’re perfect for creative wall displays and need minimal maintenance.
Ferns
Boston ferns and maidenhair ferns create lush, draping foliage perfect for wall planters. They need consistent moisture and humidity, so they work best in bathrooms or kitchens with higher humidity levels. Use a watering spray mister to keep them happy.
Wall Planter Options and Installation
You’ve got several approaches to creating a wall garden, from simple to elaborate.
Individual Wall-Mounted Planters
The easiest starting point. Mount individual planters at different heights and let plants trail down or grow upward. Use decorative ceramic plant pots with built-in wall mounts, or DIY your own using shelf brackets and regular pots.
Space planters vertically to create a cascading effect—plant at the top trails down to the next level, and so on. This layered approach creates depth and visual movement.
Wall-Mounted Shelves with Plants
Use floating shelves or indoor plant stands mounted to walls. This gives you flexibility to arrange plants, rotate them, and mix in other decor. It’s less dramatic than a full living wall but more adaptable and easier to maintain.
Hanging Planters on Command Hooks
For renters or those who don’t want to drill into walls, heavy-duty adhesive hooks can support smaller hanging plant baskets. Arrange them at staggered heights to create a vertical garden effect without permanent installation.
Installation Tips
Find the Studs
For heavier planters or living wall systems, mount directly into wall studs using a stud finder. Drywall anchors work for lighter individual planters but have weight limits.
Consider Water Drainage
Every wall planter needs drainage to prevent root rot, but you don’t want water running down your wall and ruining paint or drywall. Use planters with attached saucers, double-pot systems, or self-watering designs.
Plan for Maintenance Access
Install wall gardens where you can easily reach them for watering, pruning, and care. A beautiful wall garden 10 feet up that you can’t maintain will quickly become a problem.
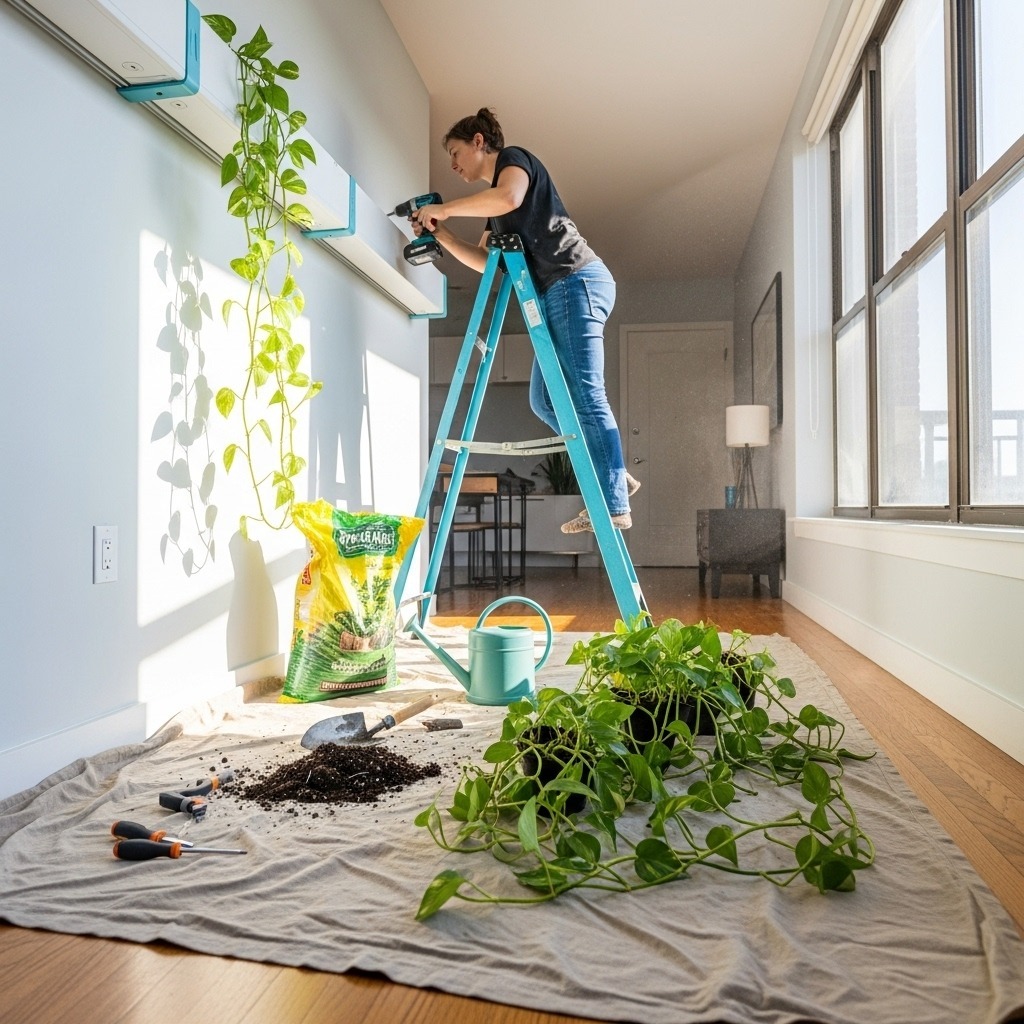
Creating a Living Wall: Step-by-Step
Ready to build your own vertical garden? Here’s how I set up my living wall.
Step 1: Choose Your Location
Pick a wall with adequate light for your chosen plants. South or west-facing walls near windows get the brightest light. North or east-facing walls or interior walls work for low-light plants like pothos and snake plants.
Consider proximity to water sources—you’ll be watering regularly, and hauling water across your apartment gets old fast.
Step 2: Plan Your Layout
Sketch your wall and plan planter placement. Consider plant sizes, growth habits, and visual balance. Put trailing plants higher so they can cascade. Place upright plants at mid-levels. Create symmetry or intentional asymmetry—whatever matches your aesthetic.
Step 3: Gather Supplies
- Wall planters or mounting system
- Drill, screws, anchors, or heavy-duty hooks
- Level
- Stud finder (for heavy installations)
- Potting mix
- Plants
- Garden tool set for planting
Step 4: Install Mounting Hardware
Mark your planter positions with a pencil, use a level to ensure they’re straight, and install brackets, shelves, or hooks according to your plan. Double-check everything is secure before adding weight.
Step 5: Plant Your Containers
Fill planters with quality potting mix, leaving space at the top for watering. Plant your selections, water thoroughly, and let them drain before mounting on the wall.
Step 6: Mount and Arrange
Carefully mount planted containers. Step back frequently to assess the overall look and make adjustments. It’s easier to reposition now than after plants establish.
Step 7: Establish Watering Routine
Wall gardens dry out faster than floor plants because they’re exposed to more air circulation. Check moisture levels regularly, especially in the first few weeks. Use a soil moisture meter to monitor without guesswork.
Watering Your Wall Garden
Watering wall plants presents unique challenges—you can’t just drip water everywhere and ruin your walls or floors.
Manual Watering Techniques
Use a spray bottle for precision watering that minimizes mess. It’s perfect for hard-to-reach planters and prevents overwatering.
For larger planters, use a small watering can with a narrow spout. Water slowly and stop when water begins draining into the saucer or drainage system.
Remove plants from wall mounts periodically (weekly or biweekly) and water them thoroughly in a sink or bathtub, allowing them to drain completely before rehanging. This ensures thorough watering and lets you check plant health.
Self-Watering Systems
For serious wall gardens, consider installing drip irrigation or wick watering systems. These use reservoirs and tubing to deliver consistent moisture directly to roots.
Self-watering planters work excellently for wall gardens, especially if you travel frequently for camping trips. They reduce watering frequency and keep plants consistently hydrated.
Preventing Water Damage
Always use planters with proper drainage and saucers to catch excess water. For wall-mounted planters without saucers, consider lining walls with waterproof barriers or using only plants that tolerate drier conditions.
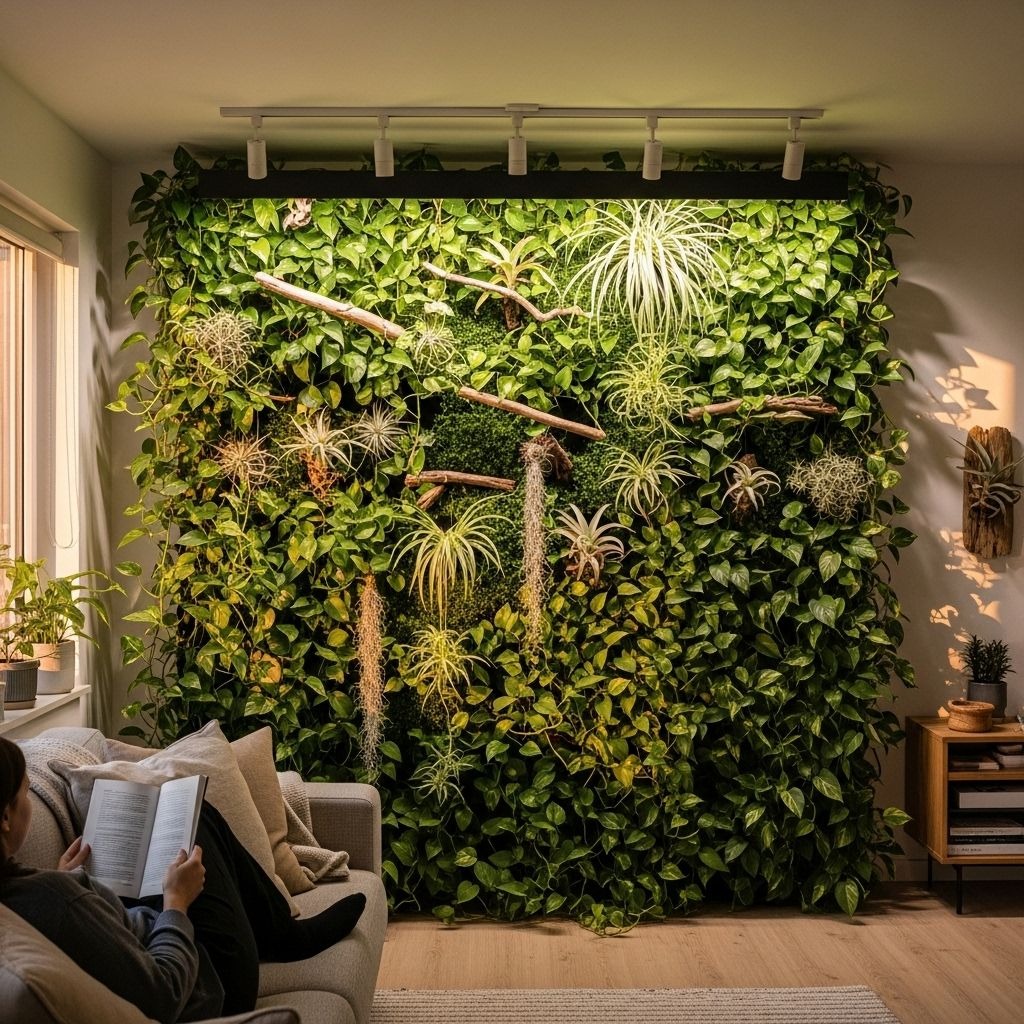
Maximizing Your Vertical Space
Once you’ve got the basics down, you can get creative with vertical gardening.
Mix Plant Types for Visual Interest
Combine trailing plants with upright plants and climbing varieties. Vary leaf shapes, sizes, and colors. Mix pothos varieties—golden, marble queen, neon—for different shades of green.
Create an Herb Wall for Cooking
Dedicate a sunny kitchen wall to culinary herbs. Mount small planters in a grid and grow basil, cilantro, parsley, thyme, oregano, and chives. Fresh herbs within arm’s reach of your cutting board transform everyday cooking—and they’re perfect for preparing camping meals before trips.
Build a Corner Garden
Corners are often wasted space. Install planters on both adjoining walls, creating a lush corner focal point. Trailing plants cascade from upper corners while upright plants fill middle zones.
Use Vertical Space in Small Bathrooms
Bathrooms often have limited floor space but ample wall area. Mount ferns, pothos, or spider plants above the toilet or beside the shower. The natural humidity is perfect for many tropical plants.
Install Grow Lights for Low-Light Walls
Don’t let poor natural light stop you. Mount LED grow lights above your wall garden to provide the light plants need. Modern grow lights are energy-efficient and come in attractive designs that complement your decor.
Maintenance and Care
Wall gardens need consistent care to thrive, but the routine is straightforward.
Regular Inspections
Check plants weekly for pests, yellowing leaves, or signs of stress. Catching problems early prevents them from spreading throughout your wall garden.
Pruning and Trimming
Trim trailing plants when they get too long or unruly. Prune dead or yellowing leaves to keep plants healthy and looking their best. Use clean, sharp pruning shears.
Fertilizing
Wall plants need regular feeding like any container plant. Use diluted liquid fertilizer every 2-4 weeks during the growing season. Organic fertilizer options work well and improve long-term soil health.
Repotting
Eventually, wall plants outgrow their containers. Watch for roots emerging from drainage holes or plants that dry out extremely quickly despite frequent watering. Repot into slightly larger containers or propagate overgrown plants.
Troubleshooting Common Issues
Plants Aren’t Growing
Insufficient light is the most common cause. Move planters closer to windows, add supplemental grow lights, or switch to more shade-tolerant species.
Yellowing Leaves
Usually indicates overwatering. Check soil moisture before watering and ensure planters have proper drainage. Can also signal nutrient deficiency—try fertilizing.
Brown, Crispy Leaf Tips
Low humidity or fluoride in tap water. Increase humidity with regular misting, group plants together, or switch to filtered water.
Pests
Isolate affected plants immediately. For fungus gnats, reduce watering frequency. For spider mites, wipe leaves with soapy water or use neem oil spray.
FAQs
Q: How do I water wall plants without making a mess?
Use a spray bottle or small watering can with a narrow spout for precision. Water slowly and stop when drainage saucers fill. Alternatively, remove planters from mounts weekly, water thoroughly in a sink or tub, let them drain completely, then rehang. Self-watering planters eliminate most mess.
Q: Will wall gardens damage my walls or paint?
Properly installed wall gardens won’t damage walls if you use appropriate mounting hardware and ensure good drainage. Always use saucers to catch water, avoid overwatering, and use waterproof barriers if needed. Renters should use removable mounting solutions like heavy-duty adhesive hooks.
Q: What’s the best wall garden for beginners with low light?
Start with pothos, snake plants, and ZZ plants mounted in individual planters rather than a full living wall system. These species tolerate low light and forgive beginner mistakes. As you gain confidence, expand to more plants or experiment with different species.
Q: How much does a wall garden cost to set up?
Costs vary dramatically. A simple DIY wall garden with a few hanging planters and basic plants can cost $50-100. Elaborate modular living wall systems with irrigation can run $500-2000+. Start small and expand gradually as your budget and confidence grow.
Q: Can I create a wall garden in a rental apartment?
Absolutely. Use damage-free mounting solutions like Command hooks for lightweight planters, freestanding shelf units that lean against walls, or tension-rod systems that don’t require drilling. Avoid permanent installations unless your landlord approves.