
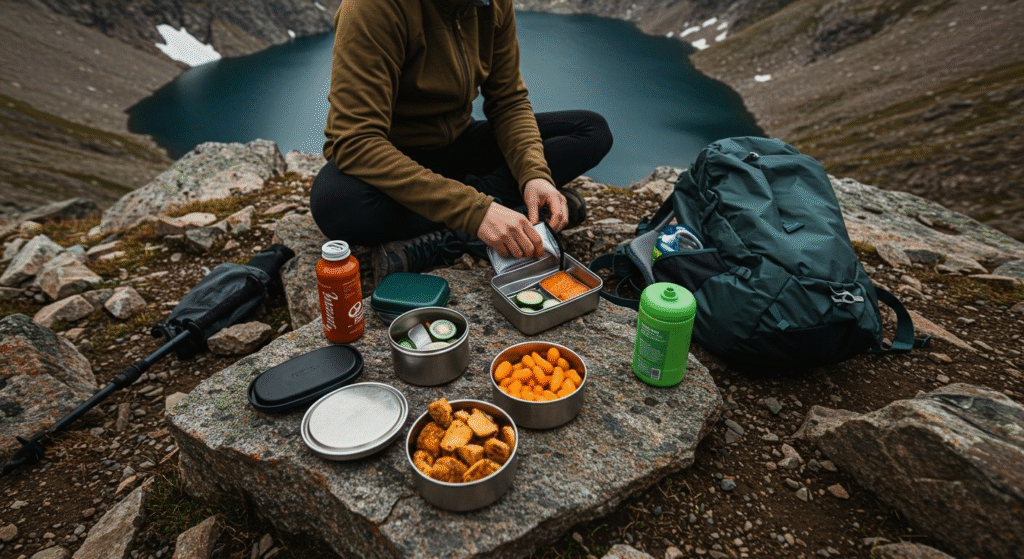
Picture this: mile 8 of what was supposed to be an epic 12-mile loop trail in the Cascades. My stomach was growling louder than a hungry bear, and I was practically drooling thinking about the gourmet sandwich I’d packed that morning. Turkey, avocado, fresh tomatoes, the works—basically a deli masterpiece.
I found the perfect lunch spot overlooking a pristine alpine lake, reached into my pack with anticipation, and pulled out what can only be described as a soggy disaster. The tomatoes had turned my bread into mush, the avocado had oxidized to an unappetizing brown, and somehow the whole thing had morphed into an unrecognizable mess.
That day changed everything. I learned that hiking lunch ideas need to be more than just tasty—they need to survive the journey. After years of trial-testing meals and swapping tips with fellow outdoor enthusiasts, I’ve cracked the code on packing lunches that actually make you excited for that midday break.
Whether you’re planning your first day hike or you’re a seasoned adventurer looking to upgrade your trail nutrition game, these hiking lunch ideas will fuel your adventures without disappointment. Before we dive in, make sure you’re fully prepared with our comprehensive hiking checklist to ensure you don’t forget any essentials beyond just lunch.
What Makes a Perfect Hiking Lunch
Before we dive into specific recipes, let’s talk about what separates trail-worthy meals from kitchen disasters. The best hiking lunches check these essential boxes:
Nutritional Balance: You need a solid mix of carbohydrates for quick energy, protein to keep you satisfied, and healthy fats for sustained fuel. Your body burns serious calories on the trail, so plan for 250-300 calories per hour of hiking.
Packability Power: If it can’t survive being jostled around in your pack for hours, it’s not hiking food. Think sturdy ingredients that won’t turn into mush or leak all over your gear.
Temperature Independence: Unless you’re packing a camp stove, your lunch needs to taste great at whatever temperature it reaches in your pack. Cold pizza? Surprisingly good. Cold pasta salad? Even better.
Mess-Free Eating: When you’re perched on a boulder with tired legs, you don’t want to wrestle with complicated utensils or messy assemblies. The best trail lunches can be eaten with one hand.
For those interested in mastering outdoor skills beyond meal prep, check out our guide on how to read a topographic map to navigate confidently on any adventure.
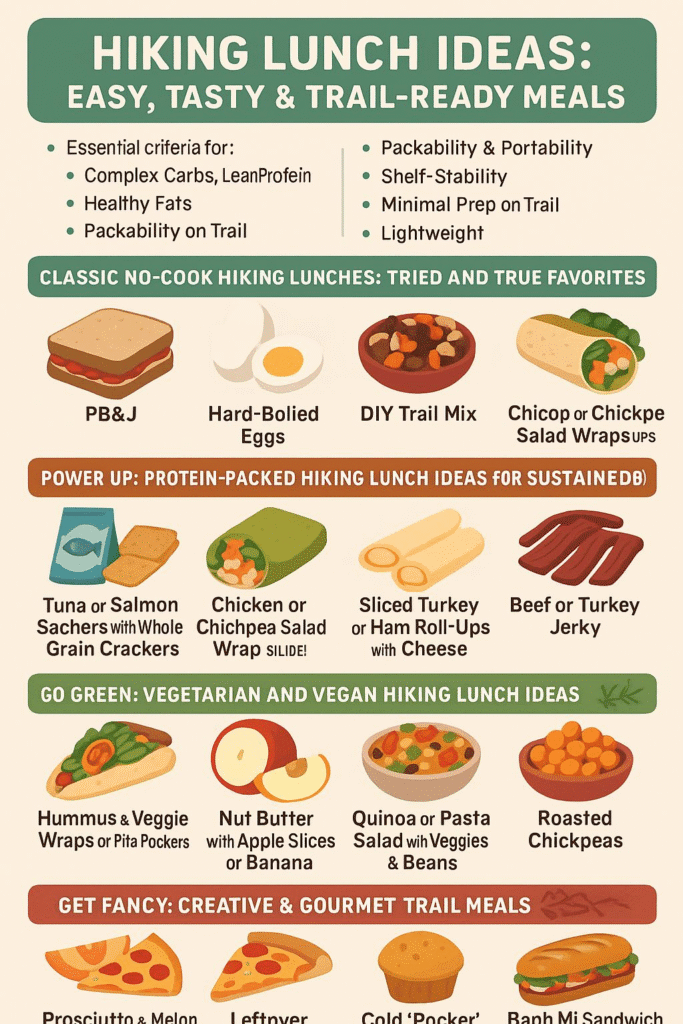
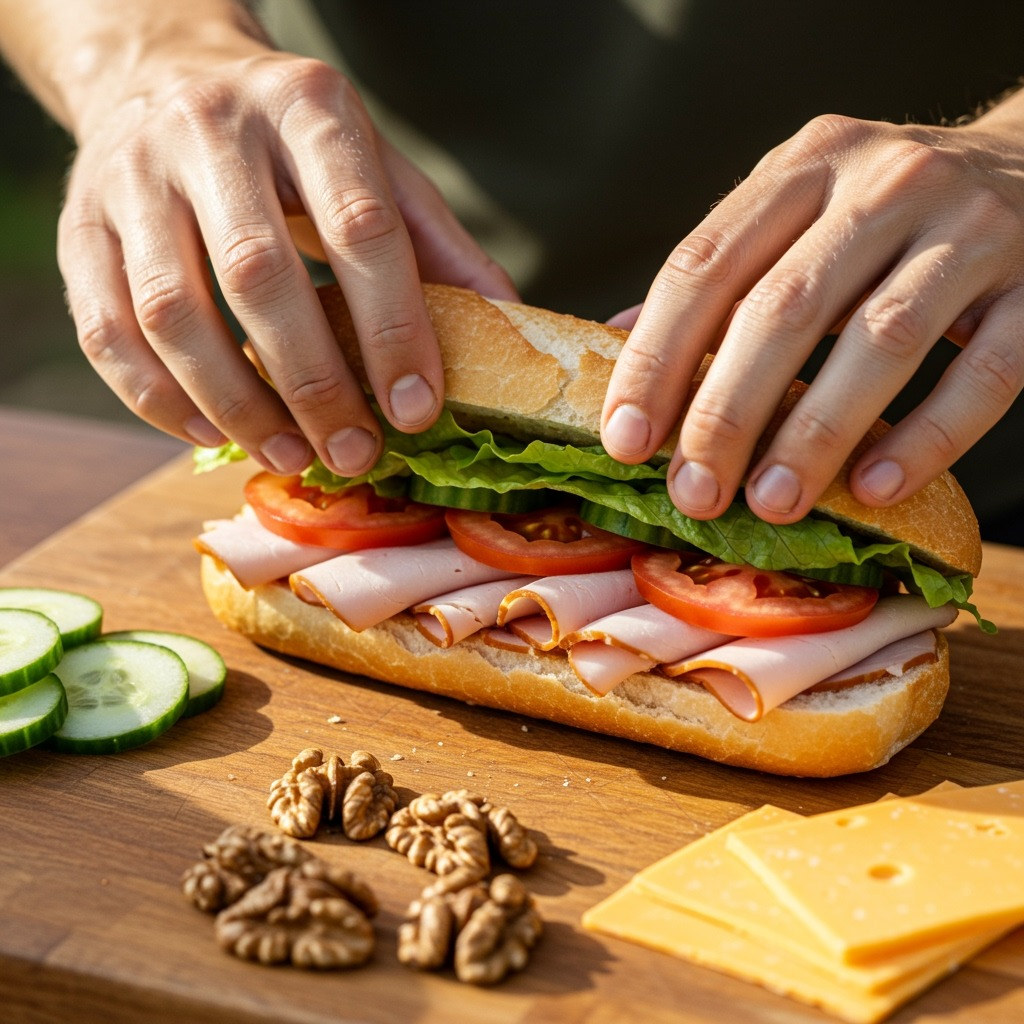
The Barrier Method: Sandwiches That Actually Work
Let me introduce you to the game-changing technique that saved my trail sandwich reputation: the barrier method. This simple strategy prevents the soggy bread syndrome that ruined my Cascades adventure.
The Secret: Create moisture barriers using spreadable fats. Cream cheese, hummus, or nut butter on both sides of the bread creates a protective layer that prevents wet ingredients from making your sandwich sad.
Classic Combinations That Hold Up
The Everything Bagel Power Sandwich
Start with a toasted everything bagel, spread with herb cream cheese on both halves. Layer smoked salmon or turkey, cucumber slices, and a sprinkle of capers. This combination provides enough salt to replace electrolytes and enough protein to keep you going strong for miles.
Gourmet PB&J Trail Edition
Don’t sleep on the humble peanut butter and jelly—it’s practically indestructible and provides excellent trail energy. Level it up by using almond or cashew butter, adding sliced bananas, and choosing hearty whole-grain bread. Pro tip: Put the peanut butter on both sides and the jelly in the middle to prevent bread sogginess.
Mediterranean Turkey Stack
Use ciabatta or sourdough, spread with olive tapenade as your moisture barrier. Layer turkey, provolone, roasted red peppers, and crisp romaine lettuce. The tapenade adds Mediterranean flair while keeping everything fresh.
Wraps That Won’t Fall Apart
Wraps are fantastic hiking lunch options when you know the right techniques. The key is choosing the right tortilla and mastering the assembly method.
Buffalo Chicken Crunch Wrap
Mix rotisserie chicken with a small amount of buffalo sauce—not too much to avoid drips. Add coleslaw mix for crunch and a sprinkle of blue cheese. Roll tightly in a large flour tortilla. The coleslaw provides perfect texture contrast and helps absorb excess sauce.
Mediterranean Hummus Wrap
Spread a thick layer of hummus on a spinach tortilla. Add roasted red peppers, cucumber strips, feta cheese, and fresh herbs. This combination stays fresh for hours and provides excellent plant-based protein.
Turkey Avocado Roll
Here’s how to include avocado without the brown disaster: Mash the avocado with lemon juice and salt, which prevents oxidation. Spread on a tortilla, add turkey, cheese, and lettuce. Roll tightly and wrap in foil to maintain shape.
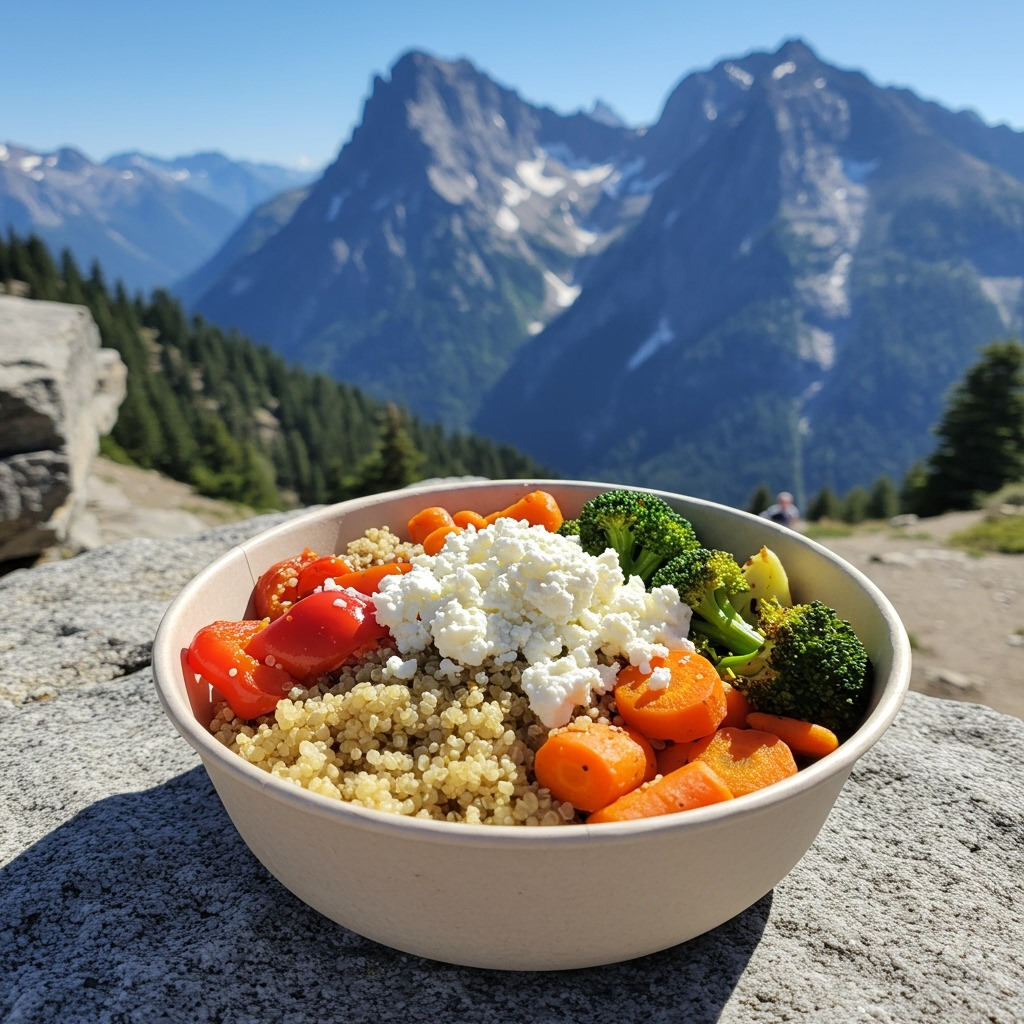
Protein-Packed Bowls for Serious Trail Fuel
Sometimes you want something more substantial than bread-based meals. These protein bowls are perfect for longer hikes when you need serious, sustained energy.
Mediterranean Quinoa Power Bowl
Cook quinoa the night before and let it cool completely. Mix with diced cucumber, cherry tomatoes, kalamata olives, feta cheese, and a simple olive oil and lemon dressing. Pack in a leak-proof container. This bowl actually tastes better after sitting for a few hours as the flavors meld together.
Southwest Black Bean Fiesta
Combine black beans, corn, diced bell peppers, red onion, and cilantro. Dress with lime juice, olive oil, cumin, and a pinch of chili powder. This combination provides complete proteins and tastes refreshing even on hot days.
Asian-Inspired Soba Noodle Bowl
Cold soba noodles tossed with shredded carrots, snap peas, and sesame-ginger dressing make an unexpectedly satisfying trail meal. Add edamame for extra protein. The key is cooking the noodles until just tender and rinsing thoroughly with cold water.
For outdoor enthusiasts who want to expand their camping horizons, explore our primitive camping guide for tips on simple, no-cook meal preparation techniques.
Trail Charcuterie: The Ultimate Snack Lunch
Sometimes the best hiking lunches involve creating a “grown-up lunchable” situation. These combinations provide variety and let you eat as much or as little as you want based on your energy needs.
Mountain Charcuterie Board
Pack hard cheeses like aged cheddar or Gouda—they handle heat better than soft cheeses. Add cured meats like salami or prosciutto, mixed nuts, dried fruits, and sturdy crackers. Include a small container of honey or fig jam for an extra treat. This setup feels luxurious on the trail while providing excellent sustained energy.
Protein-Packed Bento Box
Hard-boiled eggs, string cheese, grape tomatoes, baby carrots, hummus, and whole-grain crackers. Everything packs well, provides varied textures, and covers all your nutritional bases. Pro tip: Bring a small salt packet to sprinkle on the eggs and tomatoes.
Energy Ball Collection
Make a batch of energy balls the night before using oats, nut butter, honey, and add-ins like chocolate chips or dried fruit. Pack 4-6 balls along with fresh fruit and nuts for a sweet and satisfying lunch that feels like a treat.
Special Dietary Solutions
Vegan Power Options
- Chickpea Salad Sandwich: Mash chickpeas with tahini, lemon juice, diced celery, and seasonings. Serve on sturdy bread with lettuce and tomato.
- Nut Butter Banana Wrap: Almond butter, sliced banana, hemp seeds, and a drizzle of agave in a whole wheat tortilla.
- Mediterranean Veggie Wrap: Hummus, roasted vegetables, spinach, and avocado in a large tortilla.
Keto-Friendly Choices
- Lettuce Wrap Sandwiches: Use large butter lettuce leaves to wrap deli meat, cheese, and avocado.
- Fat Bomb Trail Mix: Macadamia nuts, pecans, small amounts of dark chocolate, and coconut flakes.
- Egg Salad Stuffed Avocado: Mix hard-boiled eggs with mayo and mustard, stuff into avocado halves.
Gluten-Free Solutions
- Rice Paper Spring Rolls: Fresh vegetables, herbs, and protein wrapped in rice paper with peanut dipping sauce.
- Stuffed Bell Peppers: Cold preparation with quinoa, black beans, corn, and cheese.
- Corn Tortilla Wraps: Use corn tortillas instead of wheat for any wrap recipe.
Remember, staying properly fueled isn’t just about lunch. Check out our comprehensive guide to the best hiking snacks to keep your energy up throughout the entire adventure.
Pro Packing Strategies That Actually Work
After years of lunch disasters and victories, these packing strategies have saved my meals countless times:
Container Hierarchy: Use hard containers for crushable items like chips, crackers, and delicate vegetables. Soft containers or bags work for sturdy items like sandwiches and wraps. Always use leak-proof containers for anything with sauce or dressing.
Temperature Strategy: If you’re hiking in hot weather, freeze your water bottles the night before and pack them against perishable items. They’ll slowly thaw throughout the day, providing cold drinks while keeping your food fresh.
Assembly on Trail: Pack wet ingredients separately and assemble at lunch time. Bring small containers of dressing, sauce, or spreads to add just before eating. This prevents sogginess and maintains optimal flavors.
The Double Bag Method: For anything that could potentially leak, use the double bag method—one bag for the food, another bag around that one. This has saved my pack from countless messes.
For comprehensive outdoor preparation beyond just meals, explore these expert resources from REI’s outdoor food safety guide for additional tips on keeping your trail meals safe and delicious.
Advanced Trail Lunch Techniques
Make-Ahead Mason Jar Salads
Layer ingredients in a wide-mouth mason jar with dressing on the bottom, hard vegetables next, grains or proteins in the middle, and greens on top. When ready to eat, shake and pour into a bowl or eat directly from the jar.
Thermal Food Jar Magic
Invest in a good thermal food jar for hot meals. Fill with boiling water, let sit for 5 minutes, empty, then add your hot food. Soup, chili, or even hot pasta can stay warm for 4-6 hours—perfect for cold-weather hiking.
Deconstructed Sandwich Kits
Pack all sandwich components separately—bread, spreads, meats, cheeses, and vegetables—and assemble fresh at lunch time. Takes up more space but ensures perfect texture every time.
Whether you’re planning day hikes or learning advanced outdoor skills, proper nutrition planning is essential. Consider expanding your knowledge with our guide on how to stay warm while camping for comprehensive outdoor preparation.
My Go-To Power Wrap Recipe
After hundreds of miles of testing, this has become my absolute favorite trail lunch:
Ingredients:
- Large whole wheat tortilla
- 2 tbsp cream cheese (room temperature)
- 3 oz turkey or ham
- 1 oz sharp cheddar, thinly sliced
- 1/4 cup coleslaw mix (dry)
- 2 tbsp dried cranberries
- 1 tbsp sunflower seeds
- Pinch of salt and pepper
Assembly:
- Spread cream cheese evenly across the tortilla surface.
- Layer meat and cheese, leaving a 1-inch border
- Sprinkle coleslaw mix, cranberries, and sunflower seeds.
- Season lightly
- Roll tightly, tucking in sides.
- Wrap in foil or parchment.
This combination provides protein, healthy fats, fiber, and just enough sweetness. The coleslaw stays crisp, the cranberries add energy-boosting natural sugars, and the sunflower seeds provide satisfying crunch.
Seasonal Adaptations for Year-Round Success
Summer Strategies: Focus on fresh vegetables, lighter proteins, and foods that taste good warm. Avoid mayonnaise-based items or anything that could spoil in the heat. Emphasize water-rich foods like cucumber, melon, and crisp vegetables.
Winter Considerations: Pack calorie-dense foods and consider warm options in thermal containers. Your body burns more calories staying warm, so increase portion sizes. Hot soup or chili can be a game-changer on cold mountain days.
Shoulder Seasons: These are perfect times for more adventurous lunches since temperature extremes are less of a concern. Experiment with fresh ingredients and creative combinations.
For outdoor coffee lovers, complement your trail lunch with a perfectly brewed cup using our guide on how to make cowboy coffee—nothing beats hot coffee with a great trail meal.
Frequently Asked Questions
How long can hiking lunches safely sit in a backpack?
Non-perishable items can last all day. Items with meat or dairy should be consumed within 4 hours unless you’re using ice packs or thermal containers. When in doubt, err on the side of caution.
What’s the best way to keep lunches cold on longer hikes?
Frozen water bottles work great as temporary ice packs. Thermal lunch boxes with ice packs are worth the extra weight for longer adventures. Pack cold items together and insulate with extra clothing.
How much food should I pack for a day hike?
Plan for 200-300 calories per hour of hiking, depending on your size, pace, and conditions. It’s better to pack slightly more than you think you need—hunger can quickly turn a fun hike into a miserable experience.
Can I prep hiking lunches the night before?
Absolutely! Most hiking lunches actually benefit from being made ahead. Flavors meld together, and you’re not rushing in the morning. Just avoid adding wet ingredients like tomatoes until morning, or pack them separately.
What containers work best for trail lunches?
Invest in leak-proof containers with secure lids. Hard-sided containers protect crushable foods, while soft-sided insulated bags keep temperatures stable. Glass containers are great but add weight—choose based on your hiking style.
For additional outdoor meal inspiration and comprehensive camping guides, check out these helpful resources from Outside Magazine’s trail food section to expand your outdoor cooking repertoire.
Final Trail Wisdom
The key to great hiking lunch ideas isn’t complexity—it’s understanding what works on the trail and what doesn’t. Start with simple combinations you enjoy at home, then modify them for packability and temperature stability.
Remember that food is fuel, but it’s also one of the great pleasures of outdoor adventure. There’s something magical about enjoying a perfectly planned meal with a view that can’t be found in any restaurant.
Pack smart, eat well, and happy trails! Your taste buds and energy levels will thank you on mile 10.