
I’ll never forget the first time I tried growing fresh herbs on my apartment balcony. It was a disaster. I grabbed whatever pots I had lying around, filled them with dirt from a friend’s backyard, and wondered why my basil turned yellow within a week. Turns out, you can’t just throw plants in a pot and hope for the best—even in small space container gardening, there are rules. But here’s the good news: once you learn the basics, you can grow everything from cherry tomatoes to fresh mint in the smallest of spaces.
You don’t need a sprawling backyard or acres of farmland to enjoy homegrown produce. Whether you’re living in a city apartment with a tiny balcony, working with a cramped patio, or simply want to bring some green life to your doorstep, small space container gardening opens up a world of possibilities. It’s flexible, forgiving, and honestly? It’s one of the most rewarding hobbies you can pick up.
The beauty of container gardening lies in its accessibility. Anyone can do it—renters who can’t dig up their yards, urban dwellers with only a fire escape or balcony, seniors who struggle with bending down to ground-level beds, and even people who simply want to experiment with gardening before committing to a full yard transformation. It’s gardening on your terms, in your space, at your pace.
Why Small Space Container Gardening Actually Works
One of the biggest myths about gardening is that you need tons of space to make it worthwhile. That’s simply not true. Container gardening for small spaces has become incredibly popular precisely because it works—and it works well.
First off, you can grow plants virtually anywhere. Got a windowsill that gets decent light? Perfect. A balcony railing? Even better. A front stoop, rooftop, or even indoors near a sunny window? All fair game. As long as you have adequate light (usually 6-8 hours of sunlight for most vegetables and herbs), access to water, and a little dedication, you’re golden.
Second, container gardens are genuinely easier to maintain than traditional in-ground gardens. Think about it: no weeding through stubborn roots, fewer pests invading your space, less disease from contaminated soil, and you can control every aspect of your plants’ environment. Plus, when the seasons change, you can simply move your pots indoors or to a sheltered spot. Just like how having the right camping gear makes outdoor adventures more enjoyable, having the right setup makes container gardening a breeze.
Third, it’s budget-friendly. You don’t need fancy equipment or expensive raised beds. Many gardeners start by repurposing old containers—buckets, baskets, even boots or wooden crates—as long as they hold soil and have drainage holes. Grab some quality potting mix, a few seed starter kits, and you’re ready to grow.
Fourth, containers give you control over soil quality. If you live in an area with poor soil or contamination concerns, containers bypass that issue entirely. You choose exactly what goes into your potting mix, ensuring your plants get the best possible growing medium from day one.
Fifth, container gardens are incredibly portable. Need to move? Your garden moves with you. Want to rearrange your space for a party? Shift those pots around. Unexpected frost coming? Bring everything inside for the night. This flexibility is something traditional gardeners can only dream about.
Choosing the Right Location for Your Containers
Before you buy a single pot or seed packet, take a good look at your space. Location is everything in small space container gardening, and getting this right from the start will save you a ton of frustration.
Most vegetables, herbs, and fruiting plants need 6-8 hours of direct sunlight daily. If you’re growing leafy greens like lettuce, spinach, or kale, you can get away with 4-5 hours. Spend a day or two observing your balcony, patio, or windowsill. Notice where the sun hits and for how long. Morning sun is gentler; afternoon sun is intense. Some plants thrive in full blast heat, while others prefer dappled light.
Here’s a trick I learned the hard way: use your phone to set hourly reminders throughout one full day. Each time it goes off, step outside and note which areas are sunny versus shaded. By the end of the day, you’ll have a clear sunlight map of your space. South-facing spots typically get the most sun in the Northern Hemisphere, while north-facing areas stay shadier. East gets gentle morning light, west gets hot afternoon rays.
Water access is another biggie. You’ll be watering your containers regularly—sometimes daily during hot summer months—so make sure you can easily reach your plants with a hose, watering can, or garden watering hose. Lugging water bottles back and forth gets old fast (trust me on this one). If your gardening spot is far from a water source, consider setting up a dedicated watering station with a large bucket or barrel that you fill periodically.
Also, consider microclimates and wind exposure. If your balcony is a wind tunnel, lightweight pots will topple over, and delicate plants will struggle. Secure your containers, choose heavier pots, or use balcony railing planters that clip on safely. And remember, water draining from containers can stain concrete or wood, so plan accordingly. Use saucers under pots or position them where drainage won’t cause damage.
Don’t forget about foot traffic. Place containers where they won’t be constantly bumped or knocked over. If you have kids or pets, position delicate plants higher up or behind barriers. Container placement is as much about practicality as it is about aesthetics.
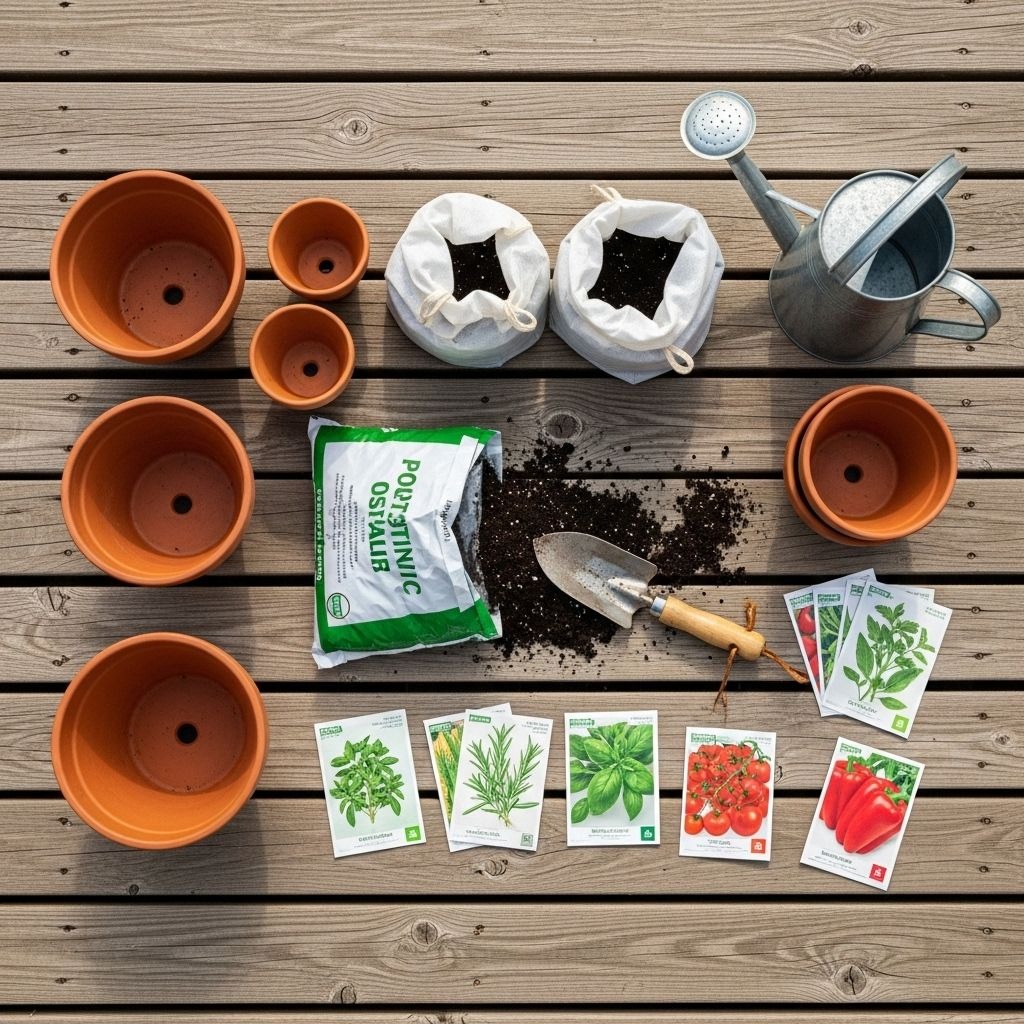
Essential Supplies You’ll Actually Need
Let’s talk gear. You don’t need a shed full of fancy tools, but investing in the right supplies from the start makes all the difference.
Containers: Your Plant’s Home
Size matters. Most vegetables need at least 12 inches of soil depth to develop healthy roots. Tomatoes, peppers, and larger plants do best in 5- to 10-gallon pots. Herbs like basil, cilantro, and parsley are happy in smaller 6-8 inch pots. Make sure every container has drainage holes at the bottom—without them, roots will rot.
You’ve got options: terracotta pots (classic and breathable, but heavy), plastic containers (lightweight and affordable), fabric grow bags (excellent drainage and air circulation), or even repurposed items like wooden crates or sturdy buckets. Personally, I love fabric grow bags for vegetables and decorative ceramic plant pots for herbs near the door—they look great and perform well.
Here’s the thing about container materials: each has pros and cons. Terracotta breathes beautifully and looks gorgeous, but it’s heavy and dries out quickly. Plastic retains moisture better and is lightweight, but it can crack in extreme cold. Fabric bags promote incredible root health through air pruning but may need more frequent watering. Wood is attractive and insulating but eventually rots. Choose based on your climate, mobility needs, and aesthetic preferences.
Potting Mix: The Foundation of Success
This is non-negotiable. Do not use regular garden soil in containers. Garden soil is too dense, compacts easily, and doesn’t drain well in pots. Instead, grab a high-quality, well-draining potting mix formulated for containers. It’s lighter, retains moisture without getting soggy, and often contains slow-release nutrients. I also mix in a bit of compost for extra richness.
A good potting mix typically contains peat moss or coconut coir for water retention, perlite or vermiculite for drainage and aeration, and sometimes a small amount of compost or fertilizer. Some gardeners make their own mix, but when you’re starting out, a quality pre-made mix takes the guesswork out of the equation.
Tools: Keep It Simple
A small hand trowel, a watering spray mister for delicate seedlings, a soil pH / moisture meter to avoid over- or under-watering, and a basic garden tool set will cover most tasks. If you’re working on a balcony or patio with hard surfaces, a gardening kneeling pad saves your knees big time.
Other handy items include plant labels (trust me, you’ll forget what you planted where), pruning shears for harvesting and maintenance, and maybe some plant stakes for taller plants that need support. Start minimal and add tools as you discover what you actually need.
Best Plants for Small Space Container Gardening
One of the best parts of container gardening is the sheer variety you can grow in a small footprint. But not all plants are created equal when it comes to pots.
Herbs: The Gateway to Container Gardening
If you’re new to this, start here. Herbs are incredibly forgiving and most thrive in containers. Basil, cilantro, parsley, thyme, rosemary, mint, and chives all do beautifully in pots. Plus, fresh herbs elevate your cooking—whether you’re prepping trail snacks or just whipping up dinner at home. I keep a few herb pots near my kitchen door for easy access.
Pro tip: mint spreads like crazy, so always keep it in its own container. Basil loves warmth and full sun. Parsley is a biennial that’ll give you two years of harvests. Rosemary prefers drier conditions and can handle some neglect. Cilantro bolts quickly in heat, so plant it in spring or fall for best results.
Vegetables: Real Food from Your Balcony
Believe it or not, you can grow a surprising amount of food in containers. Cherry tomatoes are superstars—compact varieties like ‘Patio’ or ‘Tiny Tim’ produce tons of fruit in a single pot. Peppers (both sweet and hot), lettuce, spinach, kale, green onions, radishes, and even compact varieties of cucumbers and beans work great. If you’re really ambitious, try dwarf varieties of eggplant or zucchini.
Lettuce and salad greens are perfect for succession planting—sow new seeds every two weeks for continuous harvests. Radishes mature in just 30 days. Bush beans don’t need support and produce heavily in containers. Hot peppers often do even better in pots than in the ground.
Fruits: Sweet Rewards
Strawberries are perfect for hanging baskets or tiered planters—they cascade beautifully and fruit prolifically. Dwarf citrus trees (like Meyer lemons or key limes) do surprisingly well in large containers if you have a sunny spot and can bring them indoors during winter.
Blueberries actually prefer the acidic soil conditions you can easily create in containers. Dwarf fruit trees—apples, peaches, figs—are now bred specifically for container growing. The key is choosing varieties labeled as “patio” or “dwarf” and providing adequate root space.
Flowers: Beauty and Pollinators
Don’t forget ornamentals! Petunias, marigolds, geraniums, and pansies add color and attract beneficial pollinators to your vegetable plants. Many flowers are also edible—nasturtiums, violas, and calendula can go straight into salads.
Start small, get your feet wet, and expand as you gain confidence. Much like learning how to start fishing, container gardening has a learning curve, but the payoff is worth it.
Setting Up Your Container Garden Step-by-Step
Alright, you’ve got your containers, your potting mix, and your plants or seeds. Now let’s actually get them in the ground.
Step 1: Prep Your Containers
If you’re reusing old pots, give them a good scrub to remove any lingering disease or pests. Make sure drainage holes are clear. Place a coffee filter or small piece of mesh over the hole to prevent soil from washing out while still allowing water to drain freely.
Step 2: Fill with Potting Mix
Add your potting mix, leaving about an inch of space from the rim to prevent overflow when watering. Gently tap or shake the container to settle the soil and eliminate air pockets, but don’t pack it down hard—roots need room to breathe. Moisten the soil before planting; pre-wetted soil is easier to work with and ensures even moisture distribution.
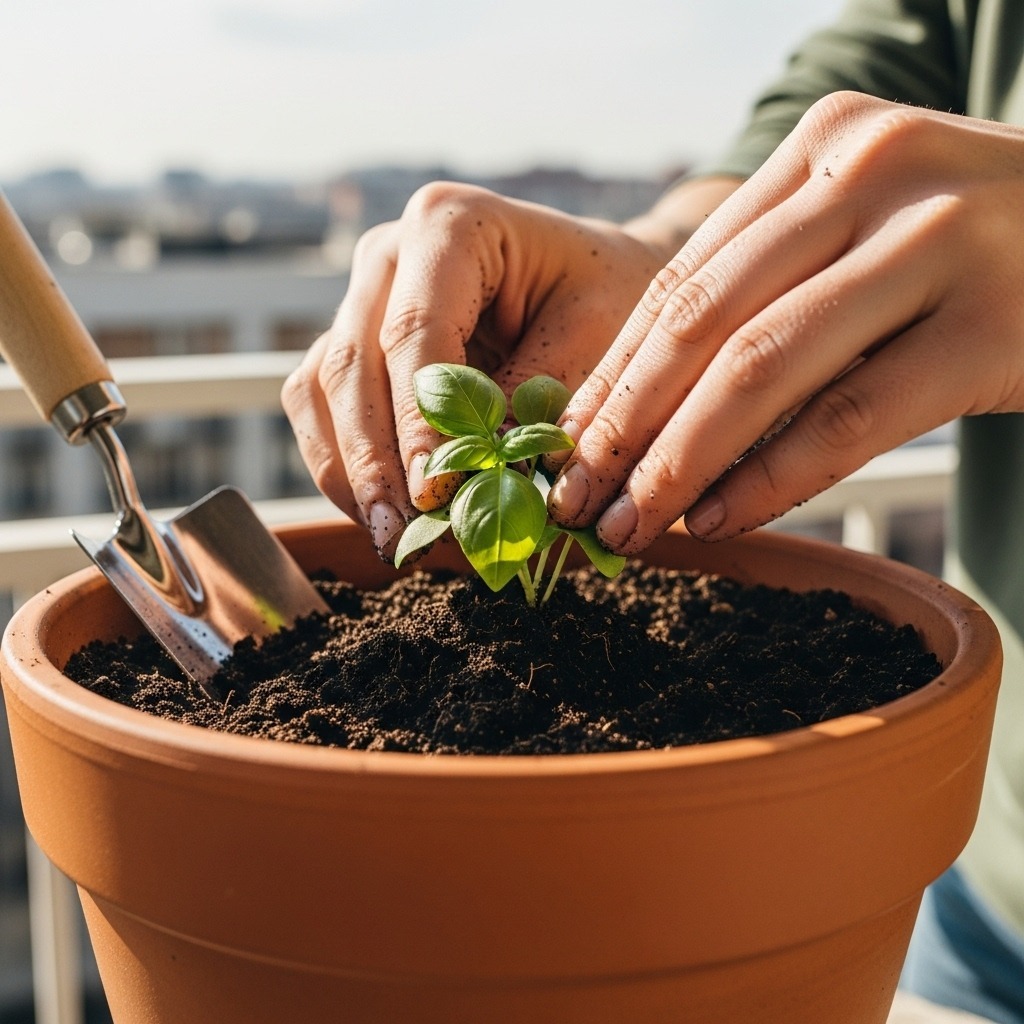
Step 3: Plant Your Seeds or Transplants
If you’re using seedlings from a nursery or seed starter kits, carefully remove the plant from its nursery pot. Gently tease apart any roots that are circling the root ball—this encourages them to spread into the new soil. Place the plant at the same depth it was growing in its original container (except tomatoes, which benefit from being planted deeper). Fill in around the roots with more potting mix.
If you’re sowing seeds directly, follow the packet instructions for depth and spacing. Smaller seeds like lettuce or herbs can be sprinkled on the surface and lightly covered; larger seeds like beans need to be pushed deeper.
Step 4: Water Thoroughly
Give your newly planted containers a good soak until water drains out the bottom. This settles the soil and ensures roots make contact with moisture. That first watering is critical—it eliminates air pockets and helps establish good root-to-soil contact.
Step 5: Arrange Strategically
Place taller plants toward the back or center, shorter plants and herbs up front. Use indoor plant stands or tiered shelving to maximize vertical space and ensure every plant gets adequate light.
Watering and Maintenance: Keeping Things Thriving
Here’s where a lot of beginners stumble. Container plants need more frequent watering than in-ground gardens because the soil dries out faster—especially in small pots.
Watering Schedule and Techniques
Check your containers daily, especially during hot weather. Stick your finger about an inch into the soil. If it feels dry, it’s time to water. When you do water, water deeply until it runs out the drainage holes. Shallow watering encourages shallow roots, which makes plants less resilient.
Water in the morning when possible. This gives plants moisture to face the day’s heat and allows foliage to dry before nightfall, reducing disease risk. Avoid watering during the hottest part of the day when much of the water evaporates before reaching roots.
If you travel often or tend to forget, consider self watering planters with built-in reservoirs. They’re lifesavers for busy folks. You can also rig up a simple drip irrigation system using a garden watering hose with a timer.
Fertilizing: Feeding Your Plants
Container plants deplete nutrients faster than garden beds because there’s less soil to draw from. Feed your plants every 2-4 weeks with a balanced, water-soluble organic fertilizer or use slow-release granules mixed into the potting mix at planting time.
The numbers on fertilizer packages (like 10-10-10) represent nitrogen, phosphorus, and potassium. Nitrogen promotes leafy growth, phosphorus supports root development and flowering, potassium improves overall plant health and disease resistance. Leafy greens need more nitrogen; flowering and fruiting plants need more phosphorus and potassium.
If you’re growing in hydroponic nutrient solutions or experimenting with compact hydroponic kits, follow the specific feeding schedules for those systems.
Pruning and Harvesting
Regularly pinch back herbs to encourage bushier growth. Harvest vegetables when they’re ripe—leaving overripe produce on the plant slows down further production. Remove dead leaves and spent flowers to keep plants healthy and looking tidy.
For herbs, harvest no more than one-third of the plant at a time. This keeps it productive. For vegetables like tomatoes and peppers, regular picking encourages more fruit production. For lettuce and greens, harvest outer leaves and let the center continue growing.
Space-Saving Hacks for Maximizing Your Grow Area
When you’re working with limited square footage, every inch counts. Here are some tried-and-true tricks to squeeze more growing space out of your balcony or patio.
Go Vertical: Use the Walls
Install hanging plant baskets for trailing plants like strawberries, cherry tomatoes, or cascading herbs. Mount shelves or use indoor plant stands to stack pots vertically. Trellises and stakes allow vining plants like cucumbers, beans, or peas to grow upward instead of sprawling outward.
Vertical gardening isn’t just practical—it’s beautiful. A wall of lush green plants creates a living privacy screen, improves air quality, and can even help insulate your space from heat or cold.
Utilize Railings and Edges
Balcony railing planters are genius—they clip right onto your railing and don’t take up floor space. Perfect for herbs, lettuce, or flowers. Just make sure they’re securely attached; you don’t want them falling on someone’s head several stories below.
Tiered Systems and Multi-Level Growing
These multi-level containers let you grow several plants in the footprint of one pot. Great for herbs or small vegetables. You can buy tiered planters or create your own using stacked pots of decreasing sizes.
Hanging From Above
Install hanging-plant hooks from eaves, pergolas, or ceiling joists to suspend pots at varying heights. This not only saves space but also adds visual interest. Just be mindful of dripping water—use saucers or plant in areas where drainage won’t be an issue.
Indoor Options for Year-Round Growing
Don’t forget about indoor gardening. If outdoor space is truly nonexistent, you can grow herbs, microgreens, and leafy greens indoors using indoor-plant LED grow lights positioned near a bright window. Combine these with mini greenhouses or grow tents for a full indoor setup.
Think of your vertical space the same way you’d organize gear in a hiking backpack—maximize every pocket and strap to carry more without adding bulk.

Common Mistakes to Avoid (Learn from My Failures)
I’ve made plenty of mistakes in my container gardening journey, and I’m happy to save you from repeating them.
Overcrowding Your Containers
It’s tempting to cram multiple plants into one pot to save space, but this backfires. Plants compete for nutrients, water, and light, and nobody thrives. Follow spacing guidelines on seed packets or plant tags. One healthy plant is better than three struggling ones.
Using Garden Soil Instead of Potting Mix
I mentioned this earlier, but it bears repeating. Garden soil compacts in containers and suffocates roots. Always use potting mix. Yes, it costs more than dirt from your yard, but the difference in plant health is dramatic.
Ignoring Drainage Requirements
Containers without drainage holes are death traps for plants. Roots sitting in waterlogged soil will rot. Drill holes if you need to, or use pots with built-in drainage. And don’t let saucers become standing water pools—empty them after watering.
Underestimating Sunlight Needs
Wishful thinking won’t make a shady spot work for sun-loving tomatoes. Be realistic about your light conditions and choose plants accordingly. If you only have shade, embrace it—plenty of gorgeous plants (hostas, ferns, impatiens) prefer low light.
Skipping Fertilizer
Unlike garden beds, containers don’t have an ecosystem of organisms replenishing nutrients. If you skip fertilizing, your plants will eventually starve. Keep up with regular feeding, especially during peak growing season.
Forgetting to Water (Or Overwatering)
Container plants dry out fast, especially in summer. Set a reminder on your phone if you need to. A wilted plant can bounce back from one missed watering, but repeated neglect will do permanent damage. Conversely, overwatering is just as deadly—always check soil moisture before watering.
Choosing the Wrong Container Size
That cute little pot might look perfect, but if your plant needs 5 gallons of soil to thrive and you’ve only given it 2, you’re setting yourself up for failure. Size containers appropriately for your plant’s mature size, not its current size.
Advanced Tips for Container Garden Success
Once you’ve got the basics down, here are some next-level strategies to take your container garden to new heights.
Succession Planting for Continuous Harvests
Don’t plant everything at once. For crops like lettuce, radishes, and beans, sow new seeds every 2-3 weeks. This ensures a steady supply of fresh produce throughout the growing season rather than a single overwhelming harvest.
Companion Planting in Containers
Some plants grow better together. Basil and tomatoes are classic companions—the basil repels pests and supposedly improves tomato flavor. Marigolds deter aphids and other insects. Nasturtiums attract beneficial predators. Research companion planting combinations for your chosen crops.
Season Extension Techniques
Use mini greenhouses or clear plastic covers to extend your growing season into cooler months. Move tender plants indoors before frost. With protection and supplemental lighting, you can keep herbs and greens producing year-round.
Crop Rotation Even in Containers
Don’t plant the same thing in the same container year after year. Diseases and nutrient depletion can build up. Rotate your crops—where tomatoes grew last year, plant beans or lettuce this year.
Bringing It All Together
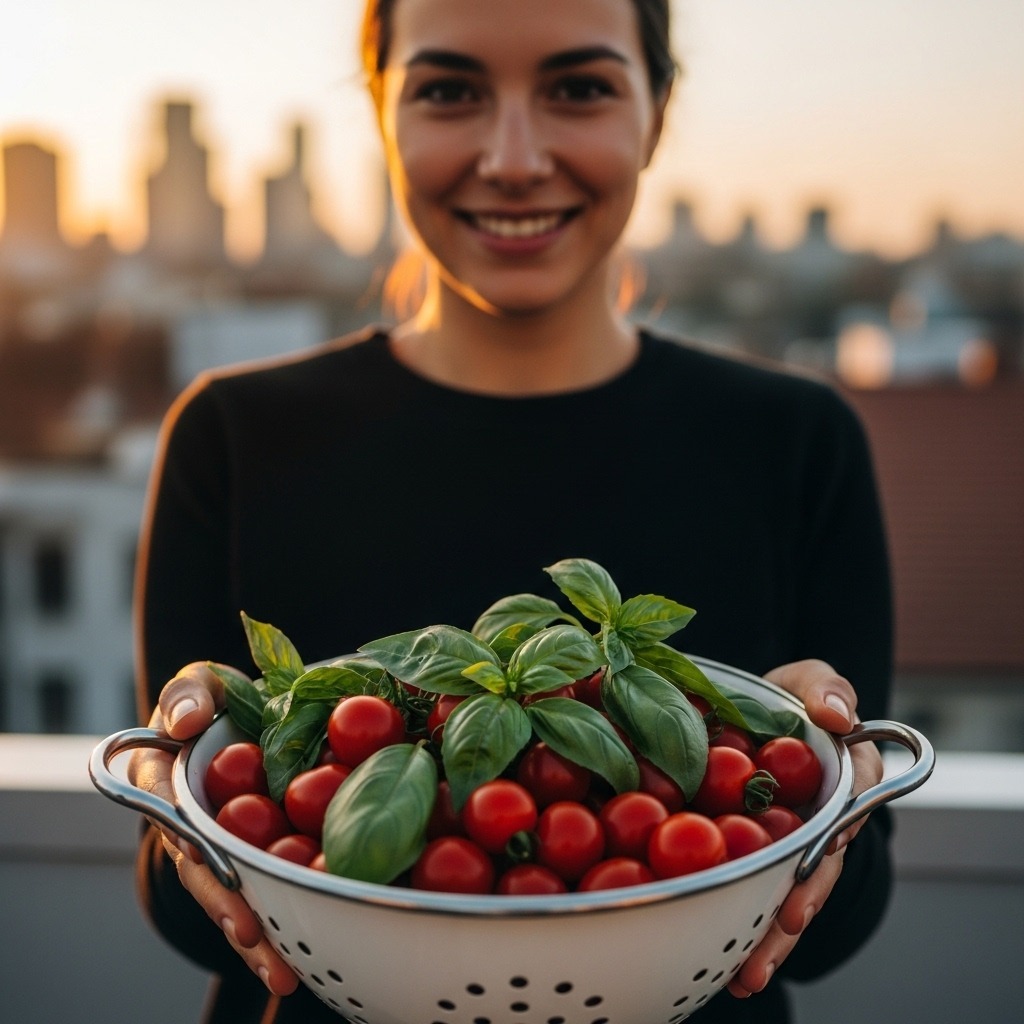
Small space container gardening isn’t just a workaround for lack of yard space—it’s a legitimate, rewarding way to grow your own food and connect with nature, no matter where you live. Whether you’re cultivating fresh herbs to pack on your next camping trip, growing vegetables to slash your grocery bill, or simply enjoying the therapeutic benefits of working with soil and plants, container gardening delivers.
The satisfaction of eating a salad made entirely from plants you grew on your balcony is indescribable. The pride in showing visitors your thriving container garden. The joy of watching seeds sprout and grow under your care. These are experiences everyone should have, regardless of their living situation.
Container gardening teaches patience and observation. You learn to read your plants’ signals—drooping leaves mean thirst, yellowing might indicate nitrogen deficiency, stunted growth could mean rootbound conditions. You become attuned to natural cycles, weather patterns, and seasonal rhythms even in the heart of the city.
Start small. Pick a few easy herbs or a cherry tomato plant. Learn as you go. Celebrate your wins, troubleshoot your failures, and most importantly, enjoy the process. Before long, you’ll be that person with a lush balcony garden, harvesting fresh produce while your neighbors wonder how you pulled it off in such a tiny space.
And the best part? You’ll have the freshest ingredients for your next outdoor adventure meal. Imagine sipping coffee from your thermal water bottle on a hike, knowing the herbs in your trail mix came from your own balcony. That’s the magic of small space container gardening—it connects you to your food, to nature, and to the satisfaction of creating something beautiful and useful with your own hands.
Frequently Asked Questions
Q1: How much space do I need for container gardening?
Even a small windowsill or balcony can work. As long as you have access to a few square feet of space with adequate sunlight (6-8 hours for most plants), you can successfully grow herbs, vegetables, and even small fruits in containers. Some people successfully garden on fire escapes, tiny patios, or even just on a sunny table near a window.
Q2: What’s the best potting mix for container gardening?
Always use a high-quality, well-draining potting mix specifically formulated for containers—never regular garden soil, which compacts and prevents proper drainage. Look for mixes that contain peat moss, vermiculite, or coconut coir for good moisture retention and aeration. You can also add compost for extra nutrition.
Q3: How often should I water my container garden?
Container plants typically need watering daily during hot weather, and every 2-3 days in cooler conditions. The key is to check the soil moisture by sticking your finger about an inch deep—if it feels dry, it’s time to water thoroughly until water drains from the bottom. Containers dry out much faster than garden beds.
Q4: Can I grow vegetables in containers indoors?
Yes! Herbs, leafy greens like lettuce and spinach, and microgreens do well indoors near a bright window. For best results, supplement natural light with indoor LED grow lights to ensure plants get 6-8 hours of light daily. Cherry tomatoes and peppers can also work indoors with adequate lighting.
Q5: What are the easiest plants for beginner container gardeners?
Start with herbs like basil, cilantro, parsley, and mint—they’re incredibly forgiving. Cherry tomatoes, lettuce, radishes, and green onions are also beginner-friendly vegetables that thrive in containers and provide quick, rewarding harvests. These plants tolerate some mistakes and bounce back quickly.
Q6: Do I need expensive containers for container gardening?
Not at all! While decorative pots are nice, you can use virtually anything that holds soil and has drainage holes. Repurposed buckets, wooden crates, fabric grow bags, and even old boots can work. The plant cares more about adequate root space and drainage than aesthetics—though beautiful containers certainly enhance your space.
Q7: How do I know what size container my plants need?
Most herbs need 6-8 inch diameter pots. Lettuce and greens need at least 6-8 inches deep. Tomatoes, peppers, and larger vegetables need 5-10 gallon containers (12-18 inches diameter and depth). When in doubt, go bigger—plants rarely complain about too much root space, but they definitely suffer in cramped quarters.