
I’ll never forget the first spring after I moved into my apartment with a tiny patio. I stood on that 6×8 concrete slab, coffee in hand, staring at the bare space and thinking about all the gardening I’d done at my parents’ house growing up. No yard meant no garden, right? Wrong. That’s when I discovered patio container gardening, and honestly, it changed everything about how I spend time outdoors.
If you’ve been thinking your small patio, balcony, or deck can’t become a productive garden space, I’m here to tell you that’s exactly where some of the most rewarding gardening happens. You don’t need acres of land or even a small plot of dirt. All you need is sunlight, the right containers, and a willingness to get your hands dirty—even if it’s just on a Saturday morning with your morning brew beside you.
Container gardening transformed my relationship with my outdoor space. What started as a barren concrete slab became my personal oasis where I could disconnect from screens, get my hands in the soil, and watch something I planted actually grow. There’s something deeply satisfying about stepping outside to harvest fresh herbs for dinner or picking sun-warmed cherry tomatoes right off the vine.
Why Patio Container Gardening Changed My Outdoor Life
The beauty of patio container gardening is that it removes almost every barrier to growing your own food and flowers. Living in an urban area or an apartment doesn’t mean you have to give up on the satisfaction of harvesting fresh tomatoes or snipping herbs for dinner.
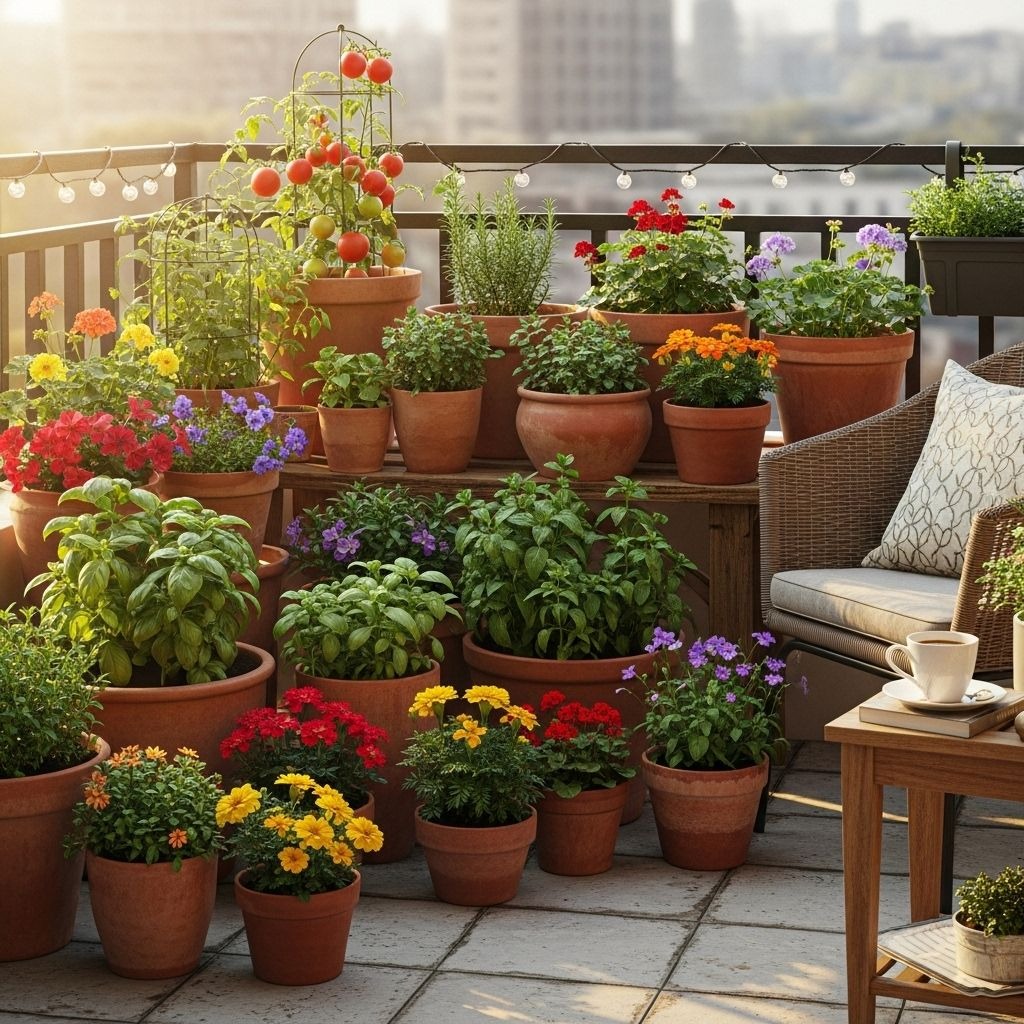
Container gardening lets you maximize limited outdoor space efficiently. Whether you have a sunny balcony, a small deck, or just a corner of a patio, you can grow an impressive variety of plants. I started with three pots on my patio, and within two seasons, I had over 15 containers producing everything from basil and cherry tomatoes to lettuce and peppers.
Another game-changer? You control the growing environment completely. Unlike in-ground gardens where you’re stuck with whatever soil and drainage conditions exist, containers let you customize everything. Need to move a plant into more shade during a heatwave? Just pick it up and relocate it. Want to protect delicate herbs from a storm? Bring them closer to the wall or even inside temporarily.
The flexibility is unmatched. When I realized my pepper plants were getting too much afternoon sun and their leaves were getting sunburned, I simply moved them to a spot that got morning sun and afternoon shade. Problem solved in 30 seconds. Try doing that with an in-ground garden!
Container gardening also means you can start small and expand gradually. You’re not committing to tilling up a huge plot of land or building raised beds. Buy a few pots, some soil, and a couple of plants. If you love it, add more containers next month. If it doesn’t work out, you’ve invested minimal time and money.
The Container Mistake I Made (So You Don’t Have To)
My first attempt at patio container gardening involved grabbing whatever pots I could find cheap at a discount store. Big mistake. I learned the hard way that container selection directly impacts plant health and your workload.
Size matters more than you think. That cute little 6-inch pot? It won’t cut it for most vegetables. Tomatoes need at least a 5-gallon container minimum, unless you’re growing tiny patio varieties. Peppers, eggplants, and larger vegetables require 3-5 gallons of soil to develop properly. Herbs and leafy greens can thrive in 1-2 gallon containers, but even they prefer a bit more root space.
I tried growing a full-size tomato plant in a 2-gallon pot my first season. The plant looked okay initially but never produced more than a handful of small, sad tomatoes. The root system simply didn’t have enough space to support healthy fruit production. The following year, I upgraded to 7-gallon grow bags and the difference was staggering—the same tomato variety produced 10 times more fruit.
Drainage holes are absolutely non-negotiable. I killed my first batch of plants by using decorative pots without drainage, thinking I’d just be careful with watering. Plants sitting in waterlogged soil develop root rot fast. Every single container you use must have drainage holes in the bottom. If you fall in love with a pot that doesn’t have holes, either drill some yourself or use it as a decorative outer sleeve for a functional pot inside.
Material choices that actually work: Plastic and glazed ceramic containers are my top recommendations. They retain moisture better than terracotta (which dries out quickly in hot sun) and they’re lighter weight if you need to move them around. If you’re working with a sunny, hot patio, lighter-colored containers help reflect heat and keep roots cooler. Dark pots absorb heat and can literally cook your plant roots on extremely hot days.
Consider investing in self-watering planters if you have a busy schedule or live in a particularly hot climate—they’ve been lifesavers during summer vacations. I can leave for a long weekend without worrying about my plants dying of thirst. The built-in reservoir keeps them consistently hydrated.
Choosing the Right Location on Your Patio
Location can make or break your patio container gardening success. Before you buy a single seed or plant, spend a few days observing your outdoor space.
Sunlight assessment is critical. Most vegetables and herbs need at least 6 hours of direct sunlight daily. Sit outside at different times and note where the sun hits and for how long. Morning sun is gentler; afternoon sun is intense. Tomatoes, peppers, and squash love full sun all day. Leafy greens like lettuce, spinach, and kale can handle partial shade and might even prefer some afternoon relief in hot climates.
I spent a full week tracking sun patterns on my patio before committing to a layout. I discovered that one corner got beautiful morning light but was completely shaded by 2 PM—perfect for lettuce and spinach. Another section baked in full sun from 10 AM to 6 PM—ideal for tomatoes and peppers. Understanding these microclimates helped me place the right plants in the right spots.
Wind protection matters too. Strong winds can dry out containers quickly and damage plants. If your patio is particularly exposed, position larger containers as windbreaks for smaller, more delicate plants. Wind also increases evaporation, meaning you’ll need to water more frequently. I learned this after a particularly windy week decimated my basil plants—the leaves turned brown and crispy despite regular watering. Now I keep delicate herbs in a more protected corner.
Attach hanging plant baskets to walls or railings in protected corners rather than exposed edges. I lost an entire hanging basket of strawberries to wind damage before I figured this out. The constant swaying snapped the stems and stressed the plants beyond recovery.
Easy water access will determine whether you actually maintain your garden or let it languish. Place containers near an outdoor spigot or hose connection if possible. I learned this the hard way after spending an entire summer hauling watering cans back and forth through my apartment. A simple garden watering hose attachment made everything easier. Now my morning watering routine takes 10 minutes instead of 30.
If your patio is far from a water source, consider clustering your containers in groups. This makes watering more efficient and creates attractive visual groupings. You can also set up a small watering station with a large decorative barrel that collects rainwater.
What to Grow: Best Plants for Patio Container Gardening
Not all plants adapt well to container life, so start with varieties bred for small spaces and containers. Plant breeders have developed compact versions of many popular vegetables specifically for container growing.
Beginner-friendly vegetables that thrive in patio containers:
- Cherry tomatoes and determinate “patio” tomato varieties: These are foolproof for beginners. Varieties like ‘Tiny Tim,’ ‘Patio Princess,’ and ‘Tumbling Tom’ stay compact and produce prolifically. Indeterminate varieties work too but need larger containers and sturdy stakes.
- Peppers (both sweet and hot types): Peppers are actually easier than tomatoes in containers. They handle heat well, produce steadily all season, and their compact root systems make them ideal for pots. Try ‘Lunch Box’ mini peppers or any jalapeño variety.
- Lettuce and salad greens: The ultimate beginner vegetable. Harvest in 30-45 days, grow in shallow containers, and you can succession plant every two weeks for continuous harvests.
- Radishes: Ready in just 25-30 days! Perfect for impatient gardeners or kids. They need minimal space and grow in almost any container depth.
- Bush-type cucumbers: Look for varieties specifically labeled as “bush” or “compact.” Standard cucumber varieties vine extensively and overwhelm small spaces.
- Spinach and chard: Both are cut-and-come-again crops, meaning you harvest outer leaves while the plant keeps producing from the center.
- Compact zucchini varieties: Standard zucchini plants are massive and unsuitable for containers, but varieties like ‘Patio Star’ or ‘Eight Ball’ stay manageable.
Herbs that practically grow themselves:
Herbs are honestly the best place to start with patio container gardening. They’re forgiving, productive, and incredibly useful in the kitchen.
- Basil: Plant near tomatoes for natural pest control through companion planting. Pinch back regularly to encourage bushy growth. I grow 3-4 basil plants every summer and still can’t keep up with how fast it produces.
- Parsley: Both flat-leaf and curly varieties grow well. A single plant provides garnish and flavor for months.
- Thyme: Nearly indestructible once established. Prefers slightly drier conditions, making it perfect for forgetful waterers.
- Cilantro: Loves cooler weather. Plant in spring and fall, skip summer unless you have shade.
- Mint: Keep in its own container—it spreads aggressively and will take over mixed plantings. Great for mojitos and iced tea.
- Oregano: Low maintenance and drought-tolerant once established. One plant produces more than most families can use.
- Chives: These perennial herbs come back year after year. Beautiful purple flowers are edible too.
Flowers for pollinators and beauty:
Don’t forget flowers! They attract beneficial pollinators to your vegetable plants and add color to your patio.
- Marigolds: Natural pest deterrent that repels aphids and other insects. Plus they’re gorgeous in yellow and orange.
- Petunias: Trailing varieties look stunning in hanging baskets. Bloom continuously all summer.
- Pansies: Perfect for spring and fall. Handle light frosts and come in every color imaginable.
- Nasturtiums: These are edible flowers! Peppery leaves and blooms add interest to salads. They also attract aphids away from your vegetables (acting as a trap crop).
- Zinnias: Easy from seed, heat-tolerant, and butterflies love them.
The trick is starting small. Pick 3-5 plants you’ll actually use and focus on keeping those thriving before expanding. I started with basil, cherry tomatoes, and lettuce—all things I used regularly in cooking. Seeing those first successes motivated me to gradually expand my patio garden.
Soil and Potting Mix Secrets
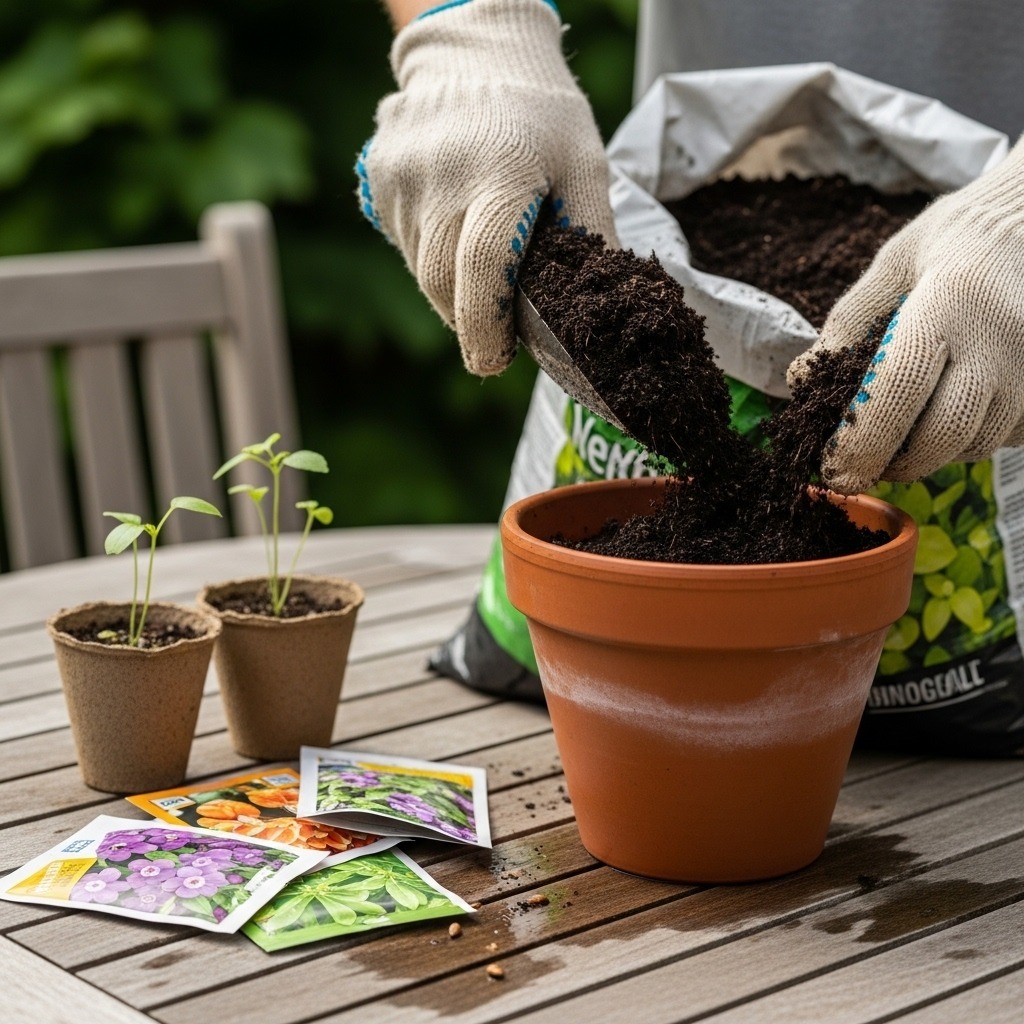
Here’s a rule I wish someone had told me on day one: never, ever use regular garden soil in containers. Garden soil is too dense, doesn’t drain properly in pots, and becomes compacted quickly. It’s also incredibly heavy. I once filled a large container with garden soil and could barely lift it to move it. After one watering, it turned into a brick-like mass that my poor tomato plant couldn’t even root through.
Use quality potting soil instead. Look for organic potting mixes at your local garden center. High-quality potting soil contains a blend of peat moss (or coconut coir), perlite, and vermiculite that provides proper drainage while retaining enough moisture. The light, fluffy texture allows roots to spread easily and air to circulate.
Yes, good potting soil costs more than dirt from your backyard, but it’s absolutely worth the investment. Your plants will grow faster, produce more, and have fewer disease problems. I tried to cheap out my first year with bargain potting mix and regretted it—the soil compacted within weeks and my plants struggled. The following year I invested in premium organic mix and the difference was night and day.
You can check your soil quality with a soil pH/moisture meter to ensure optimal growing conditions. Most vegetables prefer slightly acidic soil with a pH between 6.0-7.0.
Boost your potting mix by adding compost or worm castings. This adds organic matter, improves water retention, and provides slow-release nutrients that feed your plants throughout the season. I mix about 20-30% compost into my potting soil before filling containers. You can make your own compost or purchase bagged compost. Either way, your plants will thank you with vigorous growth and higher yields.
For extended growing seasons, especially if you want to start seeds indoors before transplanting them to your patio containers, set up a supplementary lighting system with an indoor-plant LED grow light. I start all my warm-season vegetables indoors in March using grow lights, giving them a 6-week head start before moving them outside after the last frost.
Consider using a quality seed starter kit if you want to grow vegetables from seed. Starting from seed is significantly cheaper than buying transplants and gives you access to hundreds of unique varieties you’ll never find at garden centers.
The Watering Routine That Saved My Plants
Watering is the single biggest challenge in container gardening. Containers dry out much faster than in-ground gardens because they have less soil volume and more exposure to sun and wind. I killed more plants from improper watering (both overwatering and underwatering) than any other issue combined.
Establish a morning watering schedule. Water your containers early, before the day heats up. This gives plants time to absorb moisture before hot sun hits. It also prevents water from sitting on leaves overnight, which can promote fungal diseases. Fill each pot until water drips from the drainage holes—this ensures the entire root system gets moisture. Don’t just sprinkle the surface; you need to thoroughly saturate the entire root zone.
During hot summer months, check your containers again in late afternoon. If the top inch of soil feels dry, give them another drink. Small containers (under 3 gallons) may need watering twice daily in peak summer. Larger containers retain moisture longer and might only need daily watering.
I check my containers every single morning without fail. I stick my finger into the soil about an inch deep. If it feels dry, I water. If it’s still moist, I skip that container. This simple finger test has saved me from both overwatering and underwatering countless times.
Self-watering container options can reduce your workload significantly. These containers have built-in water reservoirs that provide steady moisture to plants through a wicking system. They’re perfect for busy people, frequent travelers, or anyone who simply doesn’t want to water daily. I use self-watering planters for my tomatoes and peppers, and they perform beautifully with minimal attention.
If DIY appeals to you, consider incorporating olla pots—unglazed clay vessels you bury in the soil that slowly release water through their porous walls. Ancient technology that still works incredibly well. I made my own using terracotta pots and saved a fortune compared to buying commercial ollas.
A watering spray mister is also handy for herbs and delicate seedlings that don’t need heavy watering. I use mine for germinating seeds and for refreshing herbs on particularly hot afternoons.
Check moisture levels consistently by sticking your finger into the soil. If it’s dry an inch down, water. If it’s still moist, wait. Overwatering kills as many container plants as underwatering. Roots need oxygen to survive, and waterlogged soil drowns them. Learning this balance takes practice, but you’ll develop a feel for it quickly. After a few weeks, you’ll instinctively know which containers dry out faster and need more frequent attention.
Creative Patio Garden Layouts
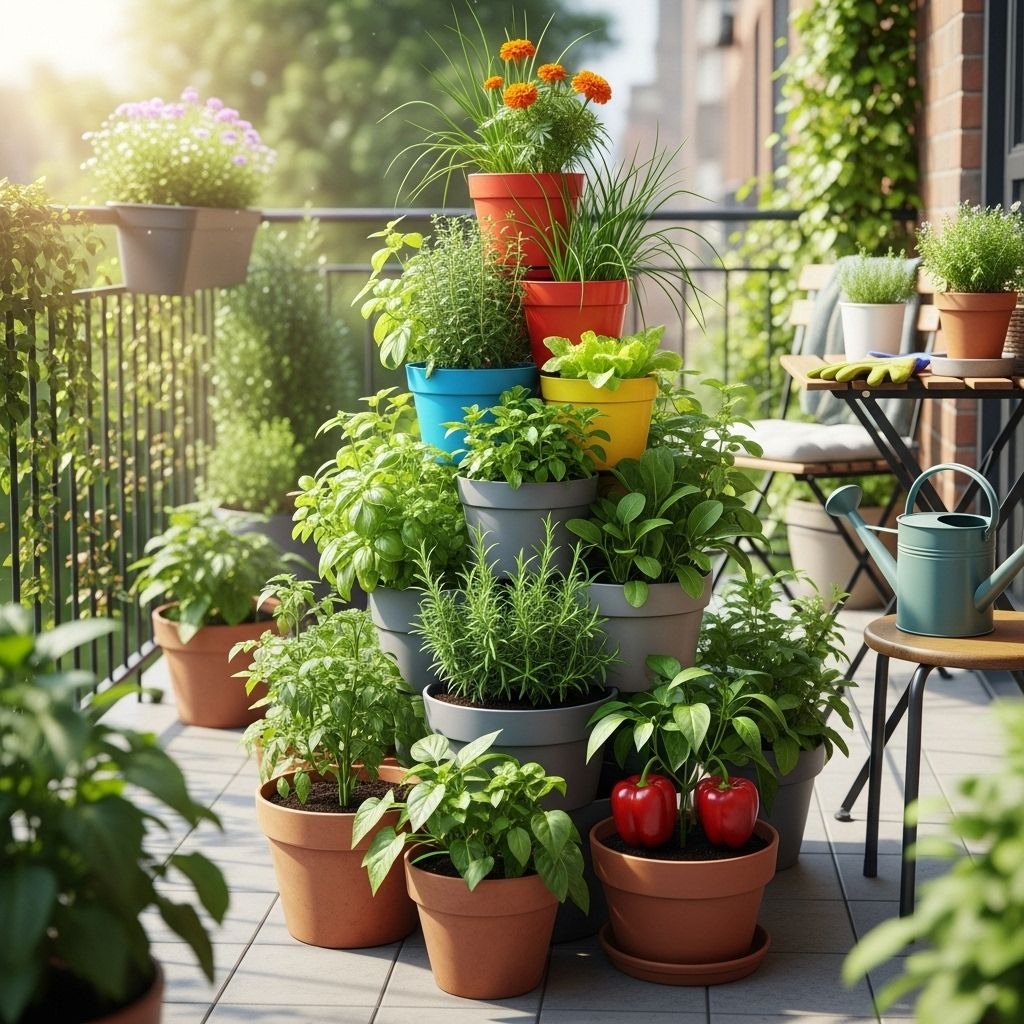
Even the smallest patio can host an impressive garden when you think vertically and creatively. My 48-square-foot patio currently grows over 25 different edible plants by utilizing vertical space and creative arrangements.
Vertical gardening maximizes space by going up instead of out. Attach balcony railing planters directly to railings—they don’t take up any floor space at all. Mount shelves or trellises on walls for climbing plants like beans, peas, or cucumbers. Use hanging-plant hooks from your patio ceiling for trailing plants like cherry tomatoes, strawberries, or cascading flowers.
I installed a simple ladder-style plant stand against one wall that holds 8 containers in the footprint of just one floor-level pot. Indoor plant stands work perfectly outdoors and create interesting height variations.
If you’re planning camping for beginners trips where you’ll need to step away from your garden, set up a watering system or ask a neighbor to help maintain your containers while you’re away.
The tiered “food fountain” setup is one of my favorite space-saving techniques. Purchase 4-5 wide, shallow pots in graduated sizes. Stack them pyramid-style to create levels. Fill each tier with a mix of herbs, greens, and compact vegetables. This vertical arrangement looks stunning and makes harvesting easy since everything is at different heights. I planted mine with strawberries cascading over the edges, lettuce in the middle tiers, and herbs at the top. It’s both functional and beautiful.
Hanging baskets and rail planters let you grow without using any floor space. I grow cherry tomatoes, strawberries, and herbs in hanging arrangements. Just remember that hanging containers dry out even faster than ground-level pots, so check them daily during warm weather. I’ve had hanging baskets require watering twice daily during heat waves.
Think about creating themed container groupings too. I have a “salsa garden” corner with tomatoes, peppers, cilantro, and onions all clustered together. My “tea garden” features mint, lemon balm, chamomile, and stevia. These themed arrangements make planning meals easier and look cohesive.
Maintenance Tips for Thriving Containers
Beyond watering, your patio container garden needs regular attention to stay productive. Don’t worry—we’re talking 15-20 minutes of work a few times per week, not hours of labor.
Fertilizing schedule: Container plants exhaust soil nutrients faster than in-ground gardens. Frequent watering leaches nutrients out of the drainage holes, and the limited soil volume means there’s not much nutrient reserve. Start fertilizing about 3-4 weeks after planting. Use an organic fertilizer every 2-3 weeks throughout the growing season, following package directions.
I prefer liquid fertilizers mixed into my watering routine—it’s easier than remembering to apply granular products. I use a diluted fish emulsion for my vegetables (yes, it smells terrible for an hour, but plants love it) and a balanced liquid fertilizer for herbs. For flowering plants, I switch to a bloom-boosting formula higher in phosphorus.
You can also use slow-release granular fertilizers mixed into the soil at planting time. These break down gradually over months, reducing your fertilizing workload. I often combine both methods—slow-release at planting, plus liquid feeding during peak growing season for extra boost.
Pruning and harvesting keeps plants productive and prevents pest problems. Remove dead, yellowing, or damaged leaves promptly. They’re just harboring pests and diseases. Harvest vegetables regularly—the more you pick, the more they produce. Vegetables left to over-ripen on the plant signal the plant to stop producing.
Pinch back herbs to encourage bushier growth. When basil reaches about 6 inches tall, pinch off the top growth just above a leaf node. This causes the plant to branch and become fuller rather than growing tall and leggy. I harvest herbs by cutting stems rather than picking individual leaves—this encourages the plant to send out new growth.
Use proper tools like those in a quality garden tool set to make maintenance easier. Sharp pruning shears, a soil scoop, and a gardening kneeling pad make tending containers much more comfortable.
Pest management in containers is generally easier than in ground gardens, but pests still find your plants. Check daily for aphids, caterpillars, whiteflies, or other issues. The sooner you catch problems, the easier they are to resolve.
Companion planting helps naturally—basil near tomatoes deters aphids and whiteflies, marigolds repel many pests, and nasturtiums act as trap crops that attract aphids away from your prized vegetables. Hand-pick larger pests like tomato hornworms and drop them in soapy water. For persistent aphid problems, blast them off with a strong spray from your hose.
Use organic solutions like neem oil spray for persistent problems. I also attract beneficial insects like ladybugs and lacewings by planting flowers. These good bugs eat the bad bugs, creating natural pest control.
Just like maintaining your garden, having the right outdoor gear enhances your adventures. A proper camping grill can help you cook fresh produce while enjoying the outdoors.
Extending Your Growing Season
If you’re interested in expanding your container garden knowledge to indoor spaces during colder months, you might explore options like compact hydroponic kits. These soil-free growing systems work year-round indoors and produce incredible yields in small spaces. I run a small hydroponic system in my kitchen window year-round for fresh lettuce and herbs.
A mini greenhouse on your patio can extend your growing season by several weeks in both spring and fall. These portable structures protect plants from light frosts and create a warmer microclimate. I start my cool-season crops like lettuce and spinach in a mini greenhouse in early spring, getting harvests weeks earlier than unprotected plants.
For serious year-round growing, consider grow tents with supplemental lighting. These self-contained growing environments let you maintain a productive garden even through harsh winters. Pair them with hydroponic nutrient solutions for optimal growth.
Making It Your Own
The best part about patio container gardening is how personal it becomes. Your space reflects your taste, your cooking style, and your effort. Add decorative ceramic plant pots that match your outdoor décor. Incorporate solar decorative lights to enjoy your patio garden in the evening. Install plant stakes for climbing vegetables and consider adding garden décor items that express your personality.
Some of my favorite mornings involve stepping onto my patio, brewing cowboy coffee with my travel coffee brewer, and harvesting fresh herbs for breakfast. After spending time in nature camping and hiking, having a small productive garden space at home keeps that outdoor connection alive daily.
Create a comfortable space to enjoy your garden too. Add a small table and chair where you can sit with morning coffee and admire your plants. I keep a plant propagation station on my patio table where I root herb cuttings and experiment with plant breeding. It’s become a peaceful morning ritual that grounds me before the workday begins.
For those who enjoy camping, check out essential gear like a portable camping stove to complement your outdoor cooking adventures. Fresh herbs and vegetables from your patio garden travel well to campsites and elevate camp meals significantly.

Start with a few containers, choose plants you’re excited about eating or looking at, and learn as you grow. Your patio container garden doesn’t need to be Instagram-perfect from day one. Mine certainly wasn’t. But watching those first tomatoes ripen, snipping fresh basil for pasta, harvesting lettuce you grew yourself—those small victories make every bit of effort worthwhile.
Whether you’re at home tending your patio garden or exploring the outdoors with proper camping gear, growing your own food connects you more deeply with natural cycles and the satisfaction of self-sufficiency. My tiny patio garden has taught me more about patience, observation, and appreciation for plants than any book ever could.
The mistakes will happen. You’ll underwater something, overwater something else, choose the wrong container, plant at the wrong time, or face pest problems. That’s all part of the learning process. Every gardener, no matter how experienced, kills plants. The difference is experienced gardeners don’t quit—they troubleshoot, adjust, and try again.
Your patio might be small, but its potential is enormous. Those few square feet of outdoor space can produce hundreds of dollars worth of fresh produce, herbs, and flowers in a single season. More importantly, they provide a peaceful sanctuary where you can disconnect from technology, observe natural growth, and feel the satisfaction that comes from nurturing living things.
So grab a few containers, some potting soil, and plants that excite you. Your patio container gardening journey starts with a single seed or transplant. Before you know it, you’ll be that person excitedly sharing fresh herbs with neighbors and posting photos of your harvest. Welcome to the club—your patio garden awaits.
FAQ: Your Patio Container Gardening Questions Answered
Q1: How many hours of sunlight do I need for patio container gardening?
Most vegetables and herbs need at least 6 hours of direct sunlight daily to thrive. Leafy greens like lettuce and spinach can manage with 4-5 hours, especially if they get morning sun. If your patio gets less than 4 hours of direct sun, focus on shade-tolerant herbs like parsley, mint, and chives, or grow decorative foliage plants instead of vegetables. You can also supplement natural light with grow lights if you’re really determined to grow sun-loving plants in a shady spot.
Q2: What size containers should I use for tomatoes?
Tomatoes need at least a 5-gallon container minimum for healthy growth and good production. Larger is always better—more soil means more nutrients, better moisture retention, and healthier root systems. Determinate “patio” tomato varieties bred specifically for containers can work in slightly smaller containers (3-4 gallons), but standard and indeterminate varieties really need that 5-gallon minimum, and they’ll perform even better in 7-10 gallon containers. I use 7-gallon grow bags for my tomatoes and get excellent harvests all summer long.
Q3: How often should I water container plants on my patio?
It depends on your climate, container size, and plant type, but generally you’ll need to water daily during hot summer months. Check the top inch of soil—if it’s dry, water until it drains from the bottom holes. If it’s still moist, wait. In cooler weather or for larger containers, you might only need to water every 2-3 days. Small containers under 3 gallons may need watering twice daily in peak summer heat. Self-watering containers or buried olla pots can extend time between waterings significantly, which is a lifesaver if you have a busy schedule or travel frequently.
Q4: Can I reuse potting soil from last year’s containers?
You can, but it’s not ideal for growing vegetables. Used potting soil loses nutrients, breaks down and compacts over time, and can harbor pests or disease pathogens from previous plants. If you do reuse soil, refresh it by mixing in 30-40% new potting soil and compost, and use it only for non-edible ornamental plants or different plant families than what grew there before. For vegetables and herbs where you want maximum production, starting fresh each season gives much better results. I reuse old potting soil for annual flowers where I’m less concerned about peak performance, but my vegetable containers always get fresh premium mix.
Q5: What’s the easiest vegetable to grow in patio containers for beginners?
Leafy greens like lettuce, spinach, and chard are incredibly beginner-friendly. They grow quickly (harvest in 30-45 days), don’t require large containers (1-2 gallons works fine), tolerate partial shade, and you can do “cut and come again” harvesting for continuous production throughout the season. Cherry tomatoes are also very rewarding if you have full sun—nothing beats picking sun-warmed tomatoes right off the plant. Radishes are another excellent choice for beginners or kids since they’re ready to harvest in just 25-30 days and are nearly impossible to kill. Start with these confidence-building plants before moving on to more challenging vegetables.
Q6: Do I need to fertilize container plants?
Yes, absolutely. Container plants need regular fertilization because frequent watering leaches nutrients out through drainage holes and the limited soil volume provides minimal nutrient reserves. Start fertilizing 3-4 weeks after planting and continue every 2-3 weeks throughout the growing season with a balanced liquid fertilizer. You can also use slow-release granular fertilizers mixed into the soil at planting time for less frequent feeding. Without regular fertilization, your plants will show stunted growth, yellowing leaves, and poor production. Container gardening requires more active nutrient management than in-ground gardens, but it’s a simple routine once you establish it.
Q7: What containers work best for herbs?
Most herbs thrive in 1-2 gallon containers with excellent drainage. I prefer terra cotta or ceramic pots for herbs because they’re porous and allow soil to dry out between waterings—most herbs prefer slightly drier conditions than vegetables. Avoid containers larger than needed because excess soil stays wet and can promote root rot. Shallow, wide containers work better than deep, narrow ones for herbs with spreading root systems like thyme and oregano. For vertical space savings, herb gardens also work beautifully in hanging baskets or wall-mounted planters. Just make sure every container has drainage holes, which is even more critical for herbs than for vegetables.