
I remember the first time I tried styling plants in my apartment. I’d just bought eight beautiful houseplants from a local nursery, feeling excited and inspired by all the gorgeous plant-filled homes I’d seen online. I brought them home, placed them randomly wherever there was space, and stepped back expecting magic. Instead, my living room looked like a garden center exploded—chaotic, cluttered, and somehow still boring.
That’s when I realized indoor plant styling isn’t just about owning plants. It’s about intentional placement, creating visual flow, and understanding design principles that make spaces feel cohesive rather than chaotic. Once I learned the fundamentals, everything changed. My same plants in the same apartment suddenly looked magazine-worthy, and friends started asking if I’d hired an interior designer.
The truth is, you don’t need expensive furniture or a complete home makeover to create stunning plant-filled spaces. You just need to understand a few key styling principles that professional interior designers use. Whether you have two plants or twenty, these techniques will help you arrange them in ways that elevate your entire home’s aesthetic.
Why Indoor Plant Styling Matters More Than You Think
Random plant placement versus intentional styling creates dramatically different results, even with identical plants and spaces.
Styled plants create cohesive design that ties your entire room together. When plants are arranged thoughtfully—considering scale, color, texture, and placement—they become part of your home’s design narrative rather than just random green objects. Well-styled plants can make small rooms feel larger, empty corners feel intentional, and sterile spaces feel warm and inviting.
The psychological benefits of organized greenery are well-documented. Studies show that indoor plants reduce stress and improve mood, but disorganized clutter (including poorly placed plants) increases anxiety. Strategic plant styling gives you all the mental health benefits of greenery without the visual chaos that undermines those benefits.
Styled plant arrangements also increase your home’s perceived value. Real estate agents consistently report that well-styled homes—including thoughtful plant placement—photograph better, show better, and sell faster. Even if you’re not selling, creating a beautifully styled space affects how you feel about your home daily.
I noticed this transformation in my own attitude. Before learning styling principles, I felt vaguely dissatisfied with my space despite loving my plants individually. After applying proper styling techniques, I actually looked forward to coming home. The same apartment, same plants, completely different emotional response.
The Rule of Threes: Creating Focal Points
The most powerful styling principle I learned came from professional interior designers: group plants in odd numbers, especially threes.
Odd-number groupings create visual interest that even numbers can’t match. Your eye naturally finds odd-numbered arrangements more dynamic and appealing. Three plants together create a triangle—the most stable and pleasing geometric shape. Five plants allow for more complex layering. Even numbers feel static and formal; odd numbers feel organic and intentional.
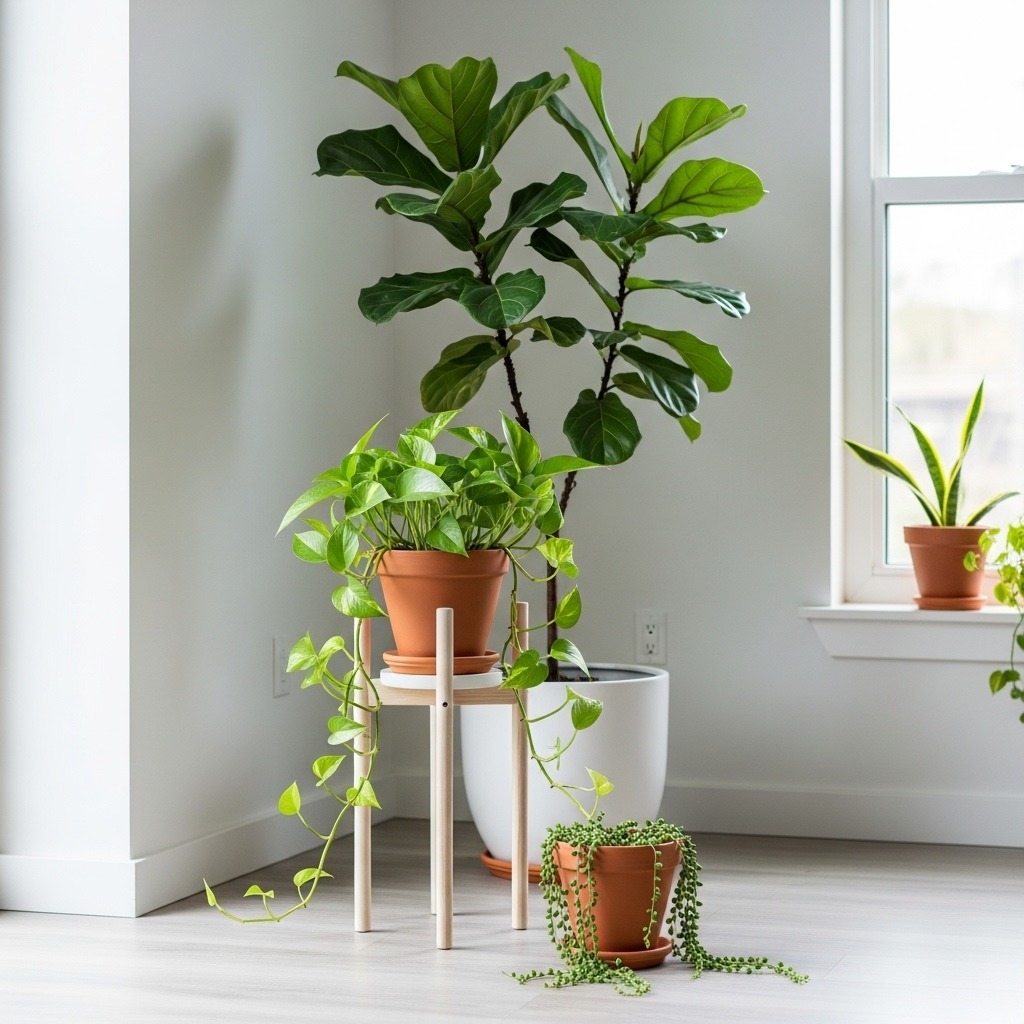
When creating plant groupings, mix heights and textures deliberately. I use the “thriller, filler, spiller” concept borrowed from container gardening. Place one tall statement plant (thriller) as your focal point, surround it with medium-height, bushier plants (fillers), and add trailing plants (spillers) that cascade over edges. This three-tier approach works whether you’re styling a plant shelf, corner arrangement, or tabletop display.
Try this specific formula: pair a tall plant like a Fiddle Leaf Fig or Snake Plant with a mid-height bushy plant like a Pothos in a decorative ceramic plant pot, and add a trailing String of Pearls or Philodendron in a hanging basket. This combination creates vertical interest, fullness, and movement.
Color coordination ties everything together visually. I choose planters in a cohesive color palette—mine is white, terracotta, and natural wood tones. This doesn’t mean everything matches exactly; it means colors complement rather than clash. Use indoor plant stands in matching finishes to create visual continuity even when pots vary.
The rule of threes extends beyond plant groupings too. When styling plant shelves, place decorative objects in groups of three. Three candles, three books, three small pottery pieces alongside your plants. This rhythmic repetition creates sophisticated design flow.
Vertical Styling: Using Walls and Ceilings
The biggest revelation in my plant styling journey was discovering vertical space. Most people (including my former self) only think horizontally, missing massive styling opportunities.
Hanging planters and macramé transform empty air into productive display space. I installed ceiling hooks in three corners of my living room and hung trailing plants at staggered heights. The cascading vines draw the eye upward, making my standard 8-foot ceilings feel taller. Use hanging plant baskets with hanging-plant hooks rated for your ceiling type.
Choose trailing varieties for hanging displays. Pothos, Philodendron, String of Hearts, String of Pearls, and Spider Plants all look stunning when allowed to cascade naturally. I positioned mine at varying heights—one high near the ceiling, one at eye level, one lower—to create visual layers rather than a uniform line.
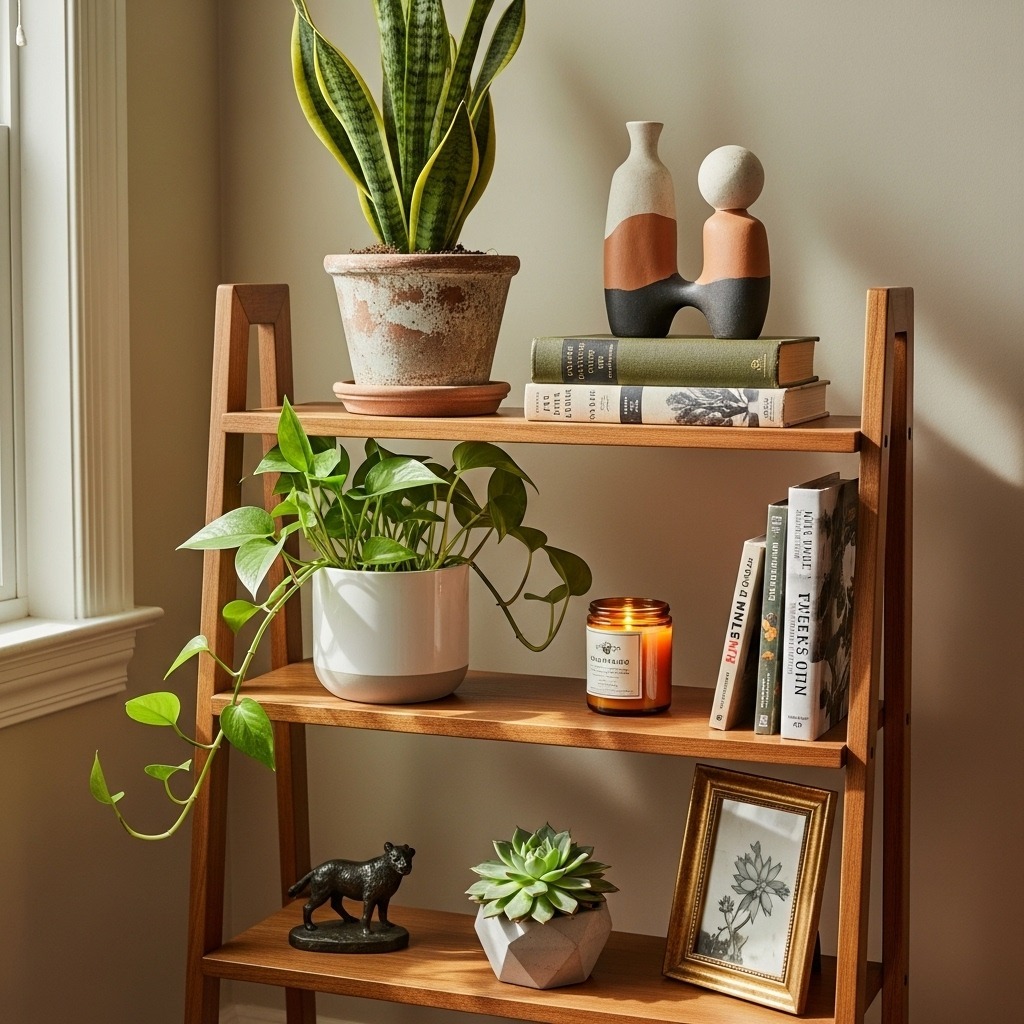
Wall-mounted shelves maximize vertical space while keeping floors clear. I installed floating wooden shelves on an empty wall and created a stunning plant display using twelve plants that previously cluttered my floor and furniture. Arrange plants on shelves using the triangle principle: tall in back, medium in middle, trailing over the front edge. Mix in books, small sculptures, or candles to prevent it from looking like a greenhouse.
Learning to maximize vertical space for camping for beginners taught me similar principles—the same approach applies to indoor plant styling. Use every dimension available.
Living walls or plant walls create dramatic focal points. You don’t need expensive installation systems; arrange multiple balcony railing planters or pocket planters on a mounted board. I created a kitchen herb wall using magnetic planters on a metal sheet—functional, beautiful, and completely vertical.
Don’t forget window treatments. Hanging plants in front of sheer curtains creates privacy while allowing light through. The silhouettes of plant leaves against translucent fabric are stunning, especially in bedrooms or bathrooms where you want privacy without blocking all natural light.
Room-by-Room Styling Guide
Different rooms have different needs, light conditions, and design aesthetics. Here’s how I style plants throughout my home.
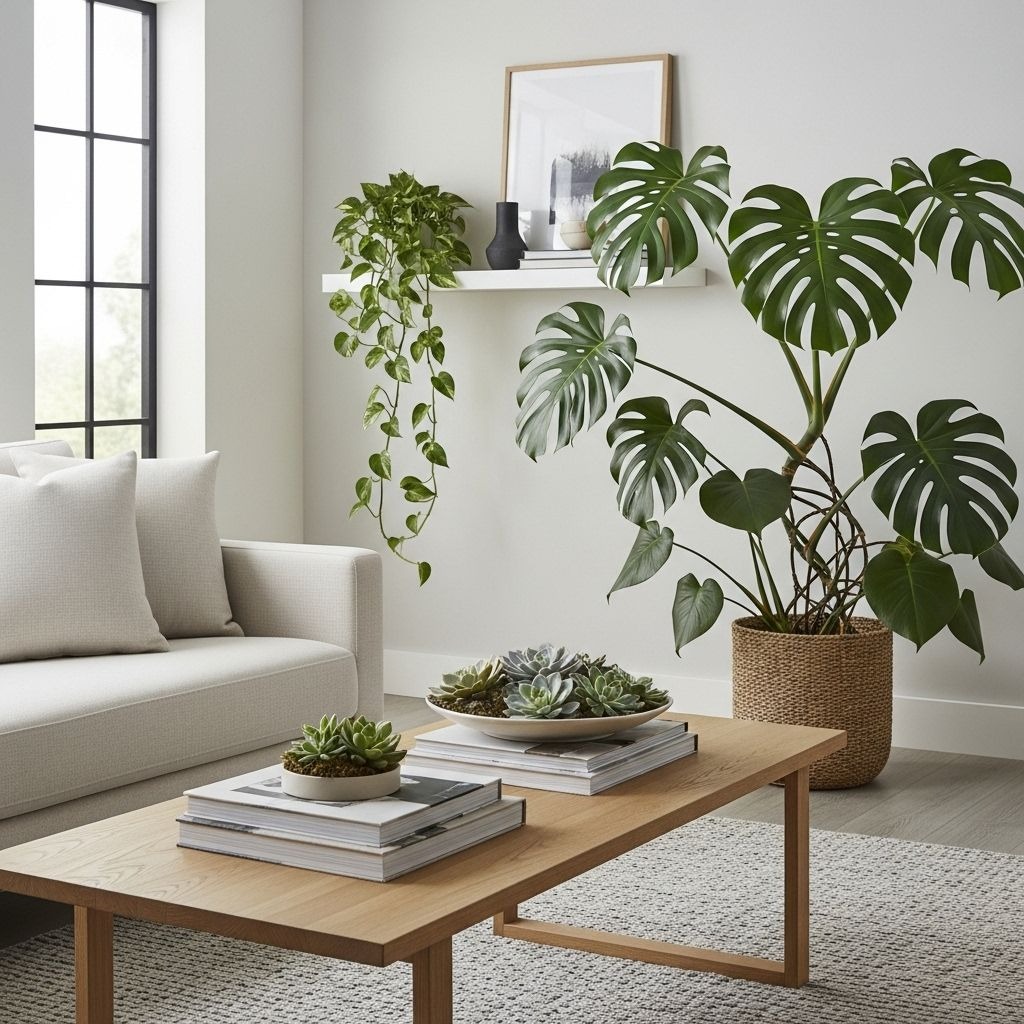
Living Room Statement Plants:
Your living room should feature at least one large statement plant that anchors the space. I keep a Fiddle Leaf Fig in a large decorative ceramic plant pot near my windows—it’s become the room’s focal point. Monstera Deliciosa, large Snake Plants, Rubber Trees, and Bird of Paradise all work as statement pieces.
Position statement plants in corners, flanking a sofa, or beside a chair to create cozy reading nooks. Use indoor plant stands to elevate shorter plants to appropriate visual height. Layer smaller plants on shelves, side tables, and coffee tables to create depth.
I group three plants on my coffee table—a small succulent arrangement, a compact fern, and a trailing Pothos in varied heights using books as risers. This creates an interesting vignette without overwhelming the table’s function.
Bedroom Calming Arrangements:
Bedrooms should feel peaceful and restful. I style mine with calming plants known for air purification. Snake Plants and Peace Lilies release oxygen at night, making them ideal bedroom companions. Keep bedroom styling minimal—one statement plant in a corner, perhaps a small plant on a nightstand, and maybe a hanging plant if you have high ceilings.
Avoid overcrowding bedroom spaces with too many plants. I learned this after creating a bedroom “jungle” that felt overwhelming rather than relaxing. Three to five well-placed plants create tranquility; fifteen plants create visual chaos that disrupts sleep.
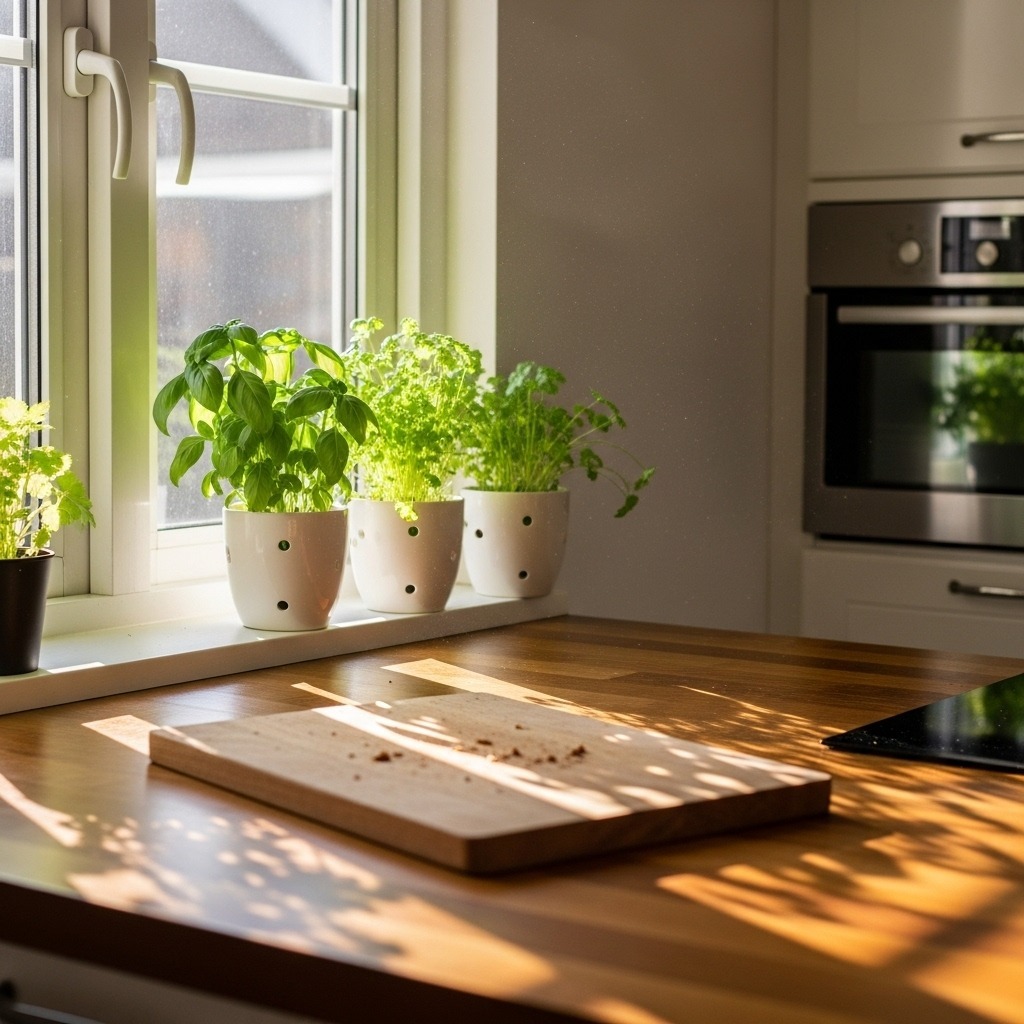
Kitchen Herb Displays:
Kitchens are perfect for functional plant styling. I keep fresh herbs on my windowsill in matching self-watering planters—basil, parsley, cilantro, and chives all within reach while cooking. Mount a small shelf above your kitchen window or sink for a vertical herb garden that’s both beautiful and useful.
Use a watering spray mister to keep kitchen herbs happy without overwatering in small pots. Group herbs in odd numbers even here—three to five varieties look intentional rather than random.
Bathroom Humidity-Lovers:
Bathrooms with windows are plant styling gold. The high humidity supports ferns, orchids, and tropical plants that struggle elsewhere. I keep a Boston Fern on a floating shelf, a Peace Lily on the bathroom counter, and a hanging Pothos cascading from above the shower.
Style bathroom plants on floating corner shelves to maximize limited space. Use hanging plant baskets suspended from the ceiling if you have a spacious bathroom. The steam and humidity create a spa-like atmosphere when combined with lush greenery.
Entryway Welcome Plants:
First impressions matter. I keep a tall Areca Palm near my apartment entrance—it welcomes guests and sets an elegant tone. Entryways typically need low-maintenance plants since this area often has less natural light. Snake Plants, ZZ Plants, and Pothos all tolerate lower light and create beautiful entryway displays.
Place an entryway plant on a small indoor plant stand to elevate it to appropriate visual prominence. Add a mirror behind the plant to reflect light and create the illusion of more greenery.
Similar to how you’d prepare camping breakfast ideas, styling plants in different rooms requires planning for different conditions and purposes.
Planter Selection and Coordination
Planter choices dramatically impact your overall styling aesthetic. I wasted money buying random pots before understanding coordination principles.
Decide between matching versus eclectic styles based on your home’s aesthetic. Minimalist modern homes look best with matching planters in the same color and material. Bohemian or eclectic spaces can handle varied planters with personality. I chose a “unified eclectic” approach—all my planters are different styles but share a color palette (white, terracotta, natural wood).
Material choices affect both aesthetics and plant health. Terracotta pots are classic, porous (good for plants that prefer drying out), and warm-toned. Ceramic glazed pots retain moisture better and come in endless colors and patterns. Modern resin or plastic planters are lightweight and practical. I mix materials but coordinate colors—my terracotta, white ceramic, and natural wood tones all complement each other.
Use decorative ceramic plant pots for featured plants and simpler containers for background plants. This creates visual hierarchy without overwhelming spaces with too many decorative elements competing for attention.
Size proportions matter enormously. Your planter should be proportional to your plant—generally about one-third the height of the plant itself. A massive planter with a tiny plant looks awkward; a huge plant in a tiny pot looks unstable. I learned this by trying to style a large Monstera in a small pot—it looked top-heavy and fell over twice before I sized up.
Consider also the relationship between planter size and furniture scale. Large floor plants need substantial planters that ground them visually. Tabletop plants need smaller pots that don’t overwhelm surfaces. Use grow bags for larger floor plants if you want a casual, modern aesthetic—they’re trendy and functional.
Layering and Depth Techniques
Professional designers create depth through layering—placing objects at different heights and distances to create three-dimensional interest.
Use plant stands and risers to create varied heights within groupings. I have a collection of wooden stands in different heights—6 inches, 12 inches, and 18 inches—that I rearrange constantly to create dynamic displays. Indoor plant stands in metal, wood, or rattan all work depending on your style.
Books serve as brilliant (and free) risers for small plants. Stack three hardcover books on a shelf, place a small plant on top, and you’ve instantly created height variation. I use this technique extensively on my bookshelves, mixing books with plants for an organic, lived-in look.
Integrate décor items alongside plants rather than styling plants in isolation. I learned this from interior design blogs—surround plants with picture frames, candles (unlit near plants), pottery, vintage finds, or meaningful objects. This integration makes plants feel like intentional design elements rather than afterthoughts.
Create visual triangles in your arrangements. When styling a shelf or surface, place items in triangular patterns—tall item in back left, medium item front right, small item back right. Your eye naturally follows triangular arrangements, creating visual flow and interest.
Layer plants at different distances from walls. Don’t push everything against walls. Pull larger plants slightly away from corners, layer medium plants in front of larger ones, and place small plants at the front edge of surfaces. This creates actual depth rather than flat, one-dimensional arrangements.
Best Plants for Different Styling Needs
Choosing the right plants for your styling goals matters as much as placement.
Statement Floor Plants:
These large plants anchor spaces and create dramatic impact. Fiddle Leaf Fig, Monstera Deliciosa, Bird of Paradise, large Snake Plants, Rubber Trees, and Majesty Palms all work as stunning floor plants. I keep mine in 10-gallon containers or grow bags for easy moving when needed.
Statement plants work best alone or paired with one smaller companion plant. Don’t crowd large plants with multiple others—let them make their statement.
Trailing and Hanging Varieties:
For vertical styling and hanging displays, choose plants that cascade beautifully. Pothos, Philodendron, String of Pearls, String of Hearts, Spider Plants, and English Ivy all create stunning trailing displays. I use hanging plant baskets with these varieties positioned at varying heights throughout my apartment.
Trailing plants also work wonderfully on high shelves where their vines can cascade down the bookshelf—much more interesting than uniform potted plants in rows.
Tabletop Compact Plants:
For coffee tables, side tables, and desks, choose compact plants that stay small. Succulents, small ferns, Peperomia, Fittonia, Nerve Plants, and compact Snake Plant varieties all work perfectly. Keep these in smaller decorative ceramic plant pots that don’t overwhelm furniture surfaces.
Low-Light Options:
Not every room has perfect light. For styling darker spaces, choose plants that tolerate low light. Snake Plants, ZZ Plants, Pothos, Philodendron, Peace Lilies, and Cast Iron Plants all survive (and sometimes thrive) in low-light conditions. I style these in my bathroom, hallway, and bedroom where natural light is limited.
Supplement low-light areas with indoor-plant LED grow lights if you want more variety. I use attractive grow lights disguised as regular lamps in my office to support plants that wouldn’t otherwise survive there.
Common Styling Mistakes to Avoid
Learning what not to do saved me from numerous styling disasters.
Uniform spacing creates boring, institutional looks. I see this constantly—people place plants in perfect rows with equal spacing like a garden center display. This feels rigid and unnatural. Instead, group plants in clusters, vary spacing, and leave some areas intentionally plant-free. Create asymmetrical balance rather than perfect symmetry.
Wrong scale relationships destroy proportions. A tiny succulent alone on a large console table looks lost. A massive floor plant in a tiny bathroom feels overwhelming. Match plant scale to furniture and room size. I use large plants in living rooms and entryways, medium plants in bedrooms and kitchens, small plants in bathrooms and on shelves.
Ignoring light needs leads to dead plants and ugly spaces. No amount of beautiful styling helps if your plants are dying from inadequate light. I learned this after killing a fiddle leaf fig by styling it in a dark corner because it looked pretty there. Match plant light requirements to actual available light in each room. Use soil pH/moisture meters with light sensors to assess conditions accurately.
Matching pots too rigidly feels sterile. While coordination matters, perfectly matching pots can feel cold and hotel-like. Mix sizes, textures, and complementary colors within your chosen palette. I use white, cream, terracotta, and natural wood—all complementary but not identical.
Neglecting negative space overcrowds rooms. More plants don’t always mean better styling. I went through a phase where I crammed plants everywhere, and it felt claustrophobic. Well-styled spaces have intentional empty areas that let the eye rest and make the planted areas more impactful.
Maintenance for Styled Spaces
Beautiful styling means nothing if maintaining your plants becomes impossible.
Design accessible watering routines into your arrangements. I learned this after creating a stunning high shelf display that required a step ladder for watering. Now I position plants considering maintenance access. Group plants with similar water needs together. Keep frequently-watered plants in easily accessible locations. Use self-watering planters for hard-to-reach spots.
Invest in proper tools like a garden watering hose with an adjustable nozzle for floor plants or a watering spray mister for delicate or hanging plants. Having the right tools makes maintenance easier, ensuring your styled arrangements actually survive long-term.
Rotate plants for even growth. Plants grow toward light sources, developing lopsided growth if never rotated. I rotate all my plants 180 degrees monthly to maintain balanced, attractive shapes. This is especially important for styled arrangements where plant symmetry matters aesthetically.
Clean leaves regularly. Dusty plants look terrible no matter how beautifully styled. I wipe large leaves with a damp cloth weekly and shower smaller plants monthly to remove dust buildup. Clean leaves also photosynthesize better, keeping plants healthier.
Prune strategically to maintain desired shapes and sizes. Trailing plants need occasional trimming to prevent excessive length. Bushy plants benefit from pruning to maintain fullness. I use sharp scissors from a garden tool set to keep plants looking their styled best.
Just as proper gear like a portable camping stove makes outdoor adventures easier, having proper plant care tools makes indoor styling maintenance manageable.
Creating Your Personal Style
The most important aspect of indoor plant styling is making it yours.
Don’t just copy Pinterest images exactly. Use them as inspiration, but adapt ideas to your actual space, light conditions, and personal aesthetic. My living room looks nothing like the inspiration photos I started with, but it reflects my personality while incorporating professional styling principles.
Consider your home’s existing design when styling plants. Modern minimalist homes need clean-lined planters and simple arrangements. Bohemian spaces can handle eclectic pots and lush layering. Traditional homes look best with classic planters and symmetrical arrangements. I have an eclectic modern style, so I mix clean-lined furniture with varied (but coordinated) plant pots and asymmetrical groupings.
Add personality with unique planters or garden décor items. I collect vintage pottery from thrift stores and repurpose interesting containers as planters. These unique pieces make my plant displays distinctly mine rather than generic catalog looks.
Seasonal styling keeps things interesting. I add flowering plants in spring, incorporate autumn-colored accessories in fall, and simplify arrangements in winter when some plants go dormant. This evolution prevents styling fatigue and keeps your space feeling fresh.
Document your styling journey with photos. I photograph my arrangements from multiple angles, which helps me see what works and what doesn’t. Comparing photos over time shows progress and helps refine my styling eye.
Starting Your Styling Journey Today
You don’t need to overhaul everything immediately. Start small and build gradually.
Begin with one well-styled vignette. Choose a corner, shelf, or table and apply the principles from this guide—odd-number grouping, varied heights, coordinated planters, integrated décor. Perfect this one area before moving to the next. My first styled area was my coffee table, which took three attempts before it looked right.
Shop your home first. Rearrange existing plants and containers using styling principles before buying anything new. I reorganized my existing eight plants and three planters into intentional groupings and immediately improved my space. Only buy additional plants or containers to fill specific gaps in your styled arrangements.
Invest gradually in quality containers and stands. I built my collection over months, not days. Each payday I’d buy one nice decorative ceramic plant pot or indoor plant stand, slowly upgrading my collection. Quality pieces last years and elevate your entire styling game.
Take inspiration from design blogs, Instagram, and Pinterest, but filter everything through your actual conditions. A stunning jungle living room photo might feature 30 plants in a south-facing room with 12-foot ceilings. You might have six plants in a north-facing space with 8-foot ceilings. Adapt the principles, not the exact execution.
Be patient with yourself. My indoor plant styling evolved over two years of experimentation, mistakes, learning, and refinement. Your first arrangements won’t be perfect—mine certainly weren’t. Each time you rearrange, you’ll develop better intuition for what works. Styling is a skill that improves with practice.
Your home should reflect your life and personality, enhanced by beautiful plant styling that makes you happy every day. Start small, apply these principles, and watch your space transform.
FAQ: Your Indoor Plant Styling Questions Answered
Q1: How many plants do I need for good styling?
You can create beautifully styled spaces with as few as three plants arranged thoughtfully. Focus on quality arrangements over quantity. One large statement plant styled with two smaller complementary plants creates more visual impact than ten randomly placed plants. I started with eight plants total and created stunning arrangements by applying proper styling principles. As you gain confidence, expand gradually, always maintaining intentional placement rather than accumulating plants randomly.
Q2: What’s the biggest indoor plant styling mistake beginners make?
Placing plants in uniform rows with equal spacing. This creates boring, institutional displays. Instead, group plants in odd numbers (especially threes), vary heights with stands and risers, and cluster arrangements asymmetrically. Another common mistake is ignoring plant light requirements for aesthetic reasons—styling a sun-loving Fiddle Leaf Fig in a dark corner because it looks good there. Always match plant needs to actual room conditions, then style within those parameters.
Q3: How do I style plants in a small apartment with limited space?
Use vertical space extensively. Install hanging plant baskets from ceiling hooks, mount floating shelves for plant displays, and use trailing plants that cascade rather than spreading horizontally. Choose compact plant varieties and style them on furniture you already have—nightstands, bookshelves, kitchen counters—rather than adding furniture just for plants. I styled my 450-square-foot studio beautifully using twelve plants and zero floor space by going entirely vertical with hangers and wall-mounted shelves.
Q4: Should all my planters match or can I mix styles?
You can absolutely mix styles, but maintain coordination. Choose a color palette (like white, terracotta, and wood tones) and select planters within that palette. Mix materials and textures while keeping colors cohesive. Perfectly matching planters can feel sterile, while completely random planters feel chaotic. Coordinated variety creates sophisticated, curated aesthetics. I use about eight different planter styles that all share my white-terracotta-wood color scheme.
Q5: How do I create a focal point with indoor plants?
Use one large statement plant as an anchor, positioned prominently in a corner or beside furniture. Fiddle Leaf Figs, Monstera Deliciosa, and large Snake Plants all work as focal points. Place this statement plant in a beautiful decorative ceramic plant pot on an indoor plant stand if needed for height. Surround with 2-4 smaller companion plants in complementary pots. Add lighting directed at the plants if possible. The key is creating clear visual hierarchy—one star plant supported by ensemble players.
Q6: What plants work best for styling dark rooms or low-light areas?
Snake Plants, ZZ Plants, Pothos, Philodendron, Peace Lilies, and Cast Iron Plants all tolerate low light well. Style these in dark hallways, bathrooms without windows, or north-facing rooms. While they tolerate low light, they still need some indirect light—no plant survives complete darkness. Supplement with indoor-plant LED grow lights if needed. I successfully styled my windowless bathroom using grow lights disguised as attractive fixtures.
Q7: How often should I rearrange my plant displays?
Rearrange seasonally or whenever you feel styling fatigue. I do major rearrangements quarterly, coinciding with seasons. This keeps things fresh and accommodates plants’ changing needs. Light angles shift seasonally, so plants that thrived in one spot during summer might need relocation in winter. Minor tweaks happen monthly—adjusting a plant’s position, swapping a plant between rooms, adding or removing a piece. Your styled arrangements should evolve as you and your plants grow together.