
I’ll never forget the day I watched my first decent-sized bass swim away with my best lure because I tied a terrible knot. That moment of watching $15 worth of tackle disappear into the depths, along with what felt like the fish of a lifetime, taught me more about fishing knots than any tutorial ever could. Good knots aren’t just about keeping your gear—they’re about confidence, success, and not having heartbreaking stories to tell.
After years of losing fish, lures, and sleep over failed knots, I’ve learned which knots actually work in real fishing situations and which ones look good on paper but fail when it matters most. The truth is, you don’t need to master dozens of complicated knots to be successful. You need to perfect 3-4 reliable knots that handle 95% of fishing situations.
Whether you’re tying your very first hook or looking to upgrade your knot game, understanding these fundamental techniques will transform you from someone who loses fish to someone who lands them consistently.
Understanding Fishing Line Types and Knot Selection
Different fishing lines require different knot approaches due to their unique characteristics and behaviors. Understanding these differences helps you choose knots that work reliably with your specific setup.
Monofilament Line Characteristics
Monofilament line stretches, has memory, and provides moderate grip for knots. This stretch acts as shock absorption during fights but can make some knots loosen over time. Monofilament’s forgiving nature makes it excellent for learning knot-tying techniques.
The line’s memory means it retains coils from the spool, which can affect knot performance if not managed properly. Monofilament also has moderate slipperiness, making it easier to grip during tying than some alternatives.
Most traditional fishing knots were designed for monofilament, making it the most versatile line type for knot selection. If you’re learning to tie knots, start with monofilament for the most forgiving experience.
Braided Line Considerations
Braided line is extremely strong but very slippery, requiring knots that create multiple friction points to prevent slippage. Many knots that work well with monofilament fail completely with braided line.
The zero stretch of braided line means knots must absorb all shock loading directly, requiring stronger knot designs. However, braided line’s thin diameter allows for more wraps in the same space, potentially creating stronger connections.
Braided line cuts easily on sharp edges and can cut into itself under extreme pressure. Choose knots that distribute pressure evenly and avoid designs that create sharp angles or pinch points.
Fluorocarbon Properties
Fluorocarbon combines the worst characteristics of both monofilament and braided line for knot tying—it’s stiff, slippery, and has little stretch. However, its invisibility underwater makes it worth mastering.
The stiffness of fluorocarbon makes it harder to tighten knots evenly, requiring extra care during the tightening process. Wet the line thoroughly before final tightening to reduce friction and prevent heat damage.
Fluorocarbon’s memory is stronger than monofilament, making it important to work out coils before tying knots. The line also tends to weaken more from repeated bending than other line types.
For comprehensive fishing line guidance, check out our how to put fishing line on a reel article.
The Essential Beginner Knot: Improved Clinch Knot
If you’re going to learn one fishing knot, make it the improved clinch knot. This versatile knot handles most fishing situations reliably while being simple enough to tie in cold weather, low light, or when you’re excited about hooking into fish.
Why the Improved Clinch Knot Works
The improved clinch knot creates multiple friction points through its wrapping design, then locks itself with a final pass through the created loop. This self-locking feature prevents slippage under load while maintaining reasonable strength.
The knot works well with all line types, though it excels with monofilament and fluorocarbon. With braided line, add an extra wrap or two for security since the smooth surface provides less friction.
Most importantly, this knot forgives minor tying errors that would cause other knots to fail. Small variations in wrapping count or tightening technique rarely cause complete failure.
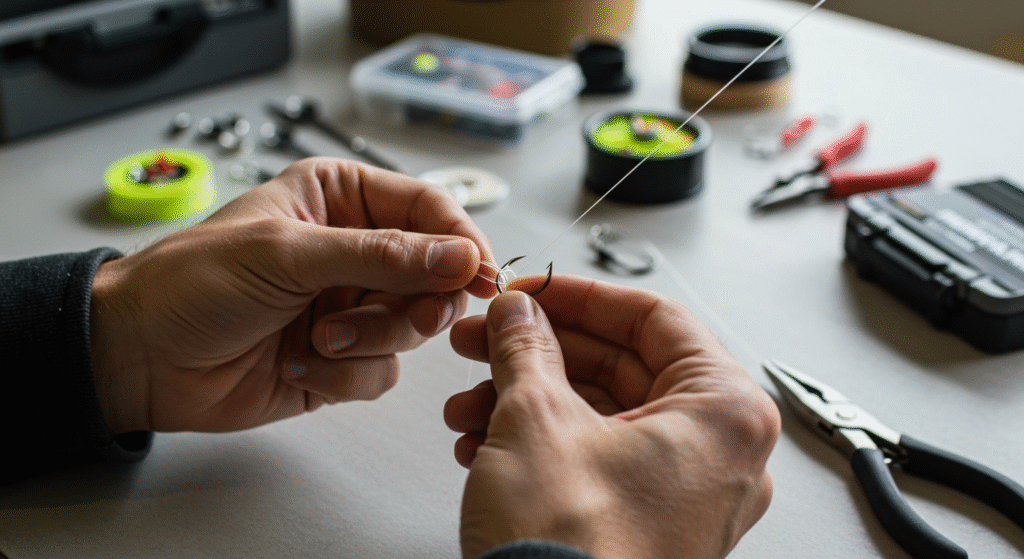
Step-by-Step Improved Clinch Instructions
Start by threading your line through the hook eye, leaving about 6 inches of working line. This tag end length provides enough material for wrapping while being manageable to work with.
Wrap the tag end around the standing line 5-6 times for monofilament, 6-7 times for braided line. Keep wraps tight and even, working back toward the hook eye. Uneven or loose wraps create weak points.
Pass the tag end through the small loop formed next to the hook eye. This creates a larger loop that the tag end must pass through one more time for the “improved” version.
Thread the tag end through this larger loop, ensuring it goes the same direction it entered the smaller loop. This maintains proper knot geometry and prevents binding.
Tightening and Testing Technique
Moisten the entire knot with water or saliva before tightening. This lubrication prevents friction heat that can weaken the line and allows the knot to seat properly.
Pull the standing line steadily while holding the tag end to prevent slippage. The knot should draw down smoothly against the hook eye without binding or creating sharp bends.
Test the finished knot by pulling firmly on the standing line. A properly tied improved clinch knot should hold without slipping or showing signs of line damage.
Trim the tag end close to the knot, leaving about 1/8 inch to prevent unraveling. Too short risks the knot loosening, while too long can catch weeds or interfere with lure action.
The Versatile Champion: Uni Knot
The uni knot deserves a place in every angler’s repertoire because of its versatility and consistent performance across different line types and fishing situations. This knot adapts to various applications while maintaining excellent strength characteristics.
Uni Knot Advantages
The uni knot’s loop-based design distributes pressure evenly, reducing stress concentrations that cause knot failures. This design works equally well for terminal connections and line-to-line joining applications.
Unlike many knots, the uni knot maintains consistent strength across different line types. Whether you’re using monofilament, fluorocarbon, or braided line, proper tying technique yields reliable results.
The knot’s ability to slide allows it to self-adjust under load, often improving its grip rather than loosening. This self-tightening characteristic makes it particularly reliable during long fights with large fish.
Basic Uni Knot Method
Thread the line through the hook eye and double it back to create a loop alongside the standing line. The size of this loop affects working room—larger loops make wrapping easier but require more tag end length.
Pass the tag end through the loop and around both strands of line 5-7 times, depending on line type and diameter. Thicker lines need fewer wraps, while thin lines benefit from additional turns.
The wraps should lay neatly inside the loop without crossing or overlapping. Messy wraps create uneven loading that can cause premature failure under pressure.
Pull the tag end to snug the wraps together, then slide the knot down toward the hook eye by pulling the standing line. This sliding action seats the knot properly against the hook.
Advanced Uni Knot Applications
The double uni knot joins two lines by tying uni knots in each line that lock together. This technique works excellently for attaching leaders to main lines or joining different line types.
The uni loop variation creates a non-slip loop that allows lures more action. Simply don’t slide the knot all the way down to the hook eye, leaving a controlled loop size.
For extremely heavy lines or large hooks, the doubled uni uses doubled line throughout the tying process, creating extra strength for demanding applications.
The Strongest Option: Palomar Knot
When maximum strength matters more than tying speed, the Palomar knot delivers consistently high performance. This doubled-line design typically retains 85-95% of line strength when tied correctly.
Palomar Knot Strengths
The doubled line through the hook eye distributes loading across more line surface area, reducing stress concentrations. This design principle makes the Palomar knot one of the strongest options available.
The knot’s geometry creates multiple friction points that resist slippage even with smooth braided lines. The final loop passing over the hook or lure locks the entire assembly securely.
Professional tournament anglers often choose Palomar knots for critical applications where knot failure means lost fish and lost money. This real-world testing validates the knot’s reliability under extreme conditions.
Palomar Knot Technique
Double about 6 inches of line and pass the loop through the hook eye. Working with doubled line requires more tag end than single-line knots, so start with extra working length.
Tie a simple overhand knot with the doubled line, leaving the loop large enough to pass over the hook or lure. Don’t tighten this overhand knot yet—it needs to remain loose for the next step.
Pass the loop end over the entire hook or lure. For large lures or treble hooks, this step can be awkward, but it’s essential for proper knot function.
Wet the knot thoroughly and pull both the tag end and standing line simultaneously to tighten. The overhand knot should draw down against the hook eye while the loop locks everything in place.
Palomar Knot Limitations
Large lures or complex tackle arrangements make passing the loop over them difficult or impossible. In these cases, alternative knots like the uni or improved clinch work better.
The doubled line through the hook eye can be difficult with very thick lines or small hook eyes. Consider whether the hook eye has sufficient room before choosing this knot.
Some anglers find the Palomar knot slower to tie than alternatives, particularly in cold weather or low light conditions. Practice speeds up the process significantly.
For more advanced knot techniques, explore our comprehensive strongest fishing knot guide.
Line-to-Line Connections: Joining Different Lines
Many fishing situations require joining different line types—attaching leaders, repairing breaks, or connecting backing to main line. These connections need specialized knots designed for line-to-line applications.
Double Uni Knot for Line Joining
The double uni knot ties a uni knot in each line that lock together when pulled tight. This creates a strong, relatively compact connection between different line types or weights.
Start by overlapping the two lines by about 6 inches. Tie a uni knot in the first line around the second line, then repeat the process in reverse—tie a uni knot in the second line around the first line.
Pull the tag ends to snug each uni knot individually, then pull the standing lines in opposite directions to slide the knots together. The finished connection should be compact with the knots locked against each other.
Surgeon’s Knot Simplicity
The surgeon’s knot offers the simplest method for joining lines, requiring nothing more than overlapping the lines and tying two overhand knots. Despite its simplicity, it provides excellent strength.
Overlap the two lines by about 8 inches and treat them as a single strand. Tie a regular overhand knot, then pass the ends through the loop one additional time before tightening.
This creates a double overhand knot that grips both lines securely. While not the strongest line-to-line connection, it’s fast, reliable, and works well in most fishing situations.
Blood Knot for Similar Diameters
The blood knot creates the smoothest line-to-line connection, making it ideal for situations where the knot must pass through rod guides frequently. However, it only works well with lines of similar diameter.
Overlap the line ends and wrap each around the other 5-7 times. Bring both tag ends back to the middle and thread them through the center gap in opposite directions.
Pull both standing lines steadily to tighten the knot. The wraps should compress evenly, creating a streamlined connection that passes through guides smoothly.
Special Situation Knots
Certain fishing techniques or conditions require specialized knots designed for specific applications. Understanding when and how to use these knots expands your fishing capabilities.
Loop Knots for Lure Action
Loop knots allow lures to move more freely, creating better action and potentially more strikes. The non-slip loop knot provides a reliable way to create this effect.
Start with an overhand knot about 6 inches from the tag end, but don’t tighten it. Pass the tag end through the hook eye, then back through the overhand knot.
Wrap the tag end around the standing line 5-7 times, then pass it back through the overhand knot again. Tighten carefully while adjusting the loop size to your preference.
Snell Knots for Hook Efficiency
Snell knots tie directly to the hook shank rather than the eye, creating straight-line pull that can improve hook-setting efficiency. This technique works particularly well with bait fishing.
Start by passing the line through the hook eye and extending it well past the hook bend. Form a loop and begin wrapping both the tag end and standing line around the hook shank.
Make 5-8 tight wraps working toward the hook eye, then pass the tag end back through the hook eye in the same direction as the initial pass. Pull tight to compress the wraps against the shank.
Heavy Line Considerations
Very heavy lines (over 30-pound test) require modified techniques due to their stiffness and bulk. Standard knots may not tighten properly or may create too much bulk.
Reduce wrap counts in knots like the uni or improved clinch when using heavy lines. The increased line diameter provides more friction per wrap, making fewer turns sufficient.
Consider using double line for extra strength with heavy tackle. The Bimini twist creates a doubled section that can then be connected using standard knots with significantly increased strength.
For comprehensive tackle techniques, review our fly fishing basics for specialized line connections.
Common Mistakes and Troubleshooting
Even experienced anglers make knot-tying errors that can cost fish. Understanding common problems and their solutions prevents heartbreaking failures during critical moments.
Insufficient Lubrication Problems
Dry knots create friction heat during tightening that can significantly weaken the line. This damage often isn’t visible but creates weak points that fail under load.
Always wet knots thoroughly before final tightening. Water, saliva, or specialized knot lubricants work well. The key is reducing friction during the seating process.
Cold weather makes this even more critical since stiff lines generate more friction. Take extra time to lubricate knots properly when fishing in cold conditions.
Uneven Tightening Issues
Jerking knots tight quickly often creates uneven seating that weakens the connection. Gradual, steady pressure allows the knot components to align properly.
Pull knots tight slowly and steadily, maintaining pressure until fully seated. Watch for binding or sudden tightening that indicates uneven loading.
If a knot doesn’t tighten smoothly, cut it off and retie rather than forcing it. A poorly seated knot is unreliable regardless of the tying technique used.
Wrong Knot Selection
Using inappropriate knots for specific line types or applications causes unnecessary failures. Match your knot choice to your line type and fishing situation.
Avoid using monofilament-specific knots with braided line without modifications. The smooth surface of braid requires additional wraps or different knot designs entirely.
Similarly, don’t assume that because a knot works with light line it will work with heavy line. Adjust wrap counts and tightening techniques for different line diameters.
Tag End Length Errors
Tag ends that are too short risk unraveling, while those that are too long can catch weeds or interfere with lure action. Find the balance for each knot type.
Leave approximately 1/8 inch for most applications after trimming. This provides security without creating snag hazards.
For knots that tend to slip, like some applications with braided line, leave slightly longer tag ends or add a small drop of super glue for security.
Practice and Skill Development
Knot-tying proficiency comes through practice, but focused practice accelerates learning and builds the muscle memory essential for field conditions.
Home Practice Sessions
Set aside time for knot practice away from fishing pressure. Use old hooks and practice line to work on technique without wasting fishing time or good tackle.
Practice tying knots with your eyes closed or in low light conditions. Fishing often happens in less-than-ideal lighting, and muscle memory becomes crucial.
Time your knot tying to build speed. In fishing situations, quick reliable knots keep you fishing instead of fighting with tackle.
Different Conditions Training
Practice knot tying while wearing gloves to simulate cold weather fishing. Bulky gloves make fine motor control more difficult, requiring adjusted techniques.
Try tying knots with wet hands to simulate fishing conditions. Wet hands and slippery line create challenges different from dry practice sessions.
Practice with different line types to understand how each behaves. The techniques that work perfectly with monofilament may need modification for braided line.
Building Confidence
Start with one knot and master it completely before learning others. Confidence with one reliable knot serves better than mediocre ability with many knots.
Test your knots by pulling them to failure. Understanding how properly tied knots fail versus poorly tied ones helps identify problems before they cost fish.
Keep practicing throughout the fishing season. Skills deteriorate without use, and regular practice maintains proficiency.
For expert fishing guidance and advanced techniques, visit Take Me Fishing’s comprehensive knot tutorials and explore detailed instructional videos at KastKing’s educational resources.
Frequently Asked Questions
Q: Which fishing knot should I learn first?
A: Start with the improved clinch knot. It’s versatile, works with all line types, forgives minor errors, and handles 90% of fishing situations. Master this knot completely before learning others.
Q: How many wraps should I make in my fishing knots?
A: It depends on line type and diameter. For monofilament: 5-6 wraps in most knots. For braided line: 6-8 wraps due to its slippery surface. For thick lines over 30-pound test: reduce wraps by 1-2 to prevent bulk.
Q: Why do my knots keep slipping?
A: Usually caused by insufficient wraps for your line type, inadequate lubrication before tightening, or improper tightening technique. Make sure to wet the knot and pull steadily rather than jerking it tight.
Q: What’s the strongest fishing knot?
A: The Palomar knot typically provides the highest strength retention (85-95%) when tied correctly. However, the “strongest” knot is the one you can tie perfectly under fishing conditions.
Q: Should I use different knots for different line types?
A: While many knots work across line types, some perform better with specific materials. Braided line often needs extra wraps, fluorocarbon requires careful tightening, and monofilament is most forgiving of technique variations.
Q: How do I know if my knot is tied correctly?
A: A properly tied knot should tighten smoothly without binding, seat against the hook eye evenly, and hold firmly when tested with steady pressure. If it slips, binds, or looks uneven, retie it.