
Ever felt that heart-sinking moment when you set the hook, only to feel nothing? Or watched your prize lure sail off into the distance after a powerful cast? For anglers using braided line, these nightmares often stem from one common culprit: knot failure. Braided line is incredible – strong, sensitive, and incredibly thin for its breaking strain. But its unique properties also make it notoriously tricky to tie correctly.
Are you struggling to find a knot that holds tight with slick braid? Do your knots slip, cut into themselves, or simply unravel when you need them most? You’re not alone. Many anglers face this challenge. But with the right technique and the right knot, you can turn that frustration into fishing success. This guide will show you exactly how to tie braided fishing line effectively, ensuring your connections are rock-solid, every single time. Get ready to gain confidence and spend more time catching fish, not re-tying lines.
Why Braided Line Demands Different Knots
Braided line is a game-changer for many fishing situations, but you can’t treat it like traditional monofilament or fluorocarbon when it comes to knots. Ignoring its unique characteristics will lead to inevitable failure.
Braided Line Characteristics: The Knot Challenge
- Slippery and Smooth Texture: Unlike mono’s slight stretch and grippy surface, braid is incredibly slick. This means knots that rely on friction to hold (like many basic mono knots) often fail or slip with braid. Imagine tying a rope made of silk – it needs a different kind of knot to stay secure.
- Thin Diameter for Strength: While a huge advantage for casting distance and sensitivity, braid’s thinness means it can cut into itself under extreme pressure, especially if a knot isn’t designed to distribute that pressure evenly.
- Lack of Stretch: Braid has almost zero stretch. This sensitivity is great for feeling bites, but it also means there’s no give in the line when a knot is cinched down or put under sudden strain. The knot takes the full force of the impact directly.
Common Knot Failures with Braid
Because of these properties, using the wrong knot with braided line often results in:
- Slippage and Untying: The knot simply comes undone, often after just a few casts or a slight tug.
- Cutting Itself Under Pressure: The line digs into itself, weakening the connection and causing it to snap, even if the main line strength is much higher. This is often called “cinch failure.”
Importance of Specific Braid Knots
This isn’t just about avoiding frustration; it’s about maximizing your catch and protecting your gear. Knots specifically designed for braided line:
- Address the slippery nature of braid, ensuring they grip tightly.
- Distribute pressure evenly to prevent the line from cutting into itself.
- Retain a higher percentage of the line’s breaking strength, meaning your knot is almost as strong as the line itself.
If you’re already familiar with how to tie a fishing hook with mono, be prepared to adapt your technique for braid.
Read more: The 10 Best Braided Fishing Lines in 2025 (Tested & Reviewed)

Essential Knots for Tying Braided Line Directly
Sometimes, you need to tie your braided line directly to a hook, lure, or swivel. These knots are specifically designed to hold strong under those conditions.
The Palomar Knot: Your Go-To Direct Knot
The Palomar knot is widely considered one of the strongest and most reliable knots for tying braided line directly to terminal tackle. It’s relatively simple and retains a high percentage of line strength.
When to Use It:
- Tying braided line directly to hooks, swivels, snaps, or the eye of a lure.
- Wherever you need a super strong and reliable direct connection.
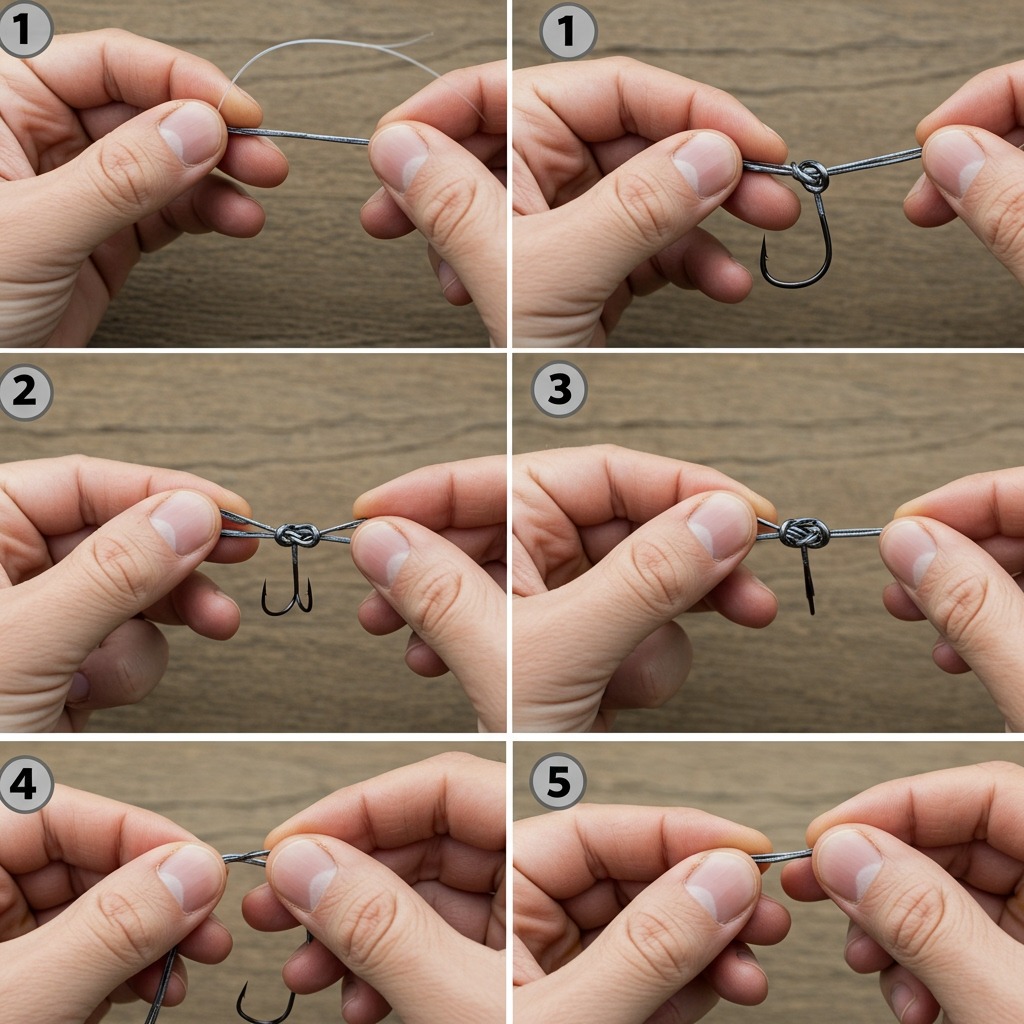
Step-by-Step Instructions:
- Double the Line: Take about 6-8 inches of line and double it over, creating a loop. Pass this loop through the eye of your hook, swivel, or lure.
- Overhand Knot: With the doubled line, tie a simple overhand knot. Make sure the hook or lure hangs freely below the knot. Do not pull it tight yet.
- Pass Loop Over: Take the loop you created and pass it over the hook, swivel, or lure.
- Moisten and Cinch: Hold the standing line and the tag end firmly. Pull slowly and evenly, guiding the loop down over the eye of the hook. Critically, moisten the knot with saliva before cinching it down. This lubrication prevents friction burn and ensures the knot seats properly. Pull until tight.
- Trim: Trim the tag end close to the knot, leaving about 1/8 inch.
The Improved Clinch Knot: A Versatile Option
While often taught for monofilament, the Improved Clinch can work with braid if you add extra turns and moisten it thoroughly. It’s a good general-purpose knot.
When to Use It:
- Another option for tying terminal tackle, especially if you’re already familiar with it.
Step-by-Step Instructions:
- Pass Through Eye: Pass the tag end of your braided line through the eye of your hook, swivel, or lure. Bring it back parallel to the main line.
- Twist the Tag End: Twist the tag end around the main line 5-7 times (more turns are better for braid).
- Back Through Loop: Pass the tag end back through the small loop formed just above the eye, and then through the larger loop you just created by twisting.
- Moisten and Cinch: Moisten the entire knot. Slowly pull the main line to cinch the knot down, ensuring the coils stack neatly.
- Trim: Trim the tag end close.
Uni Knot: Simple and Strong
The Uni knot is a versatile and popular choice that can be used for direct connections. It’s known for its simplicity and strength.
When to Use It:
- Tying to hooks, swivels, or directly connecting two lines of similar diameter.
Step-by-Step Instructions:
- Pass Through Eye: Pass the tag end through the eye of the hook. Double back parallel to the main line.
- Form a Loop: Bring the tag end back toward the hook and make a loop that crosses over both the tag end and the main line.
- Wrap Inside Loop: Wrap the tag end around the double line and through the loop 5-7 times.
- Moisten and Cinch: Moisten the line. Pull the tag end to tighten the wraps, forming a snug barrel around the main line.
- Final Cinch: Pull the main line to slide the knot down firmly against the eye of the hook. Trim excess tag end.
Master Braid-to-Leader Connections
Most serious anglers using braided main line opt for a leader. This is where knot strength truly becomes critical. Connecting braid to a monofilament or fluorocarbon leader requires specialized knots.
Why Use a Leader with Braided Line?
Leaders bridge the gap between your strong, sensitive braid and the natural presentation or abrasion resistance you need at the business end of your fishing setup.
- Abrasion Resistance: Braid is super strong but not very abrasion resistant. It can fray easily against sharp rocks, oyster shells, or fish teeth. Mono or fluorocarbon leaders offer far superior resistance.
- Invisibility: Fluorocarbon, in particular, is nearly invisible underwater, making your lure presentation more natural and less likely to spook wary fish.
- Shock Absorption: Mono leaders provide a little stretch, which acts as a shock absorber. This is crucial when a fish hits hard, preventing the braid’s lack of stretch from tearing the hook out of the fish’s mouth or breaking your knot.
- Proper Lure Presentation: Some lures perform better with a bit of stretch or specific leader material.
If you’re getting serious about your setup, you’ll want to understand how to line a fishing pole properly to get the most out of your braided main line and leader.
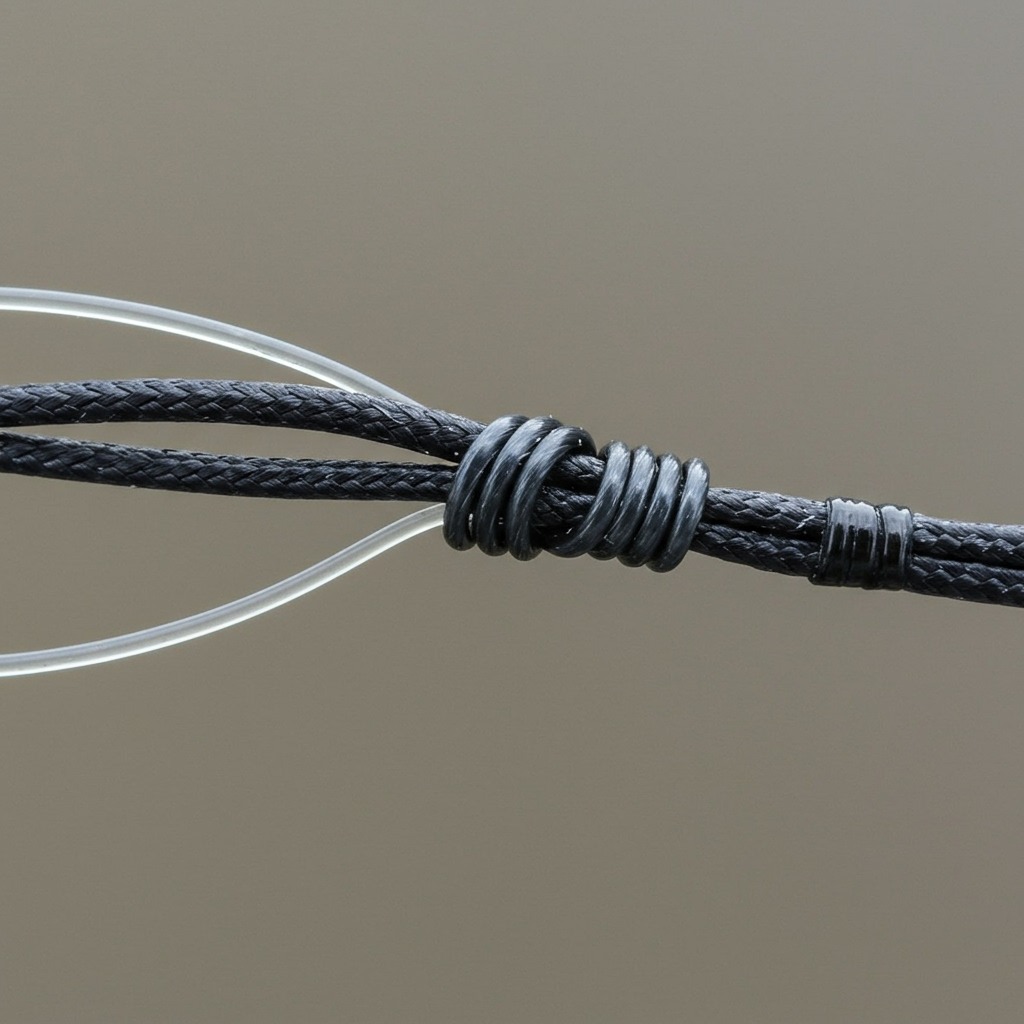
The FG Knot: The Gold Standard
The FG knot (Friction Knot) is a favorite among professional and experienced anglers. It’s incredibly strong, slim, and passes through rod guides smoothly. It has a steeper learning curve, but the effort is worth it.
Pros:
- Slim Profile: It creates a very low-profile connection that slides easily through rod guides, allowing for longer casts and preventing snags.
- Exceptional Strength: When tied correctly, it retains an incredibly high percentage of the line’s breaking strength.
- Versatile: Excellent for connecting braid to fluorocarbon or monofilament leaders.
When to Use It:
- Ideal for situations where casting distance and stealth are paramount, such as bass fishing or saltwater applications like surf fishing. It’s considered the best knot for braid-to-leader connections by many.
Detailed Step-by-Step Instructions (Simplified Overview, practice is key!):
- Setup: Hold the leader (mono/fluoro) horizontally in front of you, creating a small tension. Lay the braided line over it, at a 90-degree angle.
- First Wraps: Use your non-dominant hand to wrap the braid over and under the leader, alternating wraps. You’ll make about 10-15 wraps, keeping tension on the leader with your dominant hand.
- Reverse Wraps: Reverse the wrapping direction and make another 10-15 wraps, ensuring they stack neatly against the first set.
- Half Hitches: Secure the wraps with 2-3 half hitches (singly or paired) around the leader AND the tag end of the braid.
- Final Half Hitches: Trim the leader tag end close. Then, tie 3-5 more half hitches around only the main leader (not the tag end).
- Melt Tag (Fluorocarbon): For fluorocarbon, you can gently melt the tag end with a lighter to create a small mushroom cap, further securing it.
- Cinch: Moisten generously and slowly pull on the main braid and the main leader line until the knot is extremely tight and compact. This is critical for strength.
The Alberto Knot: Strong & Easier to Learn
The Alberto knot is a fantastic alternative to the FG knot. It’s strong and significantly easier to learn, making it a great choice for anglers who want a reliable connection without the complexity of the FG.
Pros:
- Excellent strength retention.
- Relatively easy to tie compared to the FG.
- Slightly larger profile than FG, but still passes through guides well.
When to Use It:
- A reliable braid-to-leader connection for most freshwater and inshore saltwater fishing.
Step-by-Step Instructions:
- Fold Leader: Fold your leader (mono/fluoro) about 6 inches from the end, creating a loop.
- Pass Braid Through: Pass your braided line through the inside of this loop.
- Wrap Up the Leader: Wrap the braid up the doubled leader 7-10 times.
- Wrap Down the Leader: Now, wrap the braid down the doubled leader, overlapping the previous wraps, another 7-10 times.
- Pass Braid Back: Pass the braided line back through the original loop you created, going in the opposite direction you came out.
- Moisten and Cinch: Moisten the knot. Slowly pull both main lines (braid and leader) simultaneously. The knot should tighten evenly. Then pull the tag ends to fully seat the knot.
- Trim: Trim both tag ends close.
The Double Uni Knot: Popular & Reliable
The Double Uni knot is one of the most popular and easiest braid-to-leader knots to learn. It’s widely used and quite dependable.
Pros:
- Very easy to tie, even in low light or on a boat.
- Offers good strength.
- Versatile for various line types and diameters.
When to Use It:
- A great all-around knot for connecting braided line to a leader, especially for beginners or when you need a quick, reliable connection.
Step-by-Step Instructions:
- Overlap Lines: Lay your braided main line and your leader line parallel to each other, overlapping by about 6-8 inches.
- Tie Uni on Leader: With the braided line, tie a Uni knot around the leader line. Make 5-7 turns around the leader and through the loop. Cinch it down lightly.
- Tie Uni on Braid: With the leader line, tie a Uni knot around the braided main line. Make 5-7 turns around the braid and through the loop. Cinch it down lightly.
- Pull Together: Moisten both knots. Slowly pull the main lines (braid and leader) in opposite directions. The two Uni knots will slide together and jam tight.
- Trim: Trim both tag ends close.
Critical Tips for Tying Knots with Braided Line
Knowing the knots is half the battle. Applying these tips will ensure your knots perform flawlessly every time.
Moisten Your Knots: Always!
This is perhaps the most important tip for braided line. Lubricating the knot (with saliva or water) before cinching it down reduces friction heat. Friction can literally melt or weaken braided fibers, leading to a drastically compromised knot strength. Don’t skip this step!
Cinch Down Slowly and Firmly
Don’t yank! When tightening any knot with braid, pull slowly and steadily. This allows the wraps to settle correctly and prevents the line from cutting into itself. Once the knot is seated, apply firm, even pressure to ensure it’s locked down.
Trim Tag Ends Close
Excess tag end can snag on weeds, debris, or even rod guides, leading to weakened knots or line breakage. Trim them as close as possible without cutting into the knot itself.
Practice, Practice, Practice
Knot tying is a skill, and like any skill, it improves with repetition. Practice these knots at home until you can tie them quickly and confidently, even with cold hands or in low light. This preparation will save you frustration and lost fish on the water. You can tie knots even when you’re just relaxing after a day of camping, enjoying some easy camping meals for family.
Inspect Your Knots Regularly
Before every outing, and periodically throughout your fishing trip, visually inspect your knots for any signs of fraying, slippage, or damage. A quick inspection can prevent a heartbreak. For a comprehensive overview of essential fishing knowledge, you might want to review fly fishing basics.
Consider Super Glue (Optional for some knots/situations)
For certain knots or situations where maximum security is desired, a tiny drop of super glue on the finished knot (away from the main line) can add an extra layer of security, especially with very fine diameter braids. Use sparingly and carefully.
Conclusion: Confidence on the Water
Braided fishing line offers incredible advantages, but only if you master its unique knot-tying requirements. By learning how to tie braided fishing line with the right techniques – whether for direct connections to your lure or for solid braid-to-leader junctions – you eliminate the weakest link in your fishing system. No more mysterious break-offs or frustrating moments re-tying.
Take the time to practice these essential knots. The Palomar, FG, Alberto, and Double Uni knots are your strongest allies. Once you can tie them with confidence, you’ll spend less time fiddling with your tackle and more time with your line in the water, feeling every bite, and successfully landing more fish. Go forth, cast confidently, and enjoy your fishing adventures!
Frequently Asked Questions About Tying Braided Fishing Line
Q1: Why do my knots slip with braided line?
A1: Braided line is very slick and lacks the stretch of mono, causing common knots to slip. You need knots specifically designed for braid’s properties, like the Palomar (for terminal tackle) or the FG/Alberto/Double Uni (for leaders). Always moisten and cinch slowly.
Q2: What is the best knot for connecting braided line to a leader?
A2: The FG knot is widely considered the strongest and most efficient, offering a very slim profile. However, it can be difficult to learn. The Alberto knot and Double Uni knot are excellent, easier-to-tie alternatives that still offer great strength.
Q3: Can I use a regular Uni knot for braid?
A3: While a regular Uni knot can be used for braid, it’s generally recommended to add more turns (7-10 turns instead of 5-6) and ensure it’s thoroughly moistened and slowly cinched to maximize its strength and prevent slippage. The Palomar knot is often preferred for direct braid connections.
Q4: Do I really need to moisten my knots?
A4: Absolutely, especially with braided line! Moisten your knots with saliva or water before cinching them down. This lubrication reduces friction heat, which can weaken or melt the synthetic fibers of braided line, ensuring the knot seats properly and retains its full strength. This is a critical step for preventing premature line failure.
Q5: What’s the biggest mistake people make when tying braid knots?
A5: The most common mistake is not cinching the knot down slowly and firmly, or not moistening it. This leads to friction burn, improper seating of the knot, and ultimately, knot failure. Taking your time and applying these two simple steps will drastically improve your knot strength.
Q6: Should I use super glue on my braided knots?
A6: Super glue can add an extra layer of security, particularly for leader knots like the FG or Alberto, and especially when using very fine diameter braid or fluorocarbon. Apply a tiny drop after the knot is fully tied and cinched, ensuring it only hits the knot and not the main line. It’s an optional step but can provide peace of mind. For more fishing tips, you might find our fishing in the rain guide helpful for all weather conditions.