
Ever lost that trophy fish because your knot failed? Or perhaps spent frustrating minutes fumbling with your line, wishing you had a simpler, more reliable way to attach your lure? You’re not alone. Every angler, from beginner to seasoned pro, knows the pain of a weak knot. It’s the weakest link in your fishing setup, and it can make or break your day on the water.
But what if there was a knot that was not only incredibly strong but also surprisingly easy to tie? A knot so reliable that it has become a staple for countless anglers worldwide?
Enter the Palomar Knot. This powerhouse of a knot is celebrated for its exceptional strength and straightforward tying process. It’s a game-changer, especially when you need a connection that won’t let you down. Learning how to tie a Palomar knot effectively is one of the most valuable skills you can add to your angling arsenal. Forget complex braids and intricate weaves; the Palomar offers maximum security with minimal fuss. Ready to transform your fishing game and ensure your line holds strong when it matters most? Let’s dive in.

Why Choose the Palomar Knot? Unrivaled Strength & Simplicity
The angling world is full of knots, each with its proponents and specific uses. But the Palomar Knot consistently rises to the top for very good reasons. It’s not just another knot; it’s a fundamental connection that delivers where others fall short.
Exceptional Strength
When we talk about knot strength, we’re talking about how much of the original line’s breaking strength the knot retains. Many knots significantly reduce the line’s strength at the connection point. The Palomar Knot? It’s renowned for retaining nearly 100% of your fishing line’s breaking strength. This means your line is far more likely to break somewhere along its length than at the knot itself. This isn’t just a claim; it’s backed by countless tests and the experience of anglers who trust it with their biggest catches. Knowing your knot will hold gives you confidence when fighting a powerful fish. For further insights into the strongest knots, check out our guide on the strongest fishing knot.
Simplicity: Easy to Learn and Tie
You might think a knot this strong would be complicated, but that’s where the Palomar truly shines. Its tying sequence is surprisingly intuitive, making it one of the easiest strong knots to master. You can learn it in minutes, even if you’re new to fishing. This simplicity is a huge advantage, especially when you’re out on the water, battling cold fingers, low light, or a sudden burst of activity. You won’t be fumbling when the fish are biting.
Versatility: Ideal for Various Line Types and Tackle
The Palomar Knot is incredibly versatile, making it a go-to for a wide range of fishing situations.
- Braided Line: It’s particularly favored for braided lines. Braided lines are notoriously slippery and require knots that can bite down firmly. The Palomar’s unique structure cinches down effectively on braid, preventing slippage that can plague other knots. If you’re into bass fishing, you know braid is often preferred, making the Palomar indispensable.
- Fluorocarbon and Monofilament: While excellent for braid, it also performs exceptionally well with monofilament and fluorocarbon lines, especially in lighter to medium strengths. It creates a compact, strong connection with these lines too.
- Lures, Hooks, Swivels: The Palomar is perfect for attaching a variety of terminal tackle. Whether you’re tying on a lure, a single hook, or a swivel, this knot provides a direct, reliable connection. This versatility reduces the number of different knots you need to learn.
Why it might be the strongest fishing knot you know
Its combination of high breaking strength and ease of tying puts it in a league of its own for many anglers. It’s a workhorse knot that consistently performs, reducing knot failure and maximizing your chances of landing a fish.
Step-by-Step: How to Tie a Palomar Knot Like a Pro
Ready to learn how to tie a Palomar knot? Grab some fishing line and a hook, and let’s get started. Practice this a few times, and it will become second nature.
Preparation: Gather Your Line and Tackle
Before you begin, make sure you have:
- Your fishing line (the main line you’re tying with).
- Your terminal tackle (a hook, lure, or swivel).
- A pair of line clippers or scissors.
The Process: Visual & Textual Emphasis
Follow these steps carefully. Visualization is key, so if you’re learning visually, watching a video demonstration like those found on YouTube can be incredibly helpful alongside these instructions.
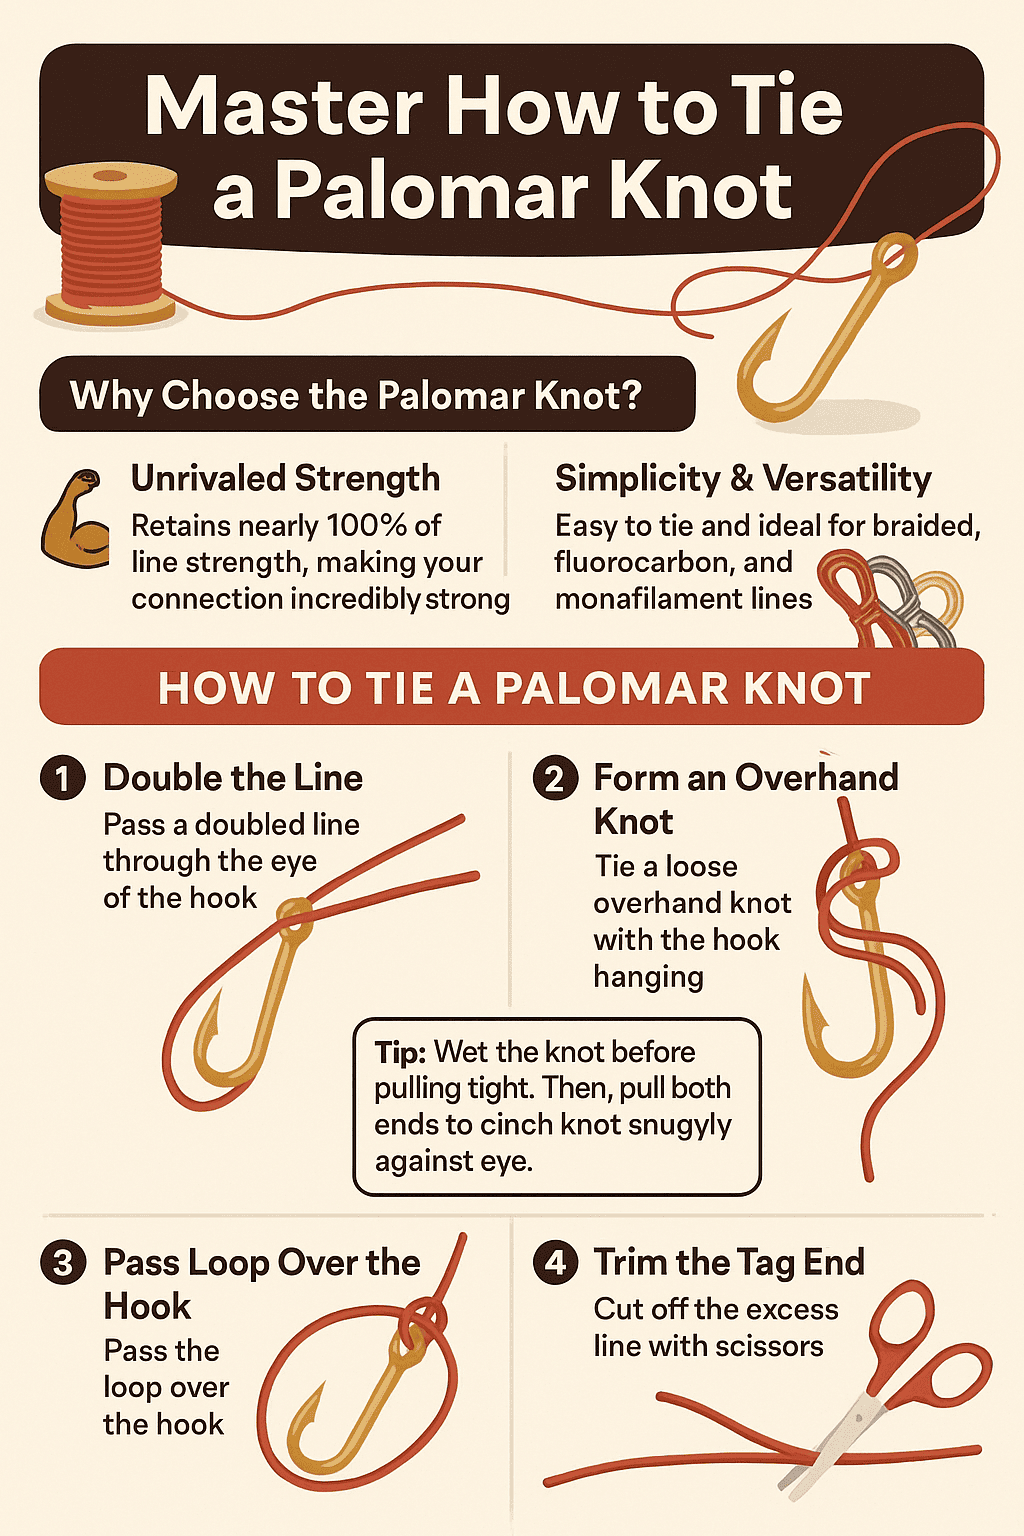
- Double the Line: Take about 6-8 inches of your fishing line and double it over, creating a loop. Pass this doubled-over end through the eye of your hook, lure, or swivel. Ensure you have enough tag end to work with comfortably.
- Pro Tip: The size of the loop you create now will dictate how easy it is to pass the hook through later. Make it generous.
- Form an Overhand Knot: With the doubled line, tie a simple overhand knot. This means you’ll loop the doubled line around itself, just like the first step of tying your shoelaces, but ensure the hook or lure hangs freely below this knot. Do not pull this knot tight yet; keep it loose.
- Pass the Loop Over: This is the most crucial step. Take the large loop that you just created by tying the overhand knot. Pass this entire loop over the hook, lure, or swivel. The goal is for the hook/lure to be completely inside this large loop. This can be tricky with larger lures or smaller hook eyes, but it’s essential for the knot’s integrity.
- Wet the Knot: Before you pull the knot tight, it’s vital to lubricate the line. Use saliva or water to wet the entire knot. This step reduces friction as the knot cinches down, preventing damage to your fishing line from heat build-up, which can weaken it significantly.
- Pull Tight: Now, hold the standing line (the main line going to your rod) in one hand and the tag end (the short, loose end) in the other. Pull steadily and slowly on both ends simultaneously. You’ll see the knot cinch down firmly against the eye of the hook or lure. Ensure it pulls down neatly and compactly.
- Trim Excess: Once the knot is fully cinched and secure, use your line clippers to trim the excess tag end. Cut it close to the knot, leaving just about 1/8th of an inch. A neat trim prevents tangles and snags.
Palomar Knot Pro Tips & Common Mistakes to Avoid
Tying a Palomar Knot is straightforward, but a few key details can make all the difference between a bomb-proof connection and a weak link.
Always Wet the Line
This tip bears repeating. Skipping the “wetting” step is a common mistake that can seriously compromise the knot’s strength. Dry line creates friction and heat, causing the line to weaken as it’s pulled tight. Always lubricate before cinching.
Ensure the Loop Clears
When you pass the hook or lure back through the large overhand loop, make absolutely certain that the entire tackle piece clears the loop. If part of the hook or lure gets caught, the knot will not cinch correctly and will be significantly weaker. Double-check this step every time.
Cinching Properly
Pull the knot tight slowly and evenly. Don’t yank it suddenly. A slow, steady pull allows the knot to seat properly and minimize stress on the line. Make sure it’s snug against the eye of the hook, but avoid over-tightening to the point of deforming the line.
Mind the Tag End
Trim the tag end close, but not too close. Leaving a tiny bit (1/8th inch or so) provides a small buffer against slippage, especially with braided lines that might move slightly under extreme tension.
Avoiding Twisted Lines
As you perform the steps, try to keep your line as straight as possible. Avoid excessive twisting of the main line or tag end during the process. This helps the knot form cleanly and minimizes kinks that can weaken the line.
When to use it for different types of fishing
The Palomar knot is a solid choice for a wide array of fishing techniques. It’s particularly popular in freshwater for species like bass fishing, where strength and quick re-tying are crucial. It’s also excellent for general purpose freshwater and light to medium saltwater applications, especially when attaching lures and hooks. Its reliability makes it a top choice for situations where you can’t afford knot failure.
When to Use the Palomar Knot (and When Not To)
While the Palomar Knot is a superstar, no knot is perfect for every single scenario. Knowing its strengths and limitations helps you choose wisely.
Best For:
- Attaching Hooks, Swivels, Lures, Flies: This is its bread and butter. The Palomar provides a strong, direct connection to any terminal tackle with an eye.
- Braided Lines: As mentioned, it’s a top contender for braided lines due to its ability to grip the slick material firmly and resist slippage.
- Light to Medium Monofilament/Fluorocarbon: For lines up to around 20-30 lb test, the Palomar offers excellent strength and a relatively small profile. It’s a reliable choice for these common line types.
- Situations Requiring Speed: Its simplicity means you can tie it quickly, which is valuable when you’re in the middle of a hot bite or needing to re-rig quickly.
Less Ideal For:
- Very Large/Bulky Lures or Hooks with Small Eyes: The main challenge arises when you can’t easily pass the large loop over the entire hook or lure. If the eye is too small, or the lure is too bulky, this step becomes difficult or impossible, making other knots like the Improved Clinch a better alternative.
- Very Heavy Monofilament/Fluorocarbon: For extremely heavy mono or fluorocarbon (e.g., 50 lb test and up), the Palomar knot can become quite bulky and may not seat as neatly as other knots designed for thicker lines. In these cases, a Uni knot or similar might be preferred for a more streamlined connection.
- Joining Two Lines Together: The Palomar knot is an “end knot” (for attaching line to tackle), not a “joining knot” (for connecting two lines). For joining lines, you’d use knots like the Double Uni or Blood Knot. Learning how to tie two fishing lines together is a separate but equally important skill.

Practice Makes Perfect: Become a Knot-Tying Master
You’ve learned how to tie a Palomar knot. Now, the real work begins: practice. You wouldn’t wait until you’re on the water, with a prize fish on the line, to try tying this knot for the first time, would you?
Don’t Wait Until You’re on the Water
Practice tying the Palomar Knot in a relaxed environment at home. Use a thicker piece of rope or heavy string first, as it’s easier to see the loops and understand the mechanics. Once you’re comfortable, switch to actual fishing line.
Tips for Practice
- Use Thicker Rope: Start with a thick cord. The larger scale helps your hands learn the motions.
- Watch Videos Repeatedly: If you’re a visual learner, rewatch video tutorials from reputable sources. Pay attention to the subtle hand movements.
- Set up your fishing rod and practice attaching different lures to get a feel for how the knot performs with various tackle. Learning how to set up a fishing rod from start to finish will enhance your overall readiness.
- Practice in Varying Conditions: Try tying it with your eyes closed, or in dim light. This simulates real-world fishing conditions where visibility might be poor.
Importance of Checking Your Knots Regularly
Even a perfectly tied knot can weaken over time due to stress, abrasion, or UV exposure. Always check your knot after landing a fish, after hitting snags, or if you feel any unusual resistance. Re-tie it if you notice any fraying, slippage, or damage. A few seconds spent re-tying a knot can save you from losing the catch of a lifetime.
FAQ Section
Q: Is the Palomar knot the strongest knot for all lines?
A: The Palomar knot is one of the strongest knots for connecting fishing line to hooks, lures, or swivels, especially with braided line. It retains a very high percentage of line strength. However, for very heavy monofilament or fluorocarbon lines, or for joining two lines, other knots might be more suitable.
Q: Can I tie a Palomar knot with fluorocarbon leader?
A: Yes, the Palomar knot can be tied with fluorocarbon leader, particularly in lighter to medium strengths. However, due to fluorocarbon’s stiffness and memory, it can sometimes be a bit more challenging to cinch perfectly. Always wet the line thoroughly before tightening.
Q: What’s the biggest mistake people make with the Palomar knot?
A: The most common mistake is failing to lubricate the knot before cinching it down. Tying it dry creates friction and heat, which can weaken the line significantly at the knot. Another common error is not ensuring the hook or lure fully clears the loop in step 3, leading to an improperly formed and weak knot.
Q: How do I know if my Palomar knot is tied correctly?
A: A correctly tied Palomar knot will look neat and compact. There should be no crossed lines within the knot itself. When gently pulled, it should cinch down tightly against the eye of the hook/lure without any visible gaps or loose coils. The tag end should be trimmed closely.
Q: What are some other essential fishing knots to learn?
A: Besides the Palomar, other essential knots for anglers include the Improved Clinch Knot (for attaching lures/hooks, especially good for monofilament), the Uni Knot (versatile for attaching tackle and joining lines), and the Blood Knot or Double Uni Knot (for joining two lines together). Learning how to tie a fishing hook with various knots broadens your capabilities on the water.
Mastering how to tie a Palomar knot is a fundamental skill that will boost your confidence and success in fishing. It’s a simple, strong, and versatile knot that will serve you well whether you’re targeting bass in a local lake or casting for bigger game in the open sea. Practice it, trust it, and enjoy the thrill of knowing your connection is solid. Happy fishing!