
There’s nothing quite like gathering around a crackling campfire. The warmth, the mesmerizing flames, the shared stories, the roasted marshmallows – it’s the quintessential camping experience. But let’s be honest, getting that perfect blaze going isn’t always as easy as it looks on a postcard. Have you ever found yourself wrestling with damp wood, fighting a stubborn spark, or watching helplessly as a puff of smoke dies out? You’re not alone. Mastering how to start a campfire is a fundamental outdoor skill, and it’s one that brings incredible satisfaction.
A reliable fire isn’t just about ambiance; it’s about warmth, cooking your meals, deterring insects, and even providing a sense of security in the wilderness. It’s a skill that elevates your outdoor adventures, turning frustration into triumph. I’m here to give you the clear, direct steps you need to build a fire successfully, every time. Forget the guesswork and the smoky false starts. We’re going to cover everything from crucial safety checks to the best techniques for nurturing a roaring fire, no matter the conditions.
Safety First: The Golden Rules of Campfires
Before you even think about striking a match, safety has to be your absolute top priority. A campfire, while beautiful, is a powerful force that demands respect. Ignoring these rules can lead to devastating consequences, not just for your trip, but for the environment and others.
A. Check Fire Restrictions: Local Regulations are Paramount
This is non-negotiable. Always, always check local fire restrictions before you head out. Conditions can change rapidly due to drought, wind, or other factors. What was allowed yesterday might be banned today.
- Where to check: Park websites, local ranger stations, campground hosts, or state forestry divisions.
- Why it matters: Fire bans are put in place for a reason – to prevent wildfires. Violating them can result in hefty fines or worse.
B. Choose Your Site Wisely: Location, Location, Location
The spot you choose for your campfire is critical.
- Use Existing Fire Rings: If available, use a designated fire ring. These are designed for safety and convenience.
- Clearance Around the Fire: Ensure there’s a 10-foot diameter clear area around your chosen spot, down to bare soil. Remove all dry grass, leaves, twigs, and any other flammable materials that could catch fire.
- Away from Overhanging Branches: Always look up. Make sure there are no low-hanging branches or other flammable objects directly above your fire ring.
- Water Source Nearby: Always have a bucket of water, a shovel, or even a fire extinguisher within arm’s reach. You need to be prepared for any unexpected flare-ups. This is a key part of responsible camping for beginners.
C. Never Leave a Fire Unattended: A Moment of Carelessness Can Cost Dearly
This rule is simple: if you’re not actively watching your fire, it’s not safe. Even a dying ember can spark a blaze.
- Stay Present: While the fire is burning, someone must be with it.
- Before Bed/Leaving: Ensure the fire is completely extinguished before you turn in for the night or leave your campsite.
D. Extinguish Completely: Drown, Stir, Drown
Putting out a fire is just as important as starting it. A smoldering ember can reignite hours later, especially with a gust of wind.
- Drown: Pour plenty of water onto the fire. You should hear hissing.
- Stir: Use a shovel or stick to stir the ashes and embers. This helps water penetrate and cools everything down.
- Drown Again: Add more water until everything is cold to the touch. You should be able to run your hand through the ashes without feeling any heat. If you’re primitive camping, this step is even more critical as you’re in a less controlled environment.
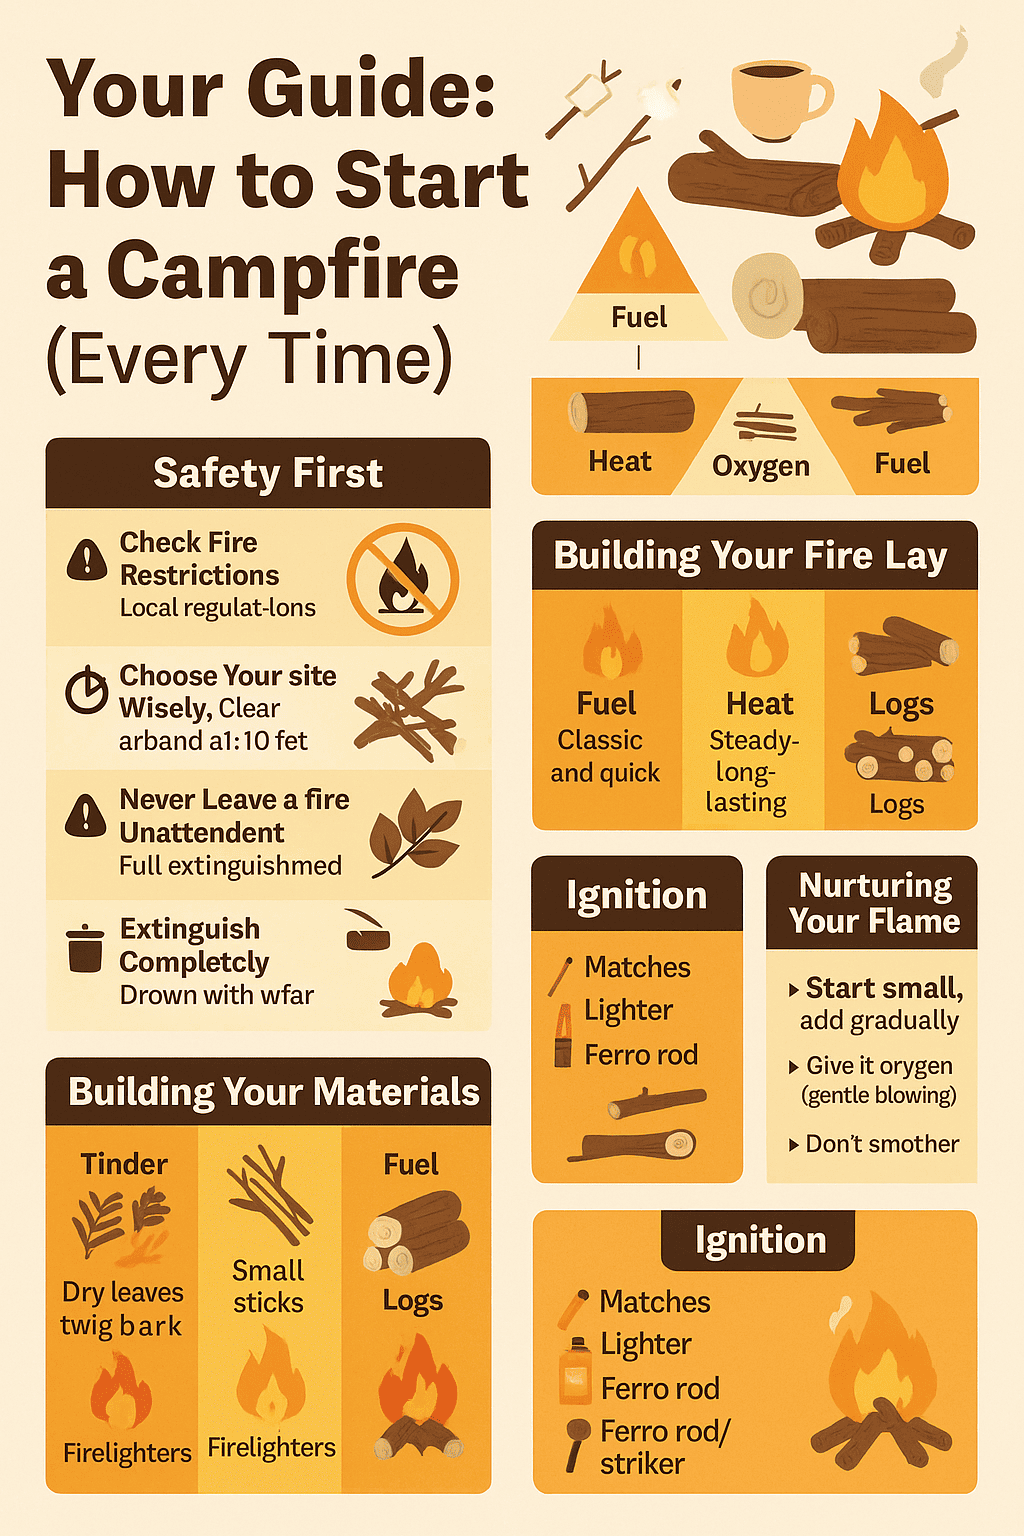
The Fire Triangle: Fuel, Heat, Oxygen
Every successful fire relies on three core components, often called the “fire triangle.” Understanding this principle is your key to consistent fire starting.
A. Fuel: The Material That Burns
This is anything that can catch fire and sustain a flame. In a campfire, this primarily means wood.
B. Heat: The Ignition Source
This is what gets the fire started – your spark, flame, or friction.
C. Oxygen: The Air It Breathes
Fire needs air to burn. Without enough oxygen, even the best fuel and heat won’t produce a flame. This is why good airflow in your fire lay is crucial.
Gathering Your Materials: The Three T’s (Tinder, Kindling, Fuel)
Before you light anything, you need to collect all your materials. Think of it as building your fire in reverse. Don’t start lighting until you have everything you need. This is a common beginner mistake that leads to frustration.
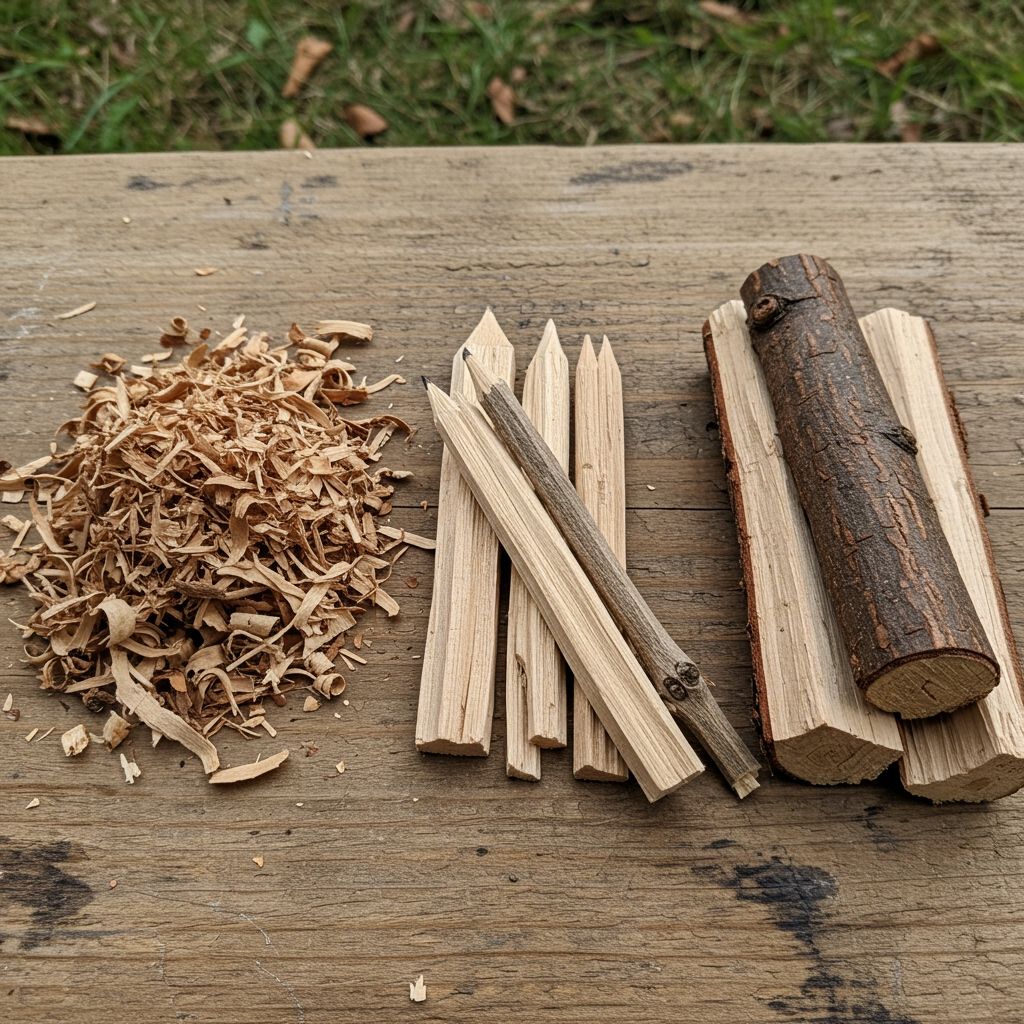
A. Tinder: The Spark Catchers
Tinder is the smallest, most flammable material that will catch a spark or tiny flame and burn long enough to ignite your kindling.
- What to look for:
- Birch bark (peeling, paper-thin pieces)
- Dryer lint (great for emergency kits)
- Cotton balls (especially those soaked in petroleum jelly)
- Fine wood shavings (scraped from dry wood)
- Dried grass or leaves (only if completely dry and brittle)
- Pine needles (if very dry, can be smoky)
- Commercial fire starters (fire starter squares, fatwood)
- Why it needs to be bone dry: Even slightly damp tinder will refuse to ignite or smolder out. If your tinder isn’t perfectly dry, it won’t work. Keep it in a waterproof bag.
B. Kindling: The Bridge to Bigger Flames
Kindling is slightly larger than tinder, typically pencil-sized sticks or smaller, that can catch fire from burning tinder and burn hot enough to ignite your larger fuel wood.
- Small sticks, pencil-sized: Look for twigs and small branches. They should snap cleanly when bent, indicating they are dry.
- How to break them down: Break them into manageable lengths that fit easily within your fire ring. Start with finger-sized pieces and gradually increase to wrist-sized.
C. Fuel Wood: The Long-Burners
Fuel wood is the main bulk of your fire – larger pieces of wood that will sustain a long, hot burn.
- Varying sizes (wrist to forearm): Collect a range of sizes. Start with smaller pieces that will catch from your kindling, and gradually add larger logs as the fire grows.
- Hardwood vs. Softwood:
- Hardwood (Oak, Maple, Hickory): Burns longer, hotter, and produces more coals. Great for sustained heat and cooking.
- Softwood (Pine, Fir, Cedar): Burns faster, produces more smoke, and sparks. Good for getting a quick fire going but doesn’t last as long.
- The “dead and down” rule: Only collect wood that is dead and has fallen to the ground. Never cut live trees or branches, as this harms the forest and live wood burns poorly. Look for dry wood that is elevated off the damp ground. For more on responsible outdoor practices, consider learning about primitive camping principles.
Building Your Fire Lay: The Art of Stacking
The way you arrange your tinder, kindling, and fuel is crucial for airflow and ignition. There are a few classic methods, each with its strengths.
A. Teepee Lay: Classic and Quick Starting
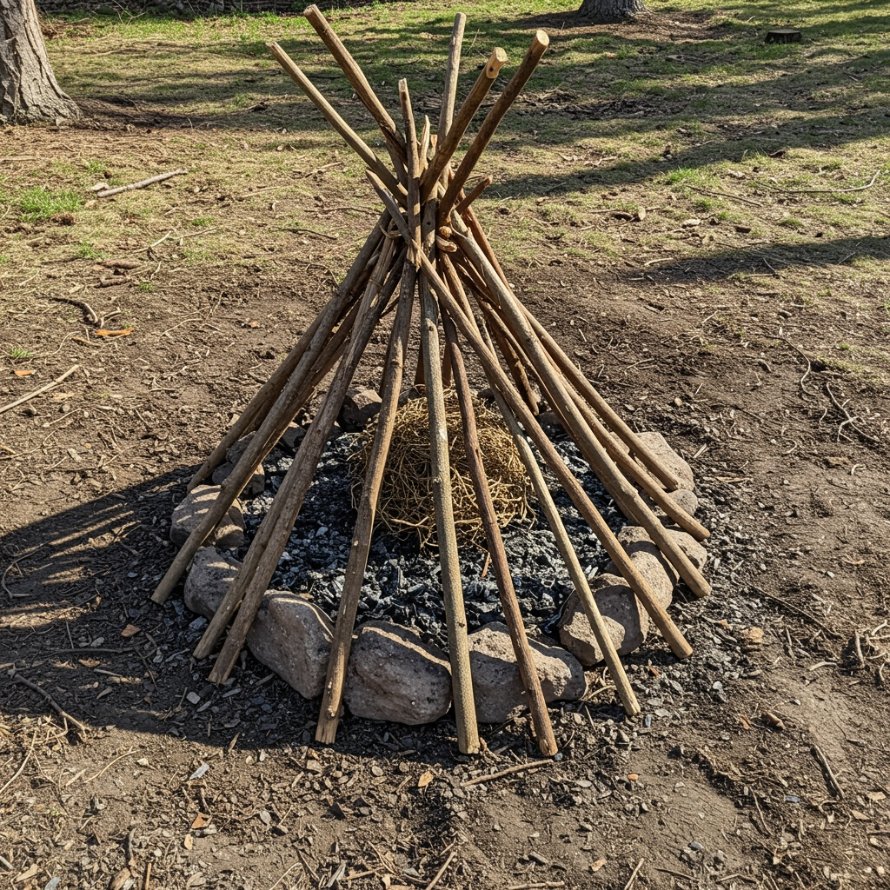
The Teepee lay is fantastic for getting a quick, hot flame. It allows for excellent airflow and directs heat upwards, quickly igniting the kindling.
- How to build it:
- Place your pile of tinder in the center of your cleared fire area.
- Arrange your smallest kindling sticks around the tinder in a teepee or cone shape, leaving gaps for airflow.
- Lean progressively larger kindling sticks against the structure.
- You can add a few small fuel wood pieces in a similar teepee shape if you have them.
- Best for quick fires or cooking: Excellent for getting a kettle boiling or quickly getting coals for cooking.
B. Log Cabin Lay: Steady, Long-Lasting Burn
The Log Cabin lay provides a stable structure that burns steadily and creates a good bed of coals.
- How to build it:
- Place your tinder in the center.
- Build a square or rectangular structure around the tinder with kindling, stacking two parallel pieces, then two on top perpendicular to them, like building a miniature log cabin.
- Gradually add larger fuel wood logs to the structure as the fire grows.
- Great for warmth and sustained cooking: Ideal for an evening campfire where you want warmth and a consistent cooking surface.
C. Lean-To Lay: Good for Windy Conditions
The Lean-To lay is useful when you need to protect your initial flame from wind or moisture.
- How to build it:
- Drive a larger piece of kindling or a small log into the ground at an angle.
- Place your tinder underneath the angled stick.
- Lean smaller kindling sticks against the main angled stick, over your tinder.
- Add larger kindling and eventually fuel wood, leaning them against the structure to provide shelter for the flame.
- Provides protection from wind: The angled structure acts as a natural windbreak.
Ignition: Bringing the Heat

Once your fire lay is built, it’s time to introduce heat. Always have multiple ignition sources.
- Matches (waterproof): Simple, reliable. Waterproof matches are a game-changer.
- Lighters: Standard Bic lighters are excellent. Keep one protected from the elements.
- Ferro Rod/Striker: A primitive yet incredibly effective tool. Scrape sharply to create hot sparks. This is especially reliable in wet conditions compared to matches.
- Paper/Cardboard (sparingly): A small amount of paper or cardboard can help, but avoid excessive amounts as it creates a lot of ash and doesn’t provide sustained heat.
Nurturing Your Flame: From Spark to Blaze
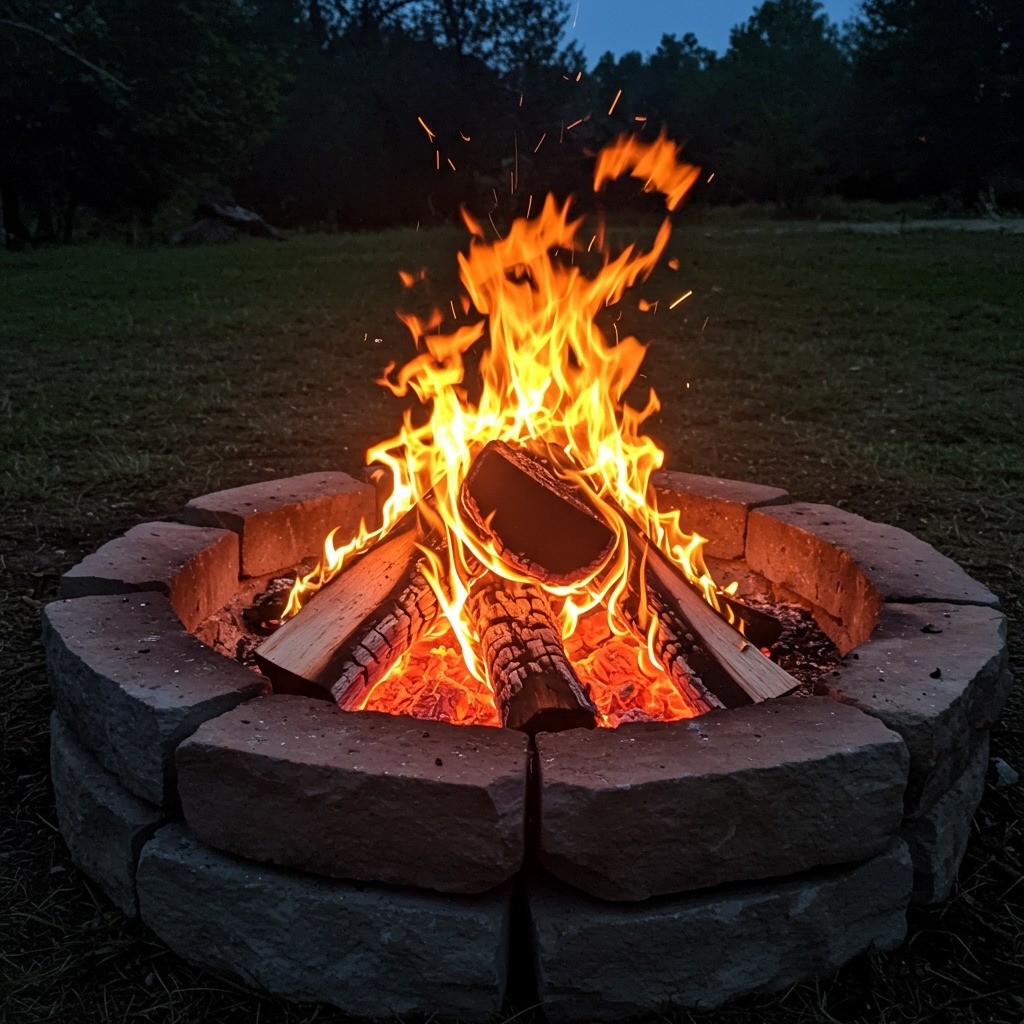
Lighting the tinder is just the beginning. The real skill is in nurturing that tiny flame into a roaring fire.
- Start Small, Add Gradually: Don’t try to add a giant log to a small flame. Feed the fire slowly, moving from tinder to the smallest kindling, then progressively larger kindling, and finally to your fuel wood. Patience is key.
- Give It Oxygen (Gentle Blowing): If your flame is struggling, gently blow on the base of the fire. This provides a fresh supply of oxygen, fueling the combustion. Be careful not to blow too hard and extinguish the flame.
- Don’t Smother: Ensure there’s always space for air to circulate through your fire lay. Overcrowding your fire with too much wood too quickly will starve it of oxygen and produce smoke instead of flame.
Troubleshooting: When Your Fire Won’t Cooperate
Even with the best preparation, campfires can be finicky. Here are some common issues and how to tackle them.
- Smoky Fire: Not Enough Oxygen or Wet Wood.
- Solution: Create more space in your fire lay for air circulation. Lift logs slightly if they’re too close. If the wood is hissing or bubbling, it’s wet. Try to find drier wood or elevate existing wood to dry out.
- Won’t Stay Lit: Not Enough Tinder/Kindling, or Damp Materials.
- Solution: Go back to basics. You need a solid bed of super-dry tinder to catch the spark, and enough kindling to burn long enough to get the small fuel wood going. Ensure all your materials are dry. For more survival skills, learning how to read a topographic map can also help you find better, drier fuel sources.
- Wind Issues: Adjust Your Fire Lay or Add a Windbreak.
- Solution: Use a Lean-To lay or build a small rock wall (outside your fire ring) on the windward side to protect the flame. Don’t build rocks directly in the fire as they can explode if they contain moisture.
- Camping in the rain: Finding Dry Materials.
- Solution: This is tough. Look for wood under fallen logs, inside hollow trees, or on the underside of branches that are off the ground. Scrape off the wet outer layers of wood to expose dry core wood. You might need to use more prepared fire starters like cotton balls soaked in petroleum jelly.
Responsible Campfire Etiquette
Building a fire is a privilege, and it comes with responsibility. Adhere to Leave No Trace principles to minimize your impact.
- Leave No Trace Principles: Pack out everything you pack in. Burn wood completely to ash. Don’t leave trash or food scraps in the fire pit.
- Packing Out Unburned Materials: Any unburned wood or debris should be packed out or scattered far from the campsite once the fire is cold. Don’t just leave a pile of charred logs.
FAQ: Your Campfire Questions Answered
What’s the easiest way to start a campfire?
The easiest way involves ample, dry tinder (like cotton balls with petroleum jelly or commercial fire starters), plenty of correctly sized kindling in a teepee lay, and a reliable lighter or ferro rod. Preparation is key to “easy.”
Can I use lighter fluid?
No, absolutely not. Avoid lighter fluid, gasoline, or any other accelerants. They are extremely dangerous, unpredictable, and can lead to uncontrolled flare-ups or explosions. They also leave behind unpleasant chemical residues.
How long does a campfire last?
This depends entirely on the amount and type of fuel wood you use, the fire lay, and how often you feed it. A well-built fire with hardwood logs can burn for several hours, providing sustained heat and coals.
What kind of wood burns best?
Hardwoods like oak, maple, hickory, and ash burn hottest and longest, producing excellent coals for cooking. Softwoods like pine, cedar, and fir burn faster and produce more smoke and sparks, but are good for getting a fire started quickly. Always use dead, dry wood.
Is it okay to burn trash in a campfire?
No, absolutely not. Burning trash (plastics, aluminum foil, food wrappers, etc.) releases toxic fumes, leaves behind harmful residues, and is bad for the environment. Pack out everything you pack in. For managing waste and other useful tips, check out essential camping hacks for your next trip.