
The first time I caught a bass on a lure I made myself from a piece of scrap wood and some old hardware, I felt a surge of satisfaction that no store-bought lure could ever match. There’s something magical about fooling a fish with a creation born from your own imagination and crafted with your own hands. That moment sparked a lifelong passion for lure making that has saved me hundreds of dollars while giving me countless hours of enjoyment both in the workshop and on the water.
Making your own fishing lures isn’t just about saving money—though a $2 homemade lure that catches fish just as well as a $12 store-bought version is certainly appealing. It’s about understanding how lures work, customizing them for your specific fishing conditions, and experiencing the ultimate angling satisfaction of catching fish on something you created from scratch.
Whether you’re looking to fill your tackle box on a budget, create custom lures for specific fishing situations, or simply enjoy a rewarding hobby that connects to your passion for fishing, this comprehensive guide will teach you everything you need to know about making effective fishing lures at home.
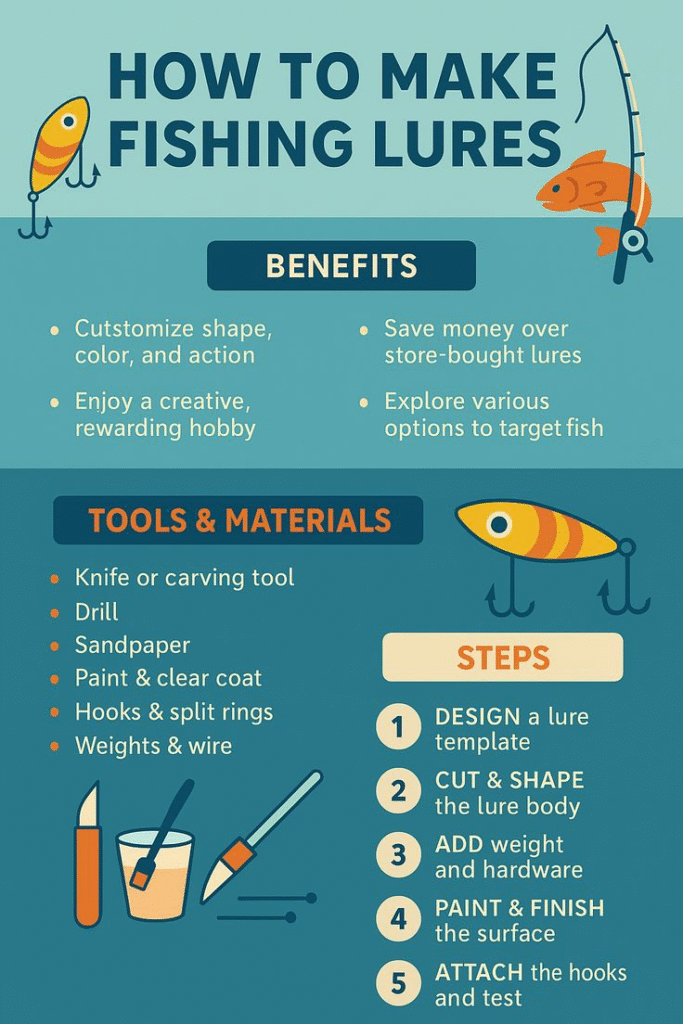
Why Make Your Own Fishing Lures?
Cost Savings
Quality fishing lures can cost anywhere from $5 to $20 each. When you’re prone to losing lures to snags, fish, or the occasional casting mishap, this adds up quickly. A homemade lure typically costs $1-3 in materials while performing just as well as expensive commercial options. If you fish frequently and lose lures regularly, the savings can add up to hundreds of dollars annually.
Ultimate Customization
Store-bought lures are designed for average conditions and mass appeal. When you make your own, you can customize everything to match your specific fishing scenarios:
- Colors precisely matched to local water clarity and forage
- Size and weight optimized for your targeted species.
- Action tuned for particular fishing techniques and conditions
- Durability is enhanced for the type of structure you fish around.
Understanding Lure Design Principles
Building lures teaches you what makes them effective, transforming you from someone who just throws lures to someone who truly understands them. You’ll learn:
- How lip angles affect diving depth and wobbling action
- Why weight placement determines swimming behavior and balance
- How color patterns and flash elements trigger predatory strikes
- What hardware choices affect durability and lure performance
Personal Satisfaction and Connection
There’s no fishing experience quite like landing a fish on a lure you made yourself. It validates your understanding of fish behavior and lure design while creating memories that last far longer than any purchased lure could provide. Every component, from the initial wood shaping to the final paint detail, represents your personal investment in the fishing experience.
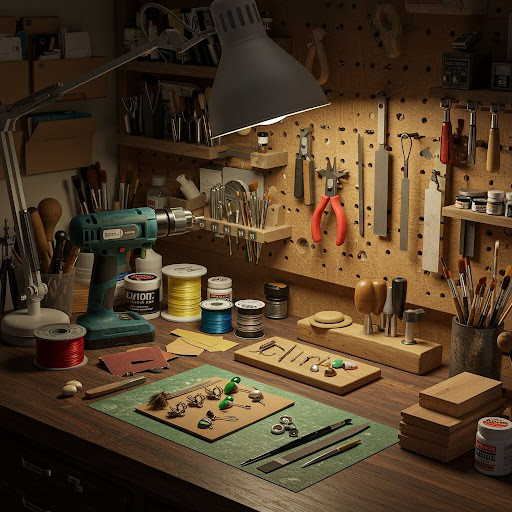
Essential Tools and Materials
Basic Workshop Setup
You don’t need an elaborate workshop to get started. A corner of a garage, a basement workbench, or even a kitchen table can suffice for simple lures. Start small and expand your setup as your interest grows.
Must-Have Tools:
- Drill with bits (1/16″ to 1/4″ range for various hardware)
- Hand saw or coping saw for cutting wood to shape
- Sandpaper assortment (80, 120, 220 grit minimum)
- Files (flat and round) for shaping and smoothing
- Needle-nose pliers for wire work and hardware installation
- Wire cutters for trimming and cutting components
- Small vise for holding work pieces securely
Useful Advanced Tools:
- Rotary tool (Dremel-style) for detail work and fine shaping
- Belt sander for faster wood shaping and contouring
- Airbrush system for professional-quality paint applications
- Hot glue gun for quick assembly and temporary positioning
Materials for Different Lure Types
Wood Selection:
- Balsa wood – Lightweight, easy to carve, naturally buoyant
- Basswood – Harder than balsa, takes fine detail well, good for durability.
- Cedar – Naturally weather-resistant, pleasant scent, stable
- Pine – Inexpensive and readily available, good for practice pieces
Hardware Components:
- Stainless steel wire (0.035″ to 0.051″) for through-wire construction
- Screw eyes in various sizes for attachment points.
- Split rings and jump rings for connecting hardware
- Treble hooks and single hooks in appropriate sizes
- Lead or tungsten weights for proper balance and action.
Finishing Materials:
- Primer (automotive or marine grade for durability)
- Acrylic paints (durable, quick-drying, wide color selection)
- Clear topcoat (polyurethane or epoxy for protection)
- Brushes in various sizes for detail work
- Masking tape for creating clean paint lines and patterns
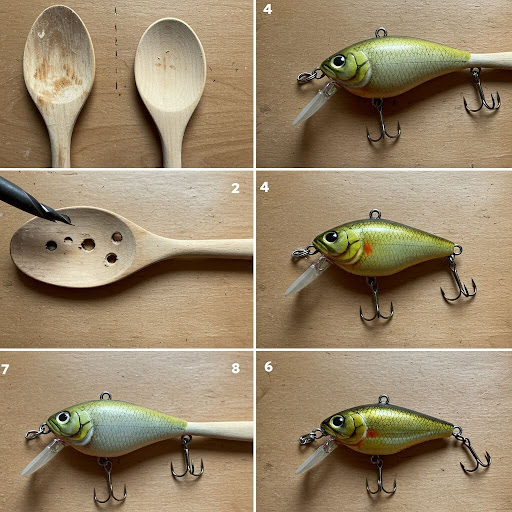
Making Your First Wooden Crankbait
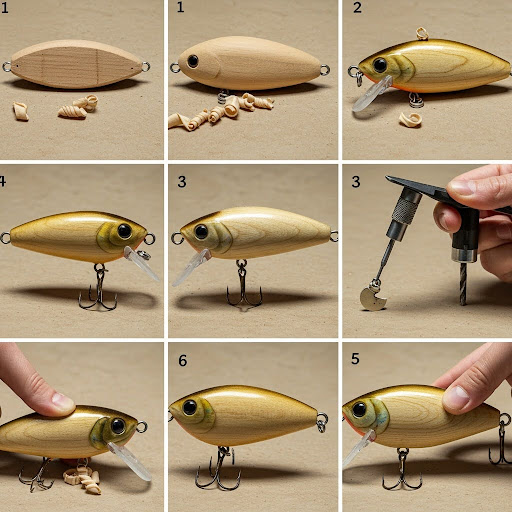
Let’s start with a simple wooden crankbait—one of the most effective and rewarding lures to make as a beginner. This project teaches fundamental skills you’ll use in all subsequent lure-making projects.
Step 1: Design and Template Creation
Start with a paper template to work out proportions and dimensions before touching wood. A good starting size for beginners is 3 inches long by 1 inch tall at the deepest point. Draw the side profile with:
- Slightly flattened sides for swimming stability
- Tapered nose section for the diving lip attachment
- Gradual taper from the thickest point to a narrower tail section
Mark critical reference points:
- Line tie position at the front (usually angled slightly downward)
- Weight cavity locations for proper balance
- Hook hanger positions on the belly and tail sections
Step 2: Wood Preparation and Transfer
Choose appropriate wood for your project. Balsa is ideal for beginners because it’s soft, forgiving, and naturally buoyant. Cut a piece slightly larger than your template to allow for shaping.
Transfer your template by tracing around it with a sharp pencil. For hollow lures (which most floating crankbaits are), you’ll need to cut two identical halves that will be glued together after internal components are installed.
Step 3: Cutting and Initial Shaping
Rough cut with a coping saw, staying slightly outside your pencil lines for safety. Shape progressively with files and sandpaper, working from coarse (80 grit) to fine (220 grit) for the smoothest finish.
Create internal weight cavities by drilling shallow holes at the marked locations. These will hold lead shot, tungsten beads, or other ballast materials to balance the lure properly and achieve the desired swimming action.
Critical Shaping Guidelines:
- Keep the belly relatively flat for swimming stability
- Create smooth, flowing lines that won’t disrupt water flow.
- Taper the nose area smoothly to accept the diving lip.
- Sand all surfaces completely smooth—imperfections show dramatically after painting.
Step 4: Diving Lip Installation
The diving lip is arguably the most critical component, determining both diving depth and swimming action characteristics.
Lip Angle Guidelines:
- Steep angle (45-60°) = shallow diving depth, tight wobble action
- Moderate angle (30-45°) = medium diving depth, moderate wobble
- Shallow angle (15-30°) = deep diving capability, wide wobble pattern
Installation process: Cut a precise slot in the nose using a thin saw blade. Create the lip from appropriate material—plastic sheets, Lexan, or thin hardwood work well. Secure permanently with high-quality epoxy and shape to your desired angle and size.
Step 5: Hardware Installation and Weighting
Drill accurate pilot holes for screw eyes at all marked positions. Use a drill bit slightly smaller than the screw eye diameter to ensure a tight, secure fit.
Install hardware systematically: The line tie goes in the nose (usually angled slightly downward for proper swimming angle), while hook hangers are positioned on the belly and tail. Add a small drop of epoxy to each hole for maximum security.
Balance the lure carefully by placing appropriate weights in the prepared cavities and securing with epoxy. Test balance in water—the lure should sit slightly nose-down when at rest, allowing it to dive properly when retrieved.
Step 6: Surface Preparation
Seal raw wood thoroughly with thinned epoxy or specialized wood sealer. This crucial step prevents paint from soaking unevenly into the grain and provides a smooth, professional base for finishing.
Apply quality primer in thin, even coats. Light gray automotive primer works excellently for lure applications. Sand lightly between coats with 400-grit sandpaper for the smoothest possible finish.
Step 7: Painting and Detailing
This stage transforms your functional lure blank into an attractive fish-catcher.
Base color application: Always start with lighter colors and work progressively darker. Proven effective patterns include:
- Clean white belly progressing to darker back colors
- Natural fish patterns mimicking local baitfish species
- High-contrast patterns for murky or stained water conditions
Add realistic details using fine brushes:
- Gill plates and fin markings for anatomical accuracy
- Scale patterns using stencils or mesh screens
- Eyes (often the most important predator trigger)
- Species-specific markings like spots, stripes, or bars
Protective topcoat application: Apply 2-3 thin coats of clear polyurethane or marine-grade epoxy. This critical step protects your paint work from fish teeth, impact damage, and UV degradation.
Step 8: Final Assembly and Performance Testing
Attach hooks using quality split rings for optimal action and easy replacement. Start with appropriately sized treble hooks—typically #6 for small lures, #4 for medium sizes, #2 for larger creations.
Test swimming action thoroughly in a swimming pool, large tub, or calm water. The lure should track straight when retrieved steadily and exhibit an attractive wobbling action that mimics distressed baitfish.
Fine-tune performance as needed: If the lure runs consistently to one side, carefully file the diving lip slightly on the side it favors. If the action seems too aggressive, reduce the lip size slightly. If the action is too subtle, increase the lip size or adjust the angle.
Our comprehensive guide on bass fishing techniques covers advanced methods for using the lures you create.
Creating Effective Spoon Lures
Spoon lures represent the perfect beginner project—they’re simple to make, incredibly effective, and require minimal tools or investment. These classic lures work for bass, trout, pike, walleye, and countless other species.
Materials and Tools Required
Primary materials:
- Old spoons from thrift stores (stainless steel preferred)
- Split rings and quality hooks
- Small swivel to prevent line twist
Essential tools:
- Drill with appropriate bits
- Metal files for smoothing
- Sandpaper (medium and fine grits)
- Center punch for marking
- Vise for secure holding
- Hacksaw for cutting
Detailed Construction Process
Step 1: Spoon Selection and Preparation
Choose spoons with good natural curvature—too flat produces no action, while excessive curve causes spinning rather than the desired wobbling action. Stainless steel spoons offer optimal durability and corrosion resistance for long-term use.
Step 2: Handle Removal
Secure the spoon firmly in your vise with just the handle extending. Cut cleanly through the handle where it meets the bowl section. File all cut edges smooth to eliminate sharp spots that could damage fishing line.
Step 3: Creating Attachment Points
Mark hole positions precisely with a center punch—one at the narrow end for line attachment, one at the wide end for hook connection. Drill holes slightly larger than your split ring requirements for easy assembly.
Step 4: Surface Finishing
File and sand progressively to eliminate any rough edges or imperfections. Polish to the desired finish using increasingly fine grits, ending with metal polish or even toothpaste for a brilliant mirror finish that attracts fish.
Step 5: Optional Color Enhancement
While natural silver is highly effective, adding color can improve performance in specific conditions:
- Spray paint for solid color schemes
- Nail polish for detailed patterns and accent colors
- Permanent markers for quick pattern application
- Tape masking for clean color separation lines
Step 6: Final Assembly
Install split rings at both attachment points. Add a quality swivel to the front connection to prevent line twist during use. Select appropriate hooks based on target species—single hooks for catch-and-release situations, trebles for maximum hookup percentages.
Check our detailed surf fishing guide for techniques using spoon lures in saltwater environments.
Advanced Soft Plastic Lure Making
Creating custom soft plastic baits allows unlimited creativity while producing lures perfectly matched to your fishing conditions. This technique requires more specialized equipment but offers incredible versatility.
Basic Soft Plastic Formula and Equipment
Primary ingredient: Plastisol liquid plastic forms the base of all soft plastic lures. Purchase from fishing supply companies or plastic crafting suppliers for the best results.
Proven recipe proportions:
- 100 parts plastisol base
- 2-5 parts softener for desired flexibility
- Salt (optional, adds weight and fish attraction)
- Colorant (as desired for specific patterns)
- Scent additives (optional enhancement)
Required equipment:
- Heat source (microwave, stovetop, or electric skillet)
- Mixing containers (disposable cups work well)
- Precision molds (purchased or custom-made)
- Stirring implements (disposable wooden sticks)
- An accurate thermometer for temperature control
- Protective equipment (gloves, adequate ventilation)
Step-by-Step Production Process
Step 1: Workspace Preparation
Ensure excellent ventilation—plastisol produces potentially harmful fumes when heated above proper temperatures. Organize all materials before beginning, as the plastic sets quickly once the correct temperature is reached.
Step 2: Controlled Heating
Heat plastisol to exactly 350°F while stirring frequently to ensure even temperature distribution. Avoid overheating—temperatures above 375°F can burn the plastic and create dangerous, toxic fumes.
Step 3: Color and Additive Integration
Mix colorants thoroughly while the plastic maintains proper temperature. Add scents last, as excessive heat can reduce their effectiveness. Popular color combinations include:
- Watermelon (green base with black flakes)
- White or pearl (versatile in varied conditions)
- Black or brown (excellent for low-light conditions)
- Bright colors (chartreuse, orange) for murky water situations
Step 4: Rapid Mold Filling
Pour quickly and steadily to prevent air bubble formation. Overfill molds slightly and trim excess material after cooling. Work efficiently—plastic begins setting immediately upon contact with the cooler mold.
Step 5: Cooling and Finishing
Allow complete cooling (typically 10-15 minutes depending on thickness). Remove carefully from molds to avoid tearing. Trim excess plastic with sharp scissors or a utility knife for a professional appearance.
Professional Finishing Techniques
Advanced Paint Systems
The difference between amateur and professional-looking lures often lies in the finishing quality. Modern paint systems offer incredible durability and visual appeal when properly applied.
Recommended paint types:
- Powder paints for maximum durability and chip resistance
- Epoxy paints for waterproof protection and UV resistance
- Airbrush paints for detailed patterns and smooth color transitions.
- Specialty finishes, including metallics and glow-in-the-dark options
Professional application techniques:
- Thin, multiple coats rather than single thick applications
- Proper curing time between each coat for maximum adhesion
- Environmental control, including temperature and humidity management
- Quality clear coat protection for long-term durability
Realistic Detail Addition
Scale pattern creation: Use plastic mesh or specialized stencils pressed against wet paint for authentic scale impressions. Gill plate definition using fine brushes and darker accent colors adds biological accuracy that triggers predator instincts.
Eye installation: Three-dimensional eyes often make the difference between a lure that gets noticed and one that gets eaten. Proper eye placement follows the natural proportions of real baitfish for maximum effectiveness.
The comprehensive Instructables guide provides additional construction techniques and creative variations for experienced builders. Meanwhile, the Reddit lure building community offers ongoing support and inspiration from fellow lure makers.
Testing and Tuning Your Creations
Initial Performance Evaluation
Every lure requires testing before fishing to ensure proper action and balance. Pool testing allows controlled observation of swimming characteristics without variables like current or wind.
Key performance indicators:
- Straight tracking without leaning to either side
- Consistent wobbling action at various retrieve speeds
- Appropriate diving depth for intended applications
- Stability during directional changes and pauses
Field Testing and Documentation
Test in known productive waters where you’ve had success with similar commercial lures. This helps separate lure effectiveness from fishing conditions or technique issues.
Maintain detailed records:
- Water conditions during testing
- Species that showed interest or struck
- Retrieve techniques that produced results.
- Any modifications needed for optimal performance
Performance Troubleshooting
Common issues and solutions:
Lure runs consistently to one side: Carefully adjust the diving lip by filing slightly on the favored side, or modify the line tie position.
Inadequate diving action: Check lip angle (may be too steep) or nose weight (may be insufficient for proper diving attitude).
Erratic or unstable action: Usually indicates poor weight distribution or incorrectly shaped diving lip geometry.
Poor casting distance: Add internal weight or check that the balance point is optimal for aerodynamic casting performance.
For advanced fishing techniques that complement your custom lures, explore our fly fishing basics guide for additional angling methods.
Creative Variations and Specialty Techniques
Multi-Jointed Lures
Creating segmented lures adds complexity but produces incredibly lifelike swimming action. Connect sections using small hinges or heavy-duty split rings that allow natural flexing movement. These lures require precise balancing of each segment but can trigger strikes when conventional lures fail.
Rattle Chamber Installation
Adding sound elements significantly improves lure effectiveness in murky water or low-light conditions. Drill chambers in wooden lures and add glass beads, metal BBs, or commercial rattle inserts. Seal chambers with epoxy after testing sound quality.
Scent Integration
Incorporate scent chambers into soft plastic lures or wooden designs. Small cavities filled with scent-infused cotton or absorbent materials can provide long-lasting attraction. Natural scents like anise oil, garlic extract, or fish oils often prove most effective.
Seasonal Modifications
Adapt existing lures for changing conditions rather than creating entirely new designs. Add lead strips for deeper winter fishing, install different lips for varying seasonal depth requirements, or apply new paint schemes to match seasonal forage changes.
Our guide on ice fishing techniques covers modifications specific to cold-weather angling conditions.
Maintenance and Long-Term Care
Protecting Your Investment
Proper storage practices significantly extend lure life and maintain peak effectiveness:
Post-use care: Rinse thoroughly with fresh water after each use to prevent salt corrosion and remove debris. Dry completely before storage to prevent rust formation on metal components.
Organized storage: Use tackle boxes with adequate ventilation and cushioning. Avoid overcrowding, which can cause paint damage or hook entanglement.
Seasonal Maintenance Protocol
End-of-season inspection: Examine each lure for paint damage, loose hardware, or worn components. Replace damaged elements before storage to ensure readiness for the next season.
Hardware inspection: Check split rings, screw eyes, and hooks for corrosion, wear, or fatigue. Replace questionable components rather than risk losing fish due to equipment failure.
Paint touch-up: Address minor paint chips or scratches with matching paint. Reapply clear coat if the protective finish shows wear or cloudiness.
Long-Term Storage Solutions
Climate-controlled storage prevents temperature and humidity fluctuations that can damage wood lures or degrade paint finishes. Organize by type and season for quick access when fishing conditions change.
Documentation system: Maintain detailed records of each lure’s performance history, including successful patterns, productive locations, and modification notes. This information proves invaluable for future lure construction projects.
Building a Lure-Making Business
Market Research and Specialization
Local specialization often proves most profitable. Research regional fishing preferences, successful local patterns, and underserved niches in your area. Custom tournament lures or guide-specific patterns command premium prices.
Quality over quantity: Focus on creating exceptional lures rather than mass production. Consistent quality builds a reputation faster than extensive product lines.
Legal and Safety Considerations
Business licensing requirements vary by location, but typically include general business permits and sales tax registration. Product liability insurance protects against potential claims from defective lures.
Safety standards: Follow applicable regulations for paint types, lead content restrictions, and labeling requirements. CPSC regulations apply to any lures that might be used by children.
Marketing Strategies
Social media platforms provide excellent opportunities to showcase craftsmanship and fishing success. Video content demonstrating lure-making processes and fishing effectiveness generates significant engagement.
Local fishing shops often welcome quality locally-made lures, especially if they fill specific niche requirements. Tournament sponsorships and guide relationships provide credible product endorsements.
Check our comprehensive fishing business guide for additional entrepreneurial insights in the fishing industry.
Advanced Design Considerations
Understanding Fish Psychology
Predator triggers extend beyond simple appearance to include specific behavioral cues that activate feeding responses. Wounded baitfish behavior includes erratic movements, listing to one side, and vulnerable positioning near cover.
Color theory applications: High-contrast patterns work well in stained water, while subtle, natural colors excel in clear conditions. Fluorescent accents can trigger strikes in low-light conditions or deep water applications.
Regional Customization Strategies
Local forage matching involves studying the actual baitfish in your waters and creating lures that closely mimic their size, shape, color, and behavior patterns. Seasonal considerations include matching the size and behavior of juvenile fish in spring and larger, more mature baitfish patterns later in the season.
Water-specific adaptations: Heavy cover situations require weedless designs and durable construction. Open water applications can utilize more delicate presentations and realistic details.
Environmental Considerations
Eco-friendly materials become increasingly important as environmental awareness grows among anglers. Lead-free weights, biodegradable soft plastics, and non-toxic paints address conservation concerns while maintaining lure effectiveness.
Sustainable practices: Source wood from certified sustainable forests, recycle metal components when possible, and design lures for longevity rather than disposability.
Making fishing lures represents far more than a cost-saving hobby—it’s a direct connection to the fundamental challenge of understanding and outsmarting your quarry. Every aspect of lure construction, from initial design through final testing, teaches valuable lessons about fish behavior, water dynamics, and the subtle factors that determine fishing success.
Start with simple projects and master basic techniques before attempting complex designs. The satisfaction of catching fish on your own creations grows with each successful outing, creating memories and experiences that purchased lures simply cannot match.
Frequently Asked Questions
What’s the easiest type of fishing lure to make for beginners?
Spoon lures are the simplest starting point. They require basic tools, minimal materials (often just an old kitchen spoon), and are incredibly effective for many fish species. You can create a productive spoon lure in under an hour with basic workshop skills.
How much money can I realistically save by making my own lures?
Homemade lures typically cost $1-3 in materials compared to $5-20 for equivalent commercial lures. For frequent anglers who lose lures to snags or fish, annual savings can easily reach several hundred dollars while providing superior customization options.
Do homemade lures actually work as well as expensive store-bought versions?
When properly constructed, homemade lures often outperform commercial versions because they can be customized specifically for your local fishing conditions, target species, and personal fishing techniques. The key is understanding basic lure design principles and testing thoroughly.
What’s the most important factor in making effective lures?
Action is typically the critical factor. A lure must move in a way that triggers predatory responses in fish. This requires proper balance, appropriate diving lip design (for crankbaits), and realistic swimming motion that convincingly mimics injured or fleeing baitfish.
How long does it typically take to make a fishing lure?
Simple lures like spoons can be completed in 30-60 minutes. Wooden crankbaits require 4-8 hours spread over several days to allow for proper drying time between paint coats. Soft plastic baits can be produced quickly once you have molds—typically 15-30 minutes per batch of multiple lures.