Three months ago, I found myself in a cabin in the Rockies with a bag of premium single-origin coffee beans and absolutely no way to grind them. My electric grinder had died the night before, and the nearest coffee shop was two hours away through winding mountain roads. That’s when I discovered that some of the most effective coffee grinding methods don’t require electricity at all. Using nothing but a rolling pin and a ziplock bag, I managed to create a surprisingly good cup of coffee that morning—and learned that necessity really is the mother of invention.
Whether your grinder breaks, you’re camping in the wilderness, or you’re trying coffee at a friend’s house, knowing how to grind coffee beans without specialized equipment can save your morning (and your sanity).
The Quick Answer: 8 Effective Methods
Here are the eight most reliable ways to grind coffee beans without a traditional grinder, ranked by effectiveness:
- Mortar and Pestle – Most control and consistency
- Rolling Pin – Best for coarse grinds, easy technique
- Food Processor – Good for larger quantities
- Blender – Convenient but requires careful technique.
- Hammer/Mallet – Effective for coarse grounds
- Knife (Flat Blade) – Precise control for small amounts
- Meat Tenderizer – Similar to the hammer method
- Two Spoons – Emergency method for very small quantities
Each method produces different grind consistencies and works better for specific brewing methods. The key is matching your technique to your intended coffee preparation method.
Understanding Coffee Grind Sizes Without a Grinder
Why Grind Size Matters
Coffee grind size directly affects extraction rate and flavor. Different brewing methods require specific particle sizes to achieve optimal extraction:
Extra Coarse (Cold Brew): Large, distinct pieces like breadcrumbs
Coarse (French Press): Chunky texture similar to sea salt
Medium-Coarse (Chemex): Slightly finer than coarse, like coarse sand
Medium (Drip Coffee): Texture of regular table salt
Medium-Fine (Pour Over): Finer than table salt, like fine sand
Fine (Espresso): Powder-like consistency similar to flour
Extra Fine (Turkish): Nearly powder, finer than flour
Matching Methods to Grind Sizes
Not all alternative grinding methods can achieve every grind size. Here’s what each method does best:
Mortar and Pestle: Can achieve any grind size with enough time and effort
Rolling Pin: Best for coarse to medium-coarse grinds
Food Processor/Blender: Produces medium to coarse grinds effectively
Hammer Methods: Naturally produce coarse grinds
Knife Techniques: Good for medium to fine grinds with small quantities
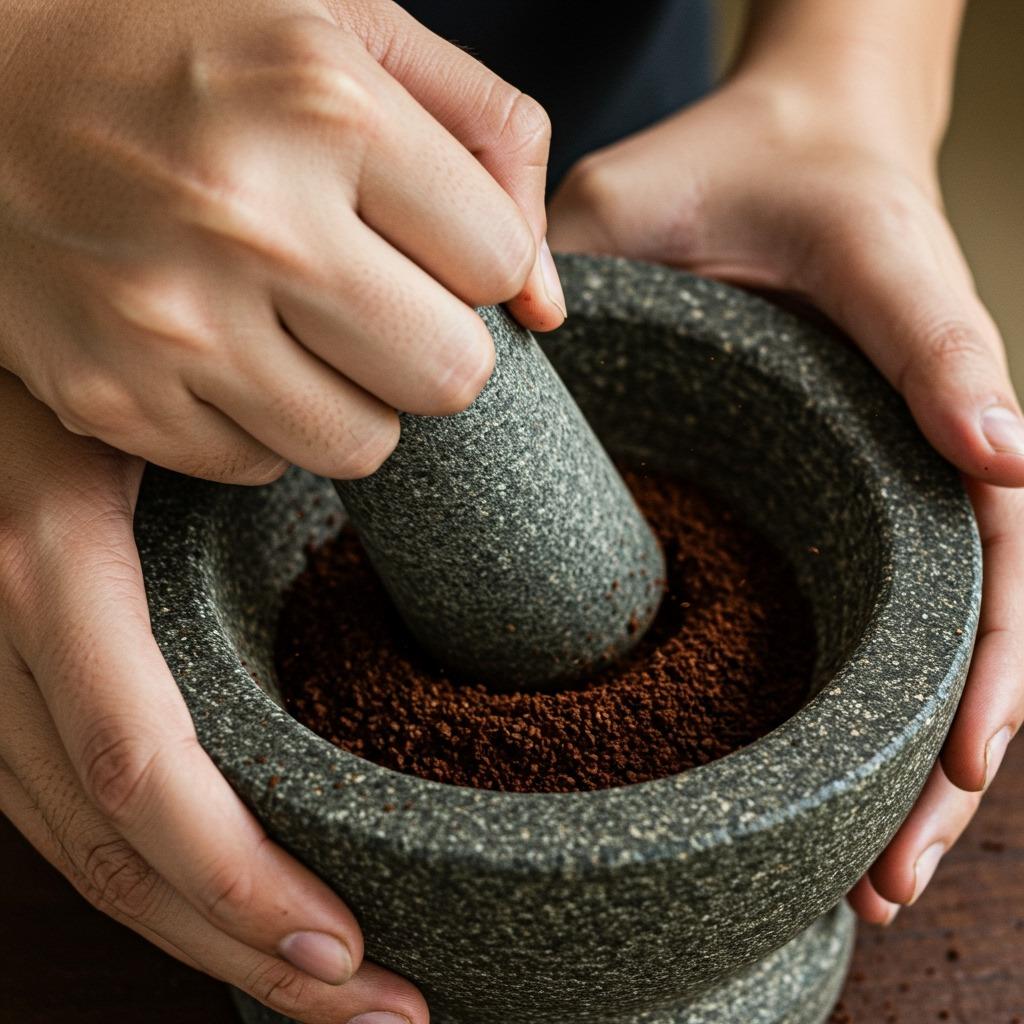
Method 1: The Mortar and Pestle Technique
The mortar and pestle represents one of humanity’s oldest grinding tools and remains the most versatile alternative to electric grinders. This method offers complete control over grind size and produces remarkably consistent results with proper technique.
Why Mortar and Pestle Works Best
Complete Control: You determine exactly how fine or coarse your grind becomes
Consistent Results: With practice, produces very uniform particle sizes
No Heat Generation: Unlike blade grinders, doesn’t heat beans and alter flavor
Versatile: Can handle any grind size from coarse to Turkish-fine
Quiet Operation: Won’t wake the household during early morning grinding
Step-by-Step Mortar and Pestle Process
Step 1: Portion Control
Fill your mortar only one-fourth full with coffee beans. This prevents overcrowding and ensures even grinding. For a standard 6-cup serving, start with about 2 tablespoons of beans.
Step 2: Secure Positioning
Hold the mortar firmly with your non-dominant hand while gripping the pestle with your dominant hand. Position the mortar on a stable, non-slip surface to prevent accidents.
Step 3: Initial Crushing
Begin with firm, downward crushing motions to break beans into smaller pieces. Apply consistent pressure and work systematically around the mortar’s interior.
Step 4: Grinding Motion
Once beans are broken into smaller fragments, switch to a rolling, grinding motion. Press down while rotating the pestle in circular movements around the mortar’s walls.
Step 5: Consistency Check
Stop every 30 seconds to assess grind uniformity. Use a spoon to redistribute beans, ensuring larger pieces move to areas where they’ll be ground further.
Step 6: Final Refinement
Continue grinding until you achieve the desired consistency. For the French press, stop at a coarse, chunky texture. For pour-over, continue until grounds resemble coarse sand.
Pro Tips for Mortar and Pestle Success
- Material Matters: Stone mortars work better than wooden ones for coffee grinding
- Clean Between Uses: Residual oils from previous grindings can affect flavor
- Batch Processing: Grind multiple small batches rather than one large batch
- Rhythm Development: Find a consistent crushing rhythm to speed the process
Method 2: Rolling Pin Technique
The rolling pin method excels at producing coarse grinds perfect for French press, cold brew, or cowboy coffee. This technique is particularly valuable for outdoor enthusiasts or when you need to grind larger quantities quickly.
Rolling Pin Advantages
Speed: Faster than mortar and pestle for coarse grinds
Quantity: Can handle larger batches efficiently
Availability: Most kitchens have a rolling pin
Control: Easy to adjust pressure for different coarseness levels
Quiet: Minimal noise compared to electric methods
Perfecting the Rolling Pin Method
Equipment Setup:
- Heavy-duty freezer bag (prevents bursting)
- Rolling pin (wood, marble, or steel work equally well)
- Stable work surface (cutting board or clean countertop)
- Kitchen towel (optional, for noise reduction)
Step-by-Step Process:
Step 1: Bean Preparation
Place 2-4 tablespoons of coffee beans in a quality freezer bag. Remove as much air as possible to prevent the bag from inflating and bursting during crushing.
Step 2: Initial Crushing
Lay the sealed bag flat on your work surface. Start with gentle pressing motions to crack the beans initially. This prevents them from shooting out when you begin rolling.
Step 3: Rolling Technique
Apply firm, even pressure while rolling back and forth over the beans. Keep the rolling pin parallel to the work surface and maintain consistent pressure throughout each stroke.
Step 4: Redistribution
Every 15-20 rolls, stop and redistribute the partially ground beans within the bag. This ensures even particle size and prevents some beans from remaining whole while others become powder.
Step 5: Consistency Achievement
Continue rolling until you reach desired coarseness. For French press, aim for pieces roughly the size of breadcrumbs. For cold brew, slightly larger chunks work well.
Rolling Pin Troubleshooting
Problem: Beans escape from bag
Solution: Use heavier-duty bags and ensure proper sealing
Problem: Uneven grind sizes
Solution: Redistribute beans more frequently and apply even pressure
Problem: Too much powder produced
Solution: Use lighter pressure and check progress more frequently
This method works particularly well when you’re camping for beginners and need a reliable way to prepare coffee with minimal equipment.
Method 3: Food Processor Grinding
Food processors can effectively grind coffee beans, though they work more like blade grinders than burr grinders. The key to success lies in using proper technique to maximize consistency while preventing overheating.
Food Processor Benefits and Limitations
Benefits:
- Handles large quantities efficiently
- Faster than manual methods
- Produces acceptable medium to coarse grinds
- Most people own one
Limitations:
- Can generate heat that affects flavor
- Produces less consistent particle sizes than dedicated grinders
- Plastic bowls may absorb coffee oils over time
- Difficult to achieve fine grinds
Optimal Food Processor Technique
Preparation Phase:
Ensure your food processor bowl is completely clean and dry. Any residual flavors from previous use will contaminate your coffee. Use the standard chopping blade for grinding.
Batch Size Management:
Fill the processor bowl with no more than 1 cup of beans at a time. Smaller batches produce more consistent results and prevent overheating.
Pulsing Strategy:
Use short, 3-5 second pulses rather than continuous running. This prevents heat buildup and gives you better control over grind size. Allow 10-15 seconds between pulses for heat dissipation.
Agitation Technique:
After every 5 pulses, remove the lid and shake the bowl to redistribute beans. This ensures even grinding and prevents some beans from remaining whole while others turn to powder.
Monitoring Progress:
Check grind consistency frequently. Food processors can go from coarse to fine very quickly, so careful monitoring prevents over-grinding.
Food Processor Best Practices
- Cool Down Periods: Allow the motor to rest every minute of operation
- Bean Quality: Use room temperature beans for best results
- Cleaning: Thoroughly clean the bowl after use to prevent oil rancidity
- Quantity Control: Never exceed the manufacturer’s maximum capacity
Method 4: Blender Grinding Method
High-powered blenders can grind coffee beans effectively, though technique is crucial for achieving consistent results without overheating the beans or damaging the equipment.
Blender Selection and Setup
Best Blender Types:
- High-powered blenders (Vitamix, Blendtec): Most effective for coffee grinding
- Standard blenders: Can work but require more careful technique
- Personal blenders: Good for single servings but limited capacity
Grinder Setting: Many blenders have a specific “grind” setting. If not available, use medium-high speed settings.
Professional Blender Grinding Technique
Pre-Grinding Setup:
Ensure the blender jar is completely dry. Any moisture will cause beans to clump and produce uneven results. Check that blades are sharp and clean.
Optimal Batch Sizing:
Use ¼ to ½ cup of beans maximum. Smaller quantities allow better control and more consistent results.
Pulsing Protocol:
- Initial pulse: 3-5 short bursts to break beans
- Grinding phase: 3-6 second pulses with 5-second breaks
- Total time: Usually 30-45 seconds of pulsing
- Agitation: Tilt the blender side to side between pulses to redistribute beans
Heat Management:
Overheating ruins coffee flavor by breaking down essential oils. Signs of overheating include:
- Warm blender jar after grinding
- Oily residue on blender walls
- Burnt smell during grinding
According to the Specialty Coffee Association, proper grinding technique preserves the aromatic compounds that make coffee flavorful.
Blender Grinding Troubleshooting
Issue: Beans won’t stay in the blade path
Solution: Use smaller batches and tilt the blender during pauses
Issue: Inconsistent grind sizes
Solution: Stop more frequently to redistribute beans
Issue: Motor strain or overheating
Solution: Reduce batch size and increase rest periods between pulses
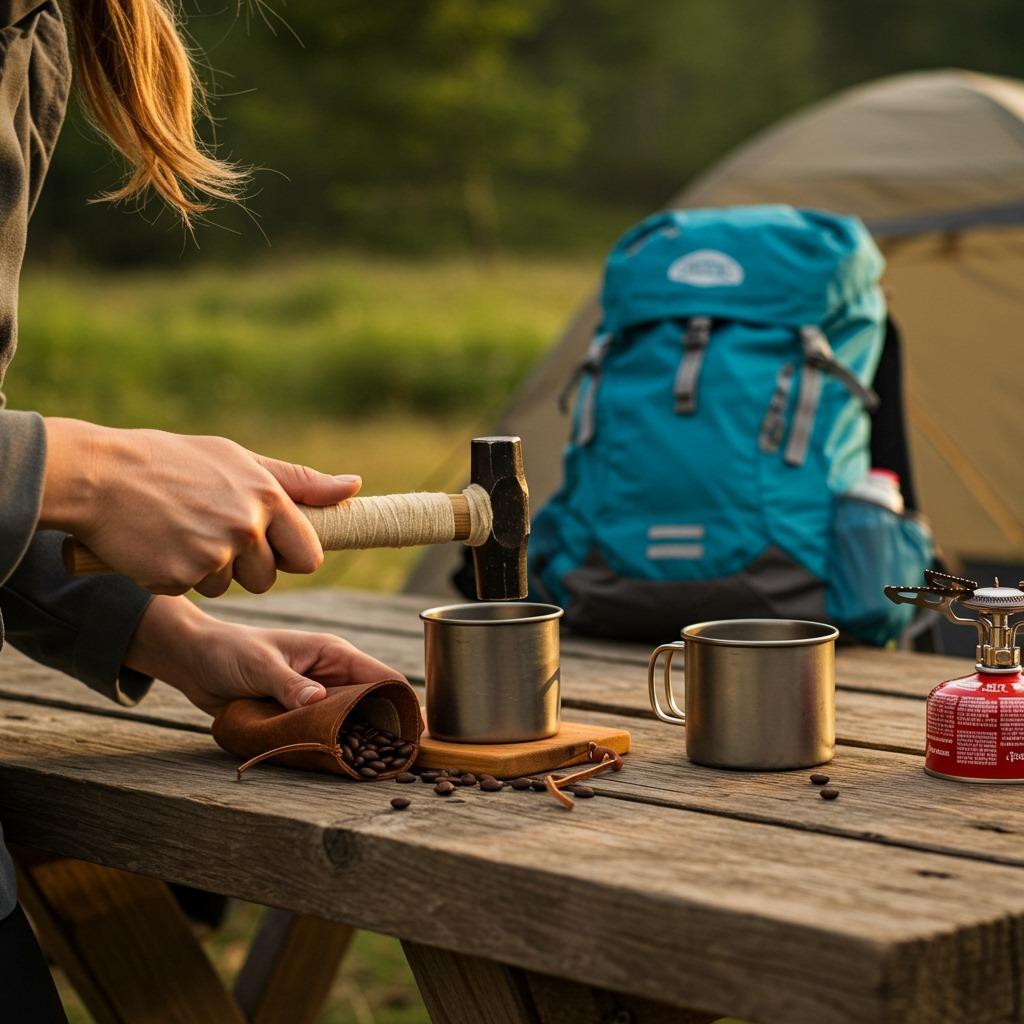
Method 5: Hammer and Mallet Techniques
Using a hammer or meat tenderizer represents the most primitive but surprisingly effective method for coarse coffee grinding. This technique works particularly well for outdoor situations or when other tools aren’t available.
Hammer Method Fundamentals
Tool Selection:
- Flat-faced hammer: Provides maximum surface contact
- Meat tenderizer: Designed for food use, often has textured surface
- Rolling pin alternative: If no hammer available
Safety Considerations:
- Always use a protective barrier (bag or towel)
- Work on stable, solid surfaces only
- Wear safety glasses if working with hard surfaces
- Keep fingers clear of impact areas
Hammer Grinding Process
Setup Phase:
Place beans in a heavy-duty freezer bag, removing excess air. Wrap the bag in a clean kitchen towel to prevent punctures and reduce noise. Position on a solid cutting board or countertop.
Striking Technique:
Begin with gentle, controlled strikes to crack beans initially. Gradually increase force while maintaining even coverage across the bag’s surface. Rotate the bag every 10-15 strikes to ensure uniform grinding.
Consistency Management:
Stop every 20-30 strikes to check progress and redistribute beans. Unwrap the bag and shake contents to move larger pieces to areas that need more attention.
Final Refinement:
Continue striking until you achieve desired coarseness. This method naturally produces coarse grinds perfect for French press or cowboy coffee.
Hammer Method Advantages
- Equipment availability: Hammers are common tools
- Outdoor friendly: Works great for camping situations
- Speed: Faster than mortar and pestle for coarse grinds
- Quantity handling: Can process larger batches effectively
When you’re engaged in truck bed camping or other outdoor adventures, the hammer method provides a reliable way to enjoy freshly ground coffee without electrical equipment.
Method 6: Knife Blade Technique
Using a knife’s flat side to crush coffee beans offers surprising precision and control, particularly for small quantities or when you need medium to fine grinds.
Knife Selection and Safety
Best Knife Types:
- Chef’s knife: Broad, sturdy blade with good leverage
- Butcher’s knife: Heavy, flat surface ideal for crushing
- Cleaver: Maximum crushing surface but requires careful handling
Safety Protocol:
- Always use the flat side of the blade, never the sharp edge
- Keep fingers away from the blade at all times
- Work on stable, non-slip surfaces only
- Apply pressure with palm, not fingertips
Flat Blade Crushing Technique
Preparation:
Place a small amount of beans (1-2 tablespoons) on a clean cutting board. Position them in a single layer to ensure even crushing.
Crushing Method:
Lay the flat side of your knife blade over the beans. Using the palm of your hand, press down firmly and evenly across the blade’s surface. The goal is to crack and crush beans rather than slice them.
Progressive Refinement:
After initial crushing, reposition bean fragments and repeat the process. Continue until you achieve desired consistency, checking progress frequently.
Final Collection:
Gather crushed beans with the knife blade, being careful not to lose any ground coffee to the cutting board’s grain or crevices.
Knife Method Advantages
Precision Control: Excellent for small, precise amounts
Fine Grind Capability: Can achieve finer grinds than most manual methods
Quiet Operation: Nearly silent grinding process
Minimal Cleanup: Easy to clean cutting board and knife
Method 7: Two-Spoon Emergency Method
When you’re truly desperate and have no other options, two sturdy spoons can crush small quantities of coffee beans. This method works best for emergency situations or single-serving preparations.
Two-Spoon Technique
Equipment: Use two metal tablespoons with deep bowls. Wooden spoons won’t provide enough hardness for effective crushing.
Process: Place beans in one spoon and use the back of the second spoon to crush them against the first. This requires patience but can produce usable coffee grounds for small quantities.
Limitations: Only suitable for very small batches (single cup servings) and produces inconsistent particle sizes.
Method 8: Meat Tenderizer Method
A meat tenderizer mallet works similarly to the hammer method but is specifically designed for food preparation, making it ideal for coffee grinding.
Meat Tenderizer Advantages
Food-Safe Design: Made specifically for food contact
Textured Surface: Many have ridged surfaces that help break beans more effectively
Controlled Weight: Designed for precise food preparation tasks
Easy Cleaning: Dishwasher safe and easy to sanitize
Process Similarity**:
Follow the same bag-and-towel technique as the hammer method, but with more controlled striking force due to the tenderizer’s designed weight and balance.
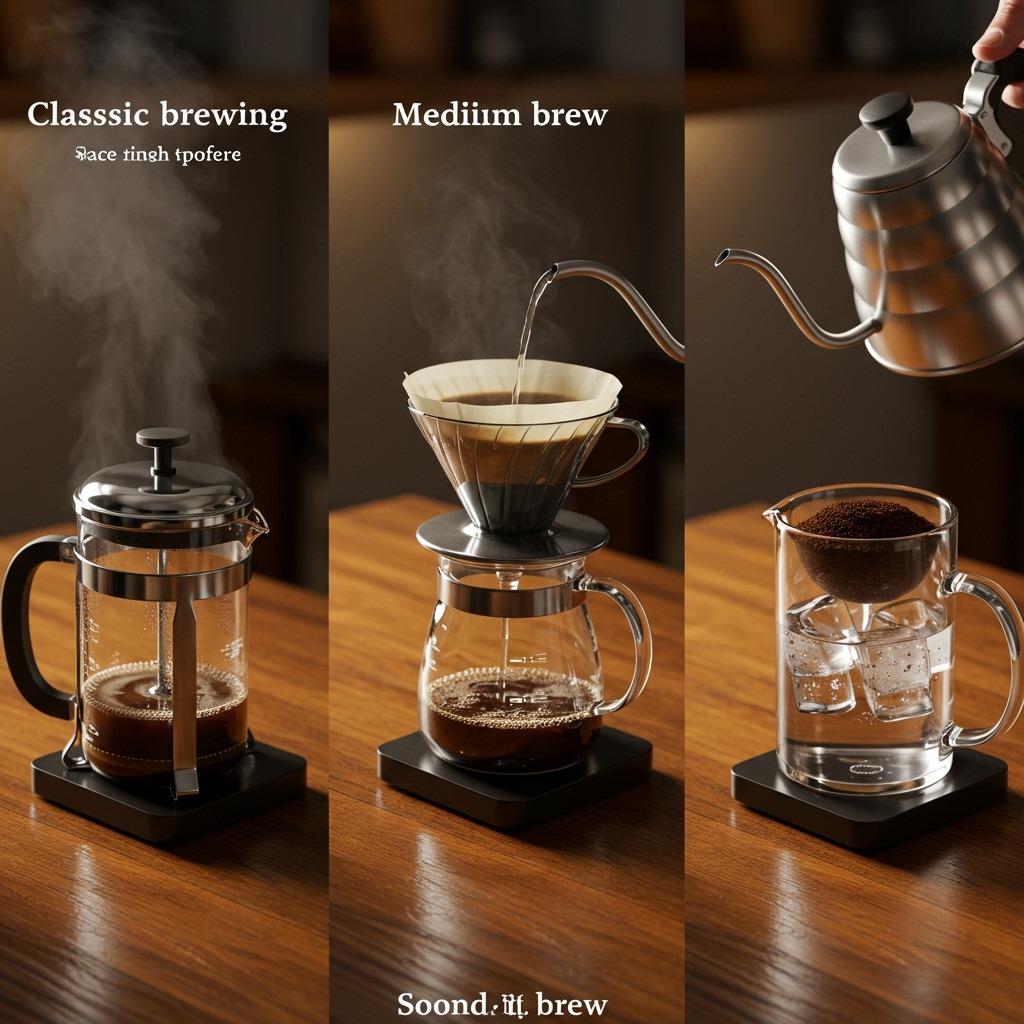
Brewing Methods That Work Best with Alternative Grinding
French Press Coffee
Coarse grinds from rolling pins, hammers, or mortars work perfectly for French press brewing. The mesh filter handles irregular particle sizes well, and the long steeping time compensates for less precise extraction.
Optimal Grind: Large, chunky pieces similar to breadcrumbs
Best Alternative Methods: Rolling pin, hammer, mortar and pestle (coarse setting)
Brewing Ratio: 1:15 coffee to water ratio
Steep Time: 4 minutes
Cold Brew Preparation
Cold brew’s extended extraction time (12-24 hours) makes it extremely forgiving of grind inconsistencies. Almost any coarse grinding method produces excellent results.
Optimal Grind: Very coarse, like coarse sea salt
Best Alternative Methods: Any method producing coarse grinds
Brewing Ratio: 1:8 coffee to water ratio for concentrate
Steep Time: 12-24 hours at room temperature
Pour-Over Adaptations
Pour-over methods require more precision but can work with carefully ground coffee from alternative methods, particularly mortar and pestle or knife techniques.
Optimal Grind: Medium consistency, like table salt
Best Alternative Methods: Mortar and pestle, food processor (careful pulsing)
Brewing Adjustments: Slower pour, longer bloom time
Extraction Compensation: Adjust water temperature and timing for grind variations
The principles learned here apply whether you’re perfecting your home brewing setup or preparing camping breakfast ideas that include quality coffee as part of your outdoor morning routine.
Optimizing Extraction with Alternative Grinds
Adjusting Brewing Parameters
When using alternatively ground coffee, modify your brewing technique to compensate for grind irregularities:
Water Temperature:
- Use slightly cooler water (190-195°F) to prevent over-extraction of fine particles
- For very coarse grinds, increase temperature to 200-205°F for better extraction
Brewing Time:
- Extend steeping time by 15-30% to compensate for larger particles
- For mixed particle sizes, aim for the middle range and adjust by taste
Agitation:
- Stir more gently to prevent breaking down larger particles further
- Allow longer bloom times for degassing
Flavor Profile Expectations
Alternative grinding methods often produce coffee with slightly different characteristics:
Enhanced Body: Irregular particles can create a fuller mouthfeel
Varied Extraction: Mix of over- and under-extracted notes
Unique Character: Often more rustic, artisanal flavor profile
Reduced Clarity: Less clean than precisely ground coffee, but often more complex
Storage and Freshness Considerations
Grinding Fresh vs. Pre-Grinding
Immediate Grinding: Always grind just before brewing when possible. Alternative methods often take longer, so plan accordingly.
Batch Grinding: If grinding larger quantities, store excess in airtight containers and use within 24-48 hours for best flavor.
Oxidation Prevention: Alternatively ground coffee may have more surface area exposed, accelerating staleness. Use quickly after grinding.
Optimal Bean Storage
Whole Bean Storage: Keep beans in airtight containers away from light, heat, and moisture
Temperature Considerations: Room temperature beans grind more easily than cold beans
Quantity Planning: Only grind what you’ll use immediately; whole beans stay fresh much longer
Troubleshooting Common Problems
Inconsistent Particle Sizes
Problem: Mix of powder and large chunks
Solutions:
- Use smaller batches for better control
- Stop frequently to redistribute partially ground beans
- Sift grounds through a fine-mesh strainer to separate different sizes
Over-Heating Issues
Problem: Beans become warm during grinding
Solutions:
- Take breaks between grinding sessions
- Use pulse techniques instead of continuous grinding
- Work in cooler environments when possible
Equipment Damage
Problem: Blenders or food processors are struggling with hard beans
Solutions:
- Use smaller batches to reduce motor strain
- Ensure beans are at room temperature for easier grinding
- Consider slightly stale beans (2-3 weeks old), which are softer
Mess and Cleanup
Problem: Ground coffee everywhere
Solutions:
- Use bags and towels to contain mess during crushing methods.
- Work over large cutting boards or trays.
- Have cleanup supplies ready before starting.
Advanced Techniques and Tips
Grind Size Consistency Tricks
Sifting Method: Use fine-mesh sieves to separate different particle sizes, keeping only the desired consistency range.
Progressive Grinding: Start with coarse crushing, then progressively refine smaller portions to achieve more uniform results.
Batch Matching: When grinding multiple batches, keep technique and timing consistent for uniform results across all batches.
Tool Modification Ideas
Improvised Tools:
- Use heavy-bottomed pans as makeshift mortars
- Wine bottles can substitute for rolling pins.
- Clean rocks can work as pestles in emergency situations.
Enhancing Existing Tools:
- Wrap knife handles for better grip during crushing
- Use multiple layers of bags for better durability during hammer methods.
- Place towels under the cutting boards to reduce noise and movement
For outdoor enthusiasts exploring methods like cowboy camping, these alternative grinding techniques become essential skills for maintaining coffee quality in primitive conditions.
Time Management Strategies
Preparation Planning: Set up all tools and workspace before starting the grinding process
Batch Processing: Grind coffee for multiple days during single sessions when time allows
Morning Routines: Incorporate grinding time into the morning routine for fresh daily coffee
Emergency Backup: Keep small amounts of pre-ground coffee as backup for time-critical mornings
Choosing the Right Method for Your Situation
Situation-Based Method Selection
Home Kitchen Emergency: Mortar and pestle or food processor for reliability and capacity
Camping/Outdoor: Rolling pin or hammer method for simplicity and equipment availability
Office/Travel: Knife method for precision and minimal equipment requirements
Large Groups: Food processor or blender for quantity handling
Quiet Environments: Mortar and pestle or knife methods to avoid noise
Quality vs. Convenience Trade-offs
Highest Quality: Mortar and pestle (time-intensive but excellent results)
Best Convenience: Food processor or blender (faster but less precise)
Most Portable: Rolling pin or hammer (works anywhere with minimal equipment)
Most Precise: Knife method (excellent control but small quantities only)
Health and Safety Considerations
Food Safety Practices
Clean Equipment: Always use food-safe tools and clean surfaces
Cross-Contamination Prevention: Avoid tools used for non-food purposes
Proper Storage: Store ground coffee in food-grade containers only
Physical Safety
Sharp Tool Handling: Always use knives safely and keep blades pointed away from your body
Heavy Tool Control: Maintain proper grip and control when using hammers or mallets
Electrical Safety: Ensure blenders and processors are properly assembled before operation
According to the FDA’s food safety guidelines, maintaining clean equipment and proper handling techniques is essential for safe food preparation.
Ergonomic Considerations
Repetitive Stress Prevention: Take breaks during extensive hand-grinding sessions
Proper Posture: Maintain good body positioning during grinding activities
Tool Selection: Choose tools appropriate for your physical capabilities
Understanding these safety aspects becomes particularly important when you’re managing camping in the rain or other challenging conditions where medical help might not be immediately available.
Professional Tips from Coffee Experts
Barista Recommendations
Professional baristas who have experimented with alternative grinding methods suggest focusing on consistency over perfection. The National Coffee Association notes that uniform extraction is more important than perfect particle size uniformity.
Key Professional Insights:
- Consistency in technique matters more than equipment perfection
- Match your grinding method to your brewing technique’s tolerance.
- Practice builds muscle memory and improves results.
- Temperature control during grinding affects the final flavor.
Coffee Roaster Perspectives
Coffee roasters often recommend these alternative methods for specific situations:
Light Roasts: Require more careful grinding to prevent over-extraction
Dark Roasts: More forgiving with alternative grinding methods
Single-Origin Beans: May benefit from coarser grinding to highlight unique characteristics
Blended Beans: Often more forgiving of grind inconsistencies
Frequently Asked Questions
Can I get espresso-fine grinds without an electric grinder?
Achieving true espresso-fine consistency is very difficult with manual methods. A mortar and pestle can come close with significant time and effort, but the grind won’t be as uniform as needed for optimal espresso extraction. For espresso, consider investing in a manual burr grinder.
How long does it take to grind coffee beans manually?
Times vary by method and quantity: Mortar and pestle takes 5-10 minutes for a single cup serving, the rolling pin method takes 2-3 minutes for coarse grinds, and the food processor takes 30-60 seconds for medium grinds. Plan extra time compared to electric grinders.
Will manually ground coffee taste different?
Manual grinding often produces more irregular particle sizes, which can create unique flavor profiles with enhanced body and complexity. The taste may be slightly different from precisely ground coffee, but many people prefer this more rustic, artisanal character.
Which method works best for camping?
The rolling pin method works excellently for camping due to its simplicity, speed, and minimal equipment requirements. A mortar and pestle is also excellent if weight isn’t a concern. Both methods produce coarse grinds perfect for camping coffee methods like French press or cowboy coffee.
Can I grind flavored or oily beans with these methods?
Flavored or very oily beans can be more challenging to grind manually and may gum up equipment. They work best with crushing methods (hammer, rolling pin) rather than grinding methods (mortar and pestle, food processor). Clean equipment thoroughly after use to prevent flavor contamination.
Mastering these alternative coffee grinding methods ensures you’ll never have to settle for instant coffee again, whether you’re dealing with equipment failure at home or enjoying the great outdoors. Remember, the best method is the one you can execute consistently with the tools available to you.
The key to success with any of these techniques is practice and patience. Start with forgiving brewing methods like French press or cold brew, and gradually work toward more demanding preparations as your grinding skills improve.