
Three years ago, I stood in my backyard staring at a patch of clay-hard soil that seemed to mock my gardening dreams. I’d tried everything—amendments, raised beds, endless digging—and my vegetables still struggled. Then a neighbor mentioned something that sounded absolutely wild: growing plants in straw bales. No soil. No digging. Just bales of straw sitting on my driveway. I was skeptical, but desperate enough to try. That decision transformed my entire approach to gardening.
Hay bale gardening (more accurately called straw bale gardening, but we’ll get to that crucial difference) is one of those genius solutions that sounds too good to be true but actually delivers. Whether you’re dealing with terrible soil, limited mobility, a concrete patio, or you just want to try something different, this method opens up possibilities you probably never considered. And the best part? It’s genuinely easier than traditional gardening once you understand the basics.
What Exactly is Straw Bale Gardening?
Let’s clear up the terminology first, because this matters more than you’d think. While people often say “hay bale gardening,” what you actually want is straw bale gardening. The difference isn’t just semantics—it’s the difference between success and frustration.
Straw is the hollow, golden stems left over after grain harvests (wheat, oats, barley). It’s essentially empty stalks with very few seeds. Hay, on the other hand, is cut grasses and legumes harvested specifically as animal feed. It’s packed with seeds that will absolutely sprout in your garden, turning your organized vegetable patch into a weedy jungle.
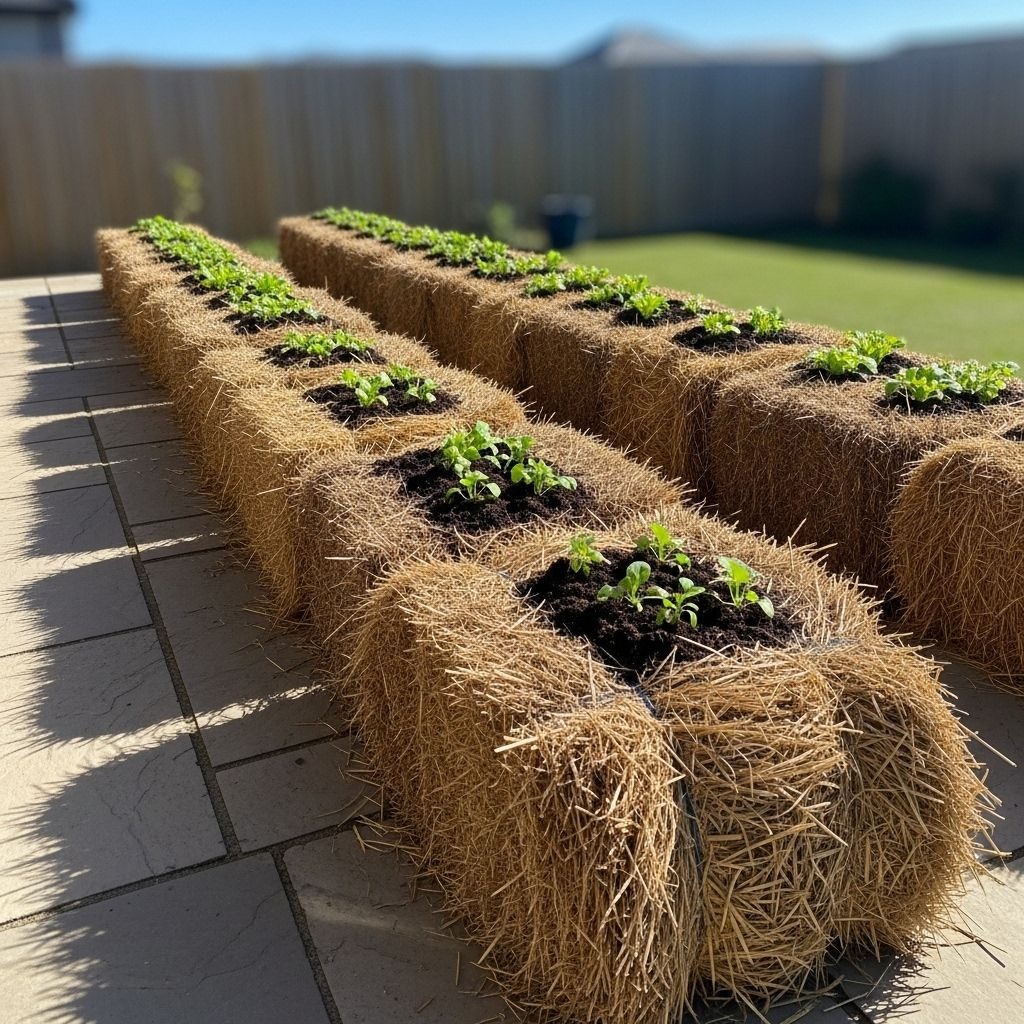
So when you’re shopping, look for straw bales—the yellow, dry, hollow stuff. They’re typically bound with two or three strings of twine or wire. Leave those strings on; they hold everything together during the growing season.
Here’s how it works: instead of planting in soil, you plant directly into straw bales that have been “conditioned” to start decomposing. As the bale breaks down with help from water, nitrogen, and beneficial bacteria, it becomes a rich growing medium that supports incredible plant growth. The bale essentially composts in place while your plants grow in it. Pretty clever, right?
The science behind this is fascinating. When you add nitrogen to carbon-rich straw and provide moisture, you’re creating the perfect environment for beneficial bacteria to multiply rapidly. These microorganisms break down the straw structure, generating heat (which plants love) and creating a loose, nutrient-rich medium that roots can easily penetrate. It’s basically controlled composting that happens while your vegetables grow.
Why Straw Bale Gardening Actually Works
When I first heard about growing vegetables in straw, my immediate thought was “there’s no way that can work.” But after seeing my neighbor’s thriving tomatoes and then experiencing my own success, I became a believer. Here’s why this method is genuinely brilliant.
No Digging Required: This is huge, especially if you’ve got soil issues. Clay? Sand? Contaminated? Rocky? Doesn’t matter. The bales sit right on top of whatever surface you have. I’ve seen straw bale gardens thriving on driveways, patios, gravel, grass, dirt—you name it. You’re creating your growing medium from scratch, so the ground beneath is irrelevant.
Works Anywhere: As long as you have sun and water access, you can grow. Apartment balcony? Perfect. Rental property where you can’t dig? Ideal. Small yard with no space for beds? Bales stack efficiently. This portability is similar to the freedom you get with container gardening, but on a larger scale.
Fewer Weeds and Pests: Since you’re not using ground soil, many common soil-borne diseases and pests never enter the picture. And because properly conditioned straw bales are mostly seed-free, weeding becomes almost nonexistent. I went from spending hours pulling weeds to spending minutes. The elevated growing surface also keeps many ground-dwelling pests like slugs and some insects away from your plants.
Ergonomic and Accessible: Bales sit about 18-24 inches off the ground, which means significantly less bending. For anyone with back problems, knee issues, or mobility challenges, this is a game-changer. My grandmother, who’d given up gardening because of arthritis, started growing again using straw bales. She could tend her tomatoes without kneeling or bending over, and the joy it brought her was priceless.
Budget-Friendly: Straw bales typically cost $5-10 each at farm supply stores. You’ll need some fertilizer for conditioning, but overall, the startup cost is minimal compared to building raised beds or amending soil. Plus, at season’s end, you’ve got beautiful compost to use elsewhere. There’s no waste—everything gets recycled back into your garden ecosystem.
Excellent Growing Conditions: The decomposing straw creates warmth, holds moisture beautifully, and provides excellent aeration. Plants grow incredibly well because their roots have access to both moisture and oxygen, plus steady nutrients from the decomposition process. The warmth generated during conditioning and throughout the growing season extends your growing season, allowing you to plant earlier in spring and grow later into fall.
Perfect for Experimentation: If you’re new to gardening or want to try something different without committing to permanent structures, straw bales are ideal. Don’t like where you placed them? Move them next year. Want to try a different layout? No problem. This flexibility removes the pressure of making permanent decisions.
Sourcing Your Straw Bales
Finding straw bales is usually pretty straightforward. Farm supply stores, feed stores, and agricultural co-ops typically stock them, especially in late summer through fall (after harvest season). Some garden centers carry them too. Expect to pay anywhere from $5-15 per bale depending on your location and whether you’re buying during peak season or off-season.
When shopping, here’s what to look for:
Verify it’s straw, not hay. If the bale looks greenish or you can see lots of seed heads, that’s hay. Straw is golden yellow and mostly hollow stems. When in doubt, ask the staff. Pull a few strands out and examine them—straw should be dry, brittle, and hollow. Hay will be more flexible and may have seed heads attached.
Check for herbicide use. This is critical and often overlooked. Some farmers spray persistent herbicides on their grain crops that can remain active in the straw for months or even years, potentially damaging your vegetables. Herbicides like Grazon (aminopyralid) or Milestone are particularly problematic. Ask whether the straw was treated with herbicides. If you can’t verify it’s herbicide-free, do a bioassay test: plant beans in a small amount of the straw mixed with potting soil. If they grow normally after a week, you’re good. If they’re stunted or deformed, the straw is contaminated.
Look for tight, dry bales. You want bales that are well-formed and held together with at least two strings. Avoid bales that are falling apart, moldy, or have been sitting outside getting rained on for months. Fresh bales from the current year’s harvest work best. Squeeze the bale—it should feel dense and tightly packed, not loose and crumbly.
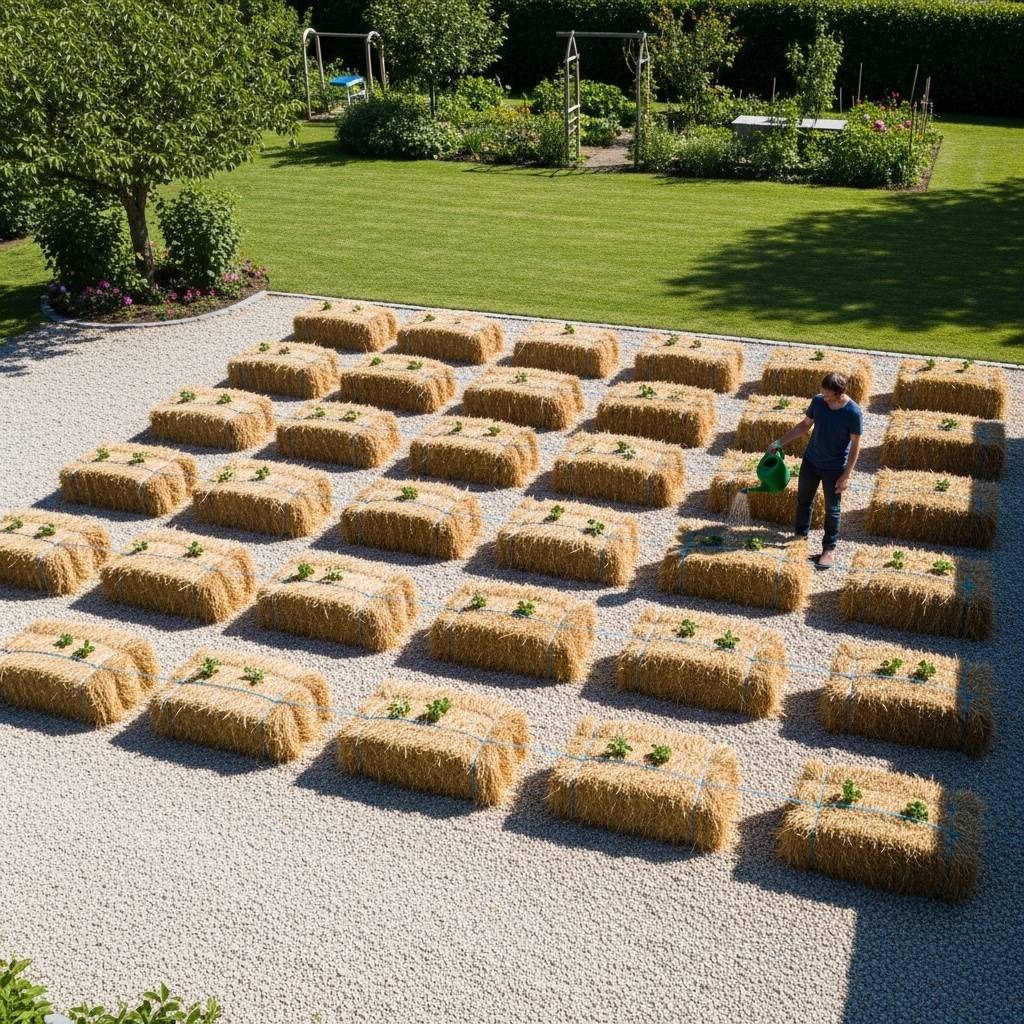
Calculate how many you need. A standard straw bale is about 18 inches wide, 14-16 inches tall, and 36-40 inches long. You can grow 2-3 large plants (like tomatoes or peppers) per bale, or 4-6 smaller plants (like lettuce or herbs). Plan accordingly based on what you want to grow. For a beginner, I’d recommend starting with 4-6 bales. This gives you enough space to grow a variety of crops without becoming overwhelming.
I usually buy a few extra bales for pathways or mulch, but start small your first year. Four to six bales will give you a solid garden without overwhelming you as you learn the system.
Setting Up Your Straw Bale Garden
Placement is everything. Once these bales get wet during conditioning, they become incredibly heavy—like, back-breakingly heavy. A saturated bale can weigh 75-100 pounds or more. So position them exactly where you want them before you start the conditioning process.
Choose a Sunny Location: Most vegetables need 6-8 hours of direct sunlight daily. Scout your space and identify the sunniest spots. South-facing areas typically get the most sun in the Northern Hemisphere, while north-facing areas stay shadier. East gets gentle morning light, west gets hot afternoon rays.
Here’s a trick I learned the hard way: use your phone to set hourly reminders throughout one full day. Each time it goes off, step outside and note which areas are sunny versus shaded. By the end of the day, you’ll have a clear sunlight map of your space. This simple exercise prevents the common mistake of placing bales in spots that don’t get enough light.
Consider Water Access: You’ll be watering frequently, especially during conditioning and early in the season. Make sure you can easily reach your bales with a hose, watering can, or garden watering hose. Lugging watering cans gets old fast (trust me on this one). If your gardening spot is far from a water source, consider setting up a dedicated watering station with a large bucket or rain barrel that you fill periodically.
Decide on Bale Orientation: The strings should run around the sides of the bale, not across the top and bottom. Position bales so the cut ends (where you can see the straw strands) face up—this makes planting easier. The cut side has all those hollow straw tubes pointing upward, which act like straws carrying water and nutrients deep into the bale.
Space Them Appropriately: Leave at least 18-24 inches between bales for walking and working. If you’re planning vertical supports for vining crops, leave extra room behind bales for posts or trellises. Consider creating aisles wide enough for a wheelbarrow or garden tool set cart if you have the space.
Use Landscape Fabric Underneath (Optional): While not necessary, laying landscape fabric or cardboard under your bales can help suppress grass or weeds that might try to grow up through the bottom. This is especially useful if you’re placing bales on grass or dirt. Some gardeners also use wooden pallets to elevate bales slightly, improving drainage and air circulation underneath.
I arranged my bales in two rows of three, creating a small aisle down the middle. This setup gave me easy access to all sides of each bale and made watering straightforward. The aisle also provided a clean workspace for harvesting and maintenance.
Conditioning Your Bales: The Critical Step
This is where most beginners mess up, and it’s the most important part of the entire process. Raw straw bales won’t support plant growth—they need to be conditioned first. Conditioning means jumpstarting the decomposition process by adding nitrogen and water, which encourages beneficial bacteria to colonize the bale and begin breaking down the carbon-rich straw.
Think of conditioning like composting, but you’re doing it inside the bale itself. The process generates heat (a sign things are working) and transforms the interior of the bale into a rich, nutrient-dense growing medium. This isn’t optional—skip or rush this step, and your plants will struggle or fail completely.
The 10-Day Conditioning Method:
Days 1-3: Soak and Saturate
Water your bales thoroughly every day. You want them completely saturated, soaking wet all the way through. This provides the moisture bacteria need to get started. Don’t just sprinkle the surface—really drench them. A good initial soaking might take 10-15 minutes per bale with a hose on moderate flow.
Days 4-6: Add Nitrogen
Sprinkle ½ cup of urea (46-0-0) fertilizer across the top of each bale and water it in thoroughly. The water carries the nitrogen down into the bale. Organic alternatives include blood meal (my preference—it’s less harsh and works beautifully), fish meal, feather meal, or well-composted manure.
The nitrogen feeds the bacteria, which multiply rapidly and start decomposing the straw. You might notice the bales getting warm to the touch—that’s exactly what you want. This heat is a sign that billions of bacteria are hard at work breaking down the straw fibers.
Days 7-9: Reduce Nitrogen
Cut back to ¼ cup of fertilizer per bale, continuing to water it in well. The bacterial population is booming now, and the interior temperature might reach 100-140°F. Don’t worry; this is perfect. Stick your hand into the center of the bale (carefully) and you’ll feel the warmth. This heat pasteurizes the bale, killing weed seeds and potential pathogens while breaking down the straw structure.
Day 10: Just Water
Stop adding fertilizer but continue keeping the bales damp. The internal temperature should start dropping as the most intense decomposition phase completes. By now, the interior of the bale should be starting to break down, creating a loose, crumbly texture that roots can penetrate.
Alternative 18-20 Day Method:
Some gardeners prefer a longer conditioning process that uses less nitrogen per application. The principle is the same—alternate days of nitrogen application with watering—but stretched over 18-20 days. This method can produce more consistent results and avoids shocking the bales with too much nitrogen at once. It’s particularly good if you’re using organic fertilizers, which release nutrients more slowly.
Testing for Readiness:
By the end of conditioning, stick your hand into the center of the bale. It should feel warm (not hot), crumbly, and somewhat loose. If you pull out a handful, you should see the straw starting to break apart and feel almost spongy. The internal temperature should be below 100°F—ideally around 80-90°F. That’s your green light to plant.
If the bale still feels very hot (over 100°F), wait a few more days. Planting in an overly hot bale will cook your seedlings’ roots. Patience here pays off.
Important timing note: Start conditioning about 2-3 weeks before your area’s last frost date if you’re growing warm-season crops like tomatoes. This ensures your bales are ready exactly when you need to plant. For cool-season crops like lettuce or peas, you can condition bales earlier in spring.
What to Plant in Your Straw Bale Garden
The beauty of straw bale gardening is that most vegetables thrive in this system. The loose, well-aerated growing medium with consistent moisture is pretty much a dream environment for plant roots. I’ve had better success with tomatoes in straw bales than I ever did in traditional garden beds.
Best Vegetables for Straw Bales:
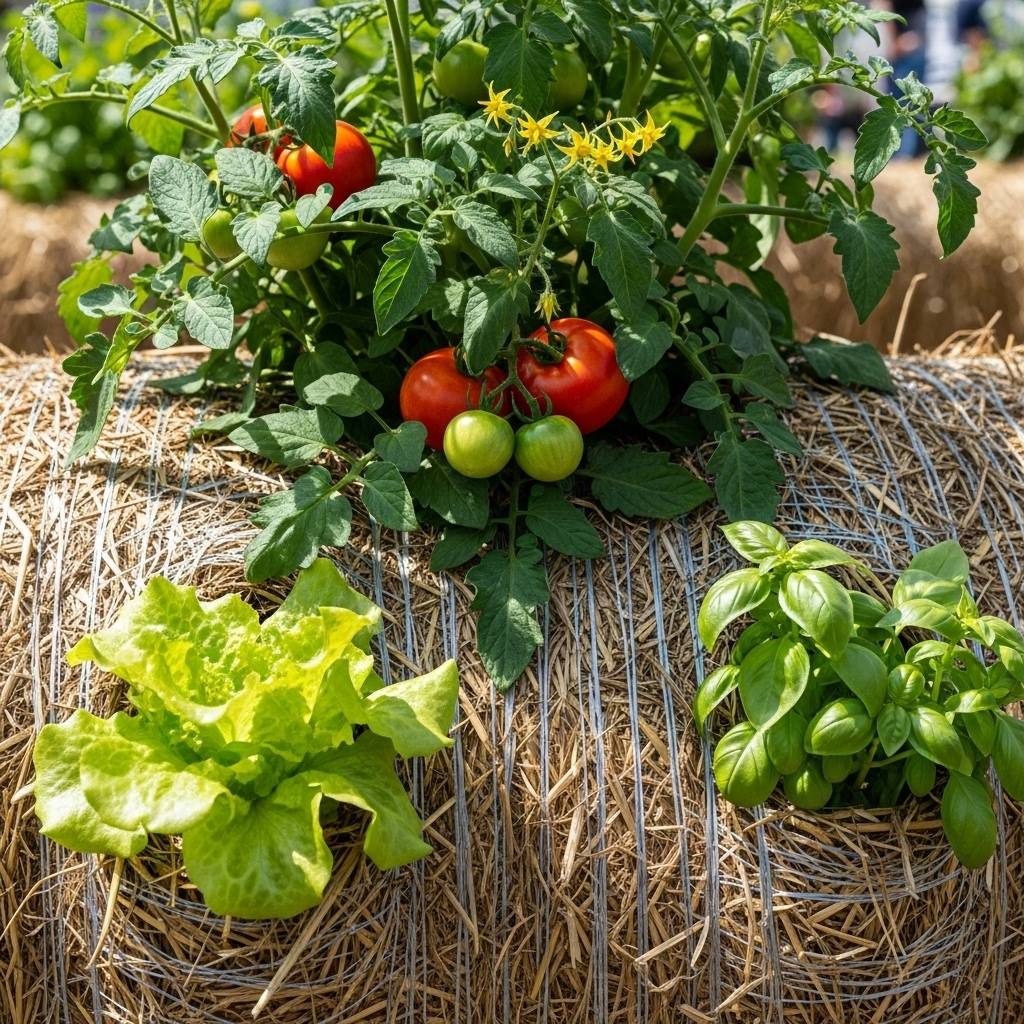
Tomatoes: Absolute superstars in straw bales. The warmth from decomposition gives them a boost, and they grow incredibly vigorously. Plan for 2-3 plants per bale depending on variety. Indeterminate (vining) varieties need sturdy support, while determinate (bush) types are more self-supporting. Cherry tomatoes are particularly prolific in bales.
Peppers: Both sweet bell peppers and hot peppers do beautifully. 3-4 plants per bale works well. They love the warmth and the consistent moisture. I’ve grown jalapeños, bell peppers, and even habaneros successfully in straw bales.
Squash and Cucumbers: These sprawling vines work great if you have room for them to spread across the ground or if you train them vertically on a trellis. One to two plants per bale is plenty—they get huge. Zucchini, summer squash, and cucumbers all thrive.
Lettuce and Leafy Greens: Perfect for tucking into the sides of bales or planting densely on top. You can succession plant for continuous harvests throughout the season. Spinach, kale, arugula, and mixed salad greens all work wonderfully.
Herbs: Basil, parsley, cilantro, and other herbs love straw bales. Tuck them into corners or sides of bales where you’ve planted larger vegetables. Fresh herbs are incredibly productive in this system, and having them at waist height makes harvesting easy.
Beans: Both bush and pole beans thrive. Pole beans benefit from vertical support systems attached to posts or trellises. Bush beans are self-supporting and produce heavily.
Root Crops: Carrots, radishes, and beets can work, but they do better in second-year bales that have decomposed more. The first year, the straw is still a bit coarse for optimal root development. However, radishes are quick-growing and can work even in first-year bales if you add a good layer of soil on top.
Strawberries: Excellent for side planting. They cascade beautifully down the sides of bales and the warm, loose medium promotes great fruit production. Plus, the elevated growing keeps berries clean and away from ground-dwelling pests.
Potatoes: These are particularly interesting in straw bales. Plant seed potatoes into the top of the bale, and as they grow, keep mounding straw and compost around them. At harvest, you simply break apart the bale—no digging required.
Plant Spacing Guidelines:
Because bales provide such excellent growing conditions—plenty of moisture, nutrients, and aeration—you can plant more densely than you would in traditional gardens.
- Large plants (tomatoes, peppers, eggplant): 2-3 per bale
- Medium plants (bush cucumbers, small squash varieties): 2-4 per bale
- Small plants (lettuce, herbs, radishes): 6-12 per bale
- Vining plants (pole beans, peas): 4-6 per bale with vertical support
- Root crops (carrots, beets): Plant in a 2-3 inch soil layer on top, follow seed packet spacing
Don’t forget about side planting! You can tuck herbs, lettuce, or strawberries into the sides of bales by creating small pockets. This maximizes your growing space significantly. I typically plant tomatoes on top and then add basil, lettuce, or nasturtiums to the sides.
Planting Your Conditioned Bales
Once your bales are properly conditioned, it’s time to plant. This part is surprisingly easy and actually kind of fun. There’s something satisfying about pushing aside straw and tucking plants into their new home.
For Transplants:
Create planting holes. Use a trowel or hand tool from your garden tool set to dig into the top of the bale, pushing straw aside to create a hole large enough for your transplant’s root ball. For larger plants like tomatoes, you might need to use a small saw or serrated knife to cut through compacted straw—make holes about 6-8 inches wide and deep.
Optional: Add potting soil. Some gardeners like to add a few handfuls of potting soil or compost into each planting hole. This gives transplants a richer medium to establish in before their roots reach into the conditioned straw. It’s not strictly necessary, but it can help, especially with young seedlings. I usually add about 2-3 cups of good potting mix per hole.
Plant and firm in. Remove your seedling from its container, gently loosen any circling roots, place it in the hole, and push straw back around the roots to hold it in place. Press down firmly so the plant is secure and upright. Water immediately after planting to settle everything.
For Seeds:
Spread a soil layer. For direct-seeding crops like lettuce, radishes, beans, or carrots, spread a 2-3 inch layer of potting soil, compost, or a mix across the top of the bale. This gives seeds a better germination medium than raw straw. The seeds need good soil contact to sprout reliably.
Plant according to seed packet instructions. Sow at the recommended depth and spacing. Press seeds gently into the soil layer to ensure good contact. Water gently with a watering spray mister to avoid washing seeds away or creating channels in the soil.
Keep moist until germination. Seeds need consistent moisture to sprout. Check daily and water lightly as needed. Don’t let the soil layer dry out during this critical germination period.
Side Planting Technique:
To plant into the sides of bales, use a trowel to create a horizontal pocket by pulling out some straw. Create a hole about 4-6 inches deep. Insert your transplant into this pocket, securing it with the straw you removed or with additional potting mix. Side pockets work great for shallow-rooted plants like lettuce, herbs, strawberries, and trailing flowers like nasturtiums.
I usually wait a couple of weeks after planting the top of the bale before adding side plants, giving the main crops time to establish. This also ensures the bale has fully cooled down and settled.
Supporting Your Plants: Staking and Vertical Systems
Because bales decompose and soften throughout the season, standard staking methods don’t work well—the bales won’t support heavy stakes driven into them. You need different solutions for supporting tall or vining plants. This is something I learned the hard way when my first tomato stakes simply fell over as the bale softened.
T-Post and Cattle Panel System:
This is my preferred method for tomatoes and other heavy crops. Drive metal T-posts into the ground behind your row of bales (about one post every 2-3 bales). Attach cattle panels or wire mesh to the T-posts using zip ties or wire. Make sure the bottom of the panel sits a few inches above the bale surface. Plants grow up and attach to the panel, which is securely anchored to the T-posts in the ground rather than the bales themselves. This system is rock-solid and can support even the heaviest indeterminate tomato plants.
Teepee Stakes:
For individual bales, create a teepee structure using three or four tall stakes (at least 6 feet). Push the stakes into the ground around the bale (not into it) at an angle, and tie them together at the top with twine or wire. Plants grow up and around this frame. This works beautifully for pole beans, peas, or smaller tomato varieties.
Fence Line Growing:
If you have existing fencing, place bales right against it. Vining crops naturally climb the fence, eliminating the need for additional support structures. This is probably the easiest method if you have suitable fencing available.
String Trellis:
Drive two sturdy stakes or posts at either end of a row of bales, anchoring them deep into the ground. String heavy twine or wire between the posts, running it above the bales at about 6 feet height. Hang vertical strings down to each plant, which they climb as they grow. This “Florida weave” style works great for indeterminate tomatoes. You can also weave horizontal strings as plants grow, creating a supportive web.
Whatever system you use, install it early—ideally right after planting or even before planting. Trying to add supports after plants are established is way harder and risks damaging roots and stems. Learn from my mistake: install your support systems before plants need them, not after they’re already flopping over.
Watering and Fertilizing Your Bale Garden
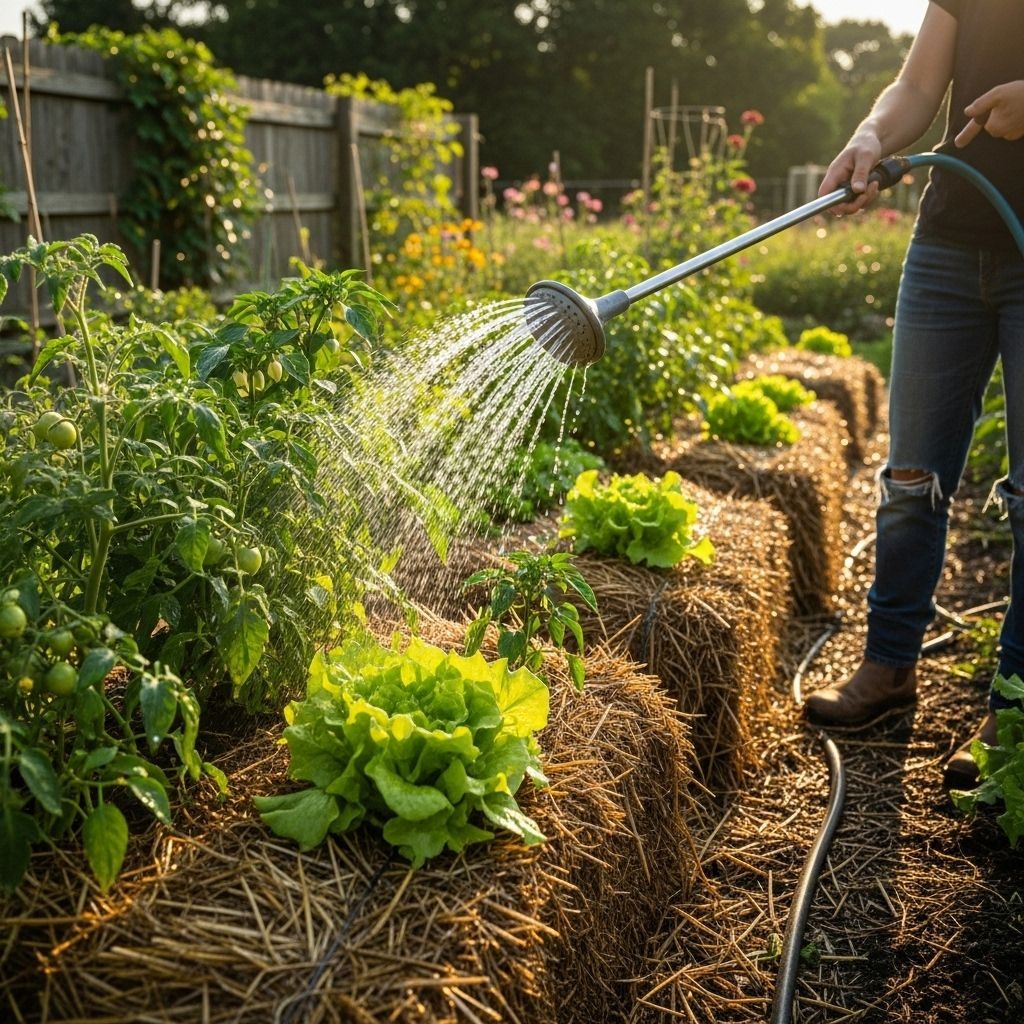
Straw bales dry out faster than you’d expect, especially once plants are established and actively growing. This is probably the biggest challenge of straw bale gardening—staying on top of watering. Consistent moisture is crucial for success.
Watering Basics:
Check daily, especially in hot weather. Stick your finger into the top of the bale. If it feels dry an inch down, it’s time to water. In peak summer, you might need to water daily or even twice daily. On extremely hot days, I sometimes water in the morning and again in the late afternoon.
Water deeply. When you water, really soak the bale. You want moisture penetrating throughout, not just wetting the surface. A garden watering hose with a gentle spray setting works perfectly. Water until you see moisture dripping from the bottom of the bale.
Consider drip irrigation or soaker hoses. For multiple bales, running a soaker hose across the tops saves enormous time and ensures consistent moisture. Position it so it drips directly onto the bale surface. This is one of the best investments you can make for a straw bale garden. You can put it on a timer for even more convenience.
Avoid overhead watering if possible. Sprinklers waste water to evaporation and can spread diseases by splashing water on foliage. Direct water at the base of plants and the bale surface. Focus on the straw, not the leaves.
Mulch helps. Once plants are established, adding a layer of compost or additional straw on top of the bale can help reduce moisture loss. This extra layer acts as insulation and slows evaporation.
Ongoing Fertilization:
Even though the decomposing bale provides nutrients, actively growing plants are heavy feeders and benefit from supplemental fertilization throughout the growing season.
Every 2-3 weeks, feed with a balanced, water-soluble organic fertilizer according to package directions. Dissolve it in water and apply it when you’re doing regular watering. Water-soluble fertilizers are immediately available to plants and work quickly.
Alternatively, sprinkle slow-release granular fertilizer across the top of bales every 4-6 weeks and water it in thoroughly. This provides a steady supply of nutrients over time.
Watch your plants. If leaves start yellowing (especially lower leaves) or growth slows, they probably need more nutrients. Lush, deep green foliage and steady growth indicate they’re happy. Tomatoes are particularly heavy feeders and benefit from regular fertilization, especially once they start setting fruit.
Common Mistakes to Avoid
I’ve made plenty of mistakes with straw bale gardening, and I’ve watched others make them too. Save yourself some frustration by learning from our failures:
Using hay instead of straw. This bears repeating because it’s such a common mistake. Hay will turn your garden into a weed disaster. Always double-check you’re buying straw—golden, hollow stems, not green grassy hay.
Skipping or rushing the conditioning process. I tried planting in partially conditioned bales my first year because I was impatient. The plants struggled terribly. Proper conditioning is non-negotiable. Give it the full time it needs—don’t shortcut this crucial step.
Not watering enough. Bales dry out fast. In summer heat, they can go from moist to bone-dry in a day. Inconsistent watering stresses plants and reduces yields dramatically. Check daily and water as needed. Set phone reminders if you need to.
Planting too early. Make sure bales have cooled down after the hot conditioning phase before planting. Putting plants in while the interior is still 100°F+ will cook the roots. Always check the internal temperature first.
Inadequate support for tall plants. Don’t wait until your tomatoes are falling over to add support. Install sturdy systems right from the start, anchored to the ground or posts, not the bales. Those bales will soften as the season progresses.
Overplanting. It’s tempting to squeeze in as many plants as possible, but overcrowding reduces air circulation, increases disease risk, and forces plants to compete for resources. Follow spacing guidelines and resist the urge to cram in more.
Forgetting to fertilize. Unlike traditional gardens with established soil biology, bales depend on you to provide ongoing nutrition after the initial conditioning. Don’t skip the regular feeding schedule, especially mid-season when plants are producing heavily.
Not preparing for the end of season. Have a plan for what you’ll do with decomposed bales. They make excellent compost and mulch, but they’re bulky. Think ahead about where you’ll use that material.
End of Season: What Happens to Your Bales
By late summer or fall, your straw bales will be significantly decomposed—soft, crumbly, dark, and looking pretty rough. This is totally normal and actually fantastic for your garden long-term. What started as tightly-bound golden straw is now rich, dark, partially composted organic matter.
First-year bales are typically spent by the end of the growing season. They’ve done their job supporting your vegetables and can now be repurposed. Break them apart and add the decomposed straw to your compost pile, use it as mulch around perennial beds or fruit trees, or spread it in areas where you want to improve soil. It’s rich, partially composted organic matter—garden gold.
When I break down my bales in fall, I typically use about half as mulch around my fruit trees and the other half gets added to my compost bin or spread on future garden beds. Over winter, it breaks down further and by spring, it’s beautiful, crumbly compost that plants love.
Some gardeners reuse bales for a second year, though they’re much more broken down and barely hold their shape. Second-year bales work wonderfully for root crops like carrots, beets, and radishes since the medium is softer and more soil-like. You can also use partially decomposed bales as raised bed fill or mix them into poor soil as an amendment.
The beauty of this system is that nothing goes to waste. You’ve grown a season’s worth of vegetables and created valuable compost at the same time. It’s the ultimate form of productive recycling. Every bit of that straw gets used—first as a growing medium, then as soil amendment.
Is Straw Bale Gardening Right for You?
After three years of growing in straw bales, I still use this method for about half my garden. It’s not without trade-offs—you do need to stay on top of watering, and there’s an initial learning curve—but the benefits far outweigh the challenges for many situations.
This method is ideal if you:
- Have terrible, rocky, or contaminated soil
- Rent and can’t make permanent garden changes
- Have mobility issues that make ground-level gardening difficult
- Want to garden on a patio, driveway, or other hard surface
- Need a temporary or portable growing solution
- Want fewer weeds and less digging
- Are looking for an accessible way to start gardening
- Have limited space but want high yields
- Want to extend your growing season (the warmth helps)
It’s less ideal if you:
- Have very limited water access or can’t commit to daily watering
- Live somewhere extremely hot and dry (bales dry out very quickly)
- Want a completely hands-off garden (bales require consistent attention)
- Prefer permanent, long-term garden structures
- Can’t source straw bales locally
- Have severe physical limitations that make even the minimal work difficult
For me, the biggest win is how it’s expanded where and how I can grow food. That concrete patio that was just wasted space? Now it’s producing tomatoes, peppers, and herbs all summer. My aging parents who’d given up gardening? They’re growing again with minimal bending. That’s the real magic of straw bale gardening—it removes barriers and makes growing accessible to more people.
Whether you’re an experienced gardener looking to try something new or a complete beginner intimidated by traditional gardening, straw bales offer a unique entry point. The method is forgiving, the results are impressive, and the satisfaction of pulling fresh vegetables from what started as a simple bale of straw is genuinely rewarding.
Frequently Asked Questions
Q1: What’s the difference between hay and straw bales for gardening?
Straw consists of hollow grain stalks (wheat, oats, barley) with few seeds, making it ideal for gardening. Hay is cut grasses and legumes full of seeds that will sprout and create a weed problem. Always use straw bales, not hay bales, for gardening. Straw is golden yellow and dry; hay is greener and denser. This distinction is critical—using hay instead of straw will give you a frustrating experience with constant weeding.
Q2: How long does it take to condition straw bales before planting?
The standard conditioning process takes 10-18 days depending on the method you use. This involves alternating applications of nitrogen fertilizer (or organic alternatives like blood meal) with regular watering. The process jumpstarts decomposition and creates the right environment for plant roots. Start conditioning 2-3 weeks before your planned planting date. Don’t rush this process—properly conditioned bales make all the difference in plant success.
Q3: How many plants can I grow in one straw bale?
A standard straw bale (approximately 18″ x 14″ x 36″) can support 2-3 large plants like tomatoes or peppers, 4-6 medium plants like lettuce or herbs, or 6-12 small plants like radishes. You can also plant into the sides of bales for even more growing space, which is perfect for herbs, lettuce, or strawberries. The excellent growing conditions in conditioned bales allow for denser planting than traditional gardens.
Q4: How often do I need to water straw bale gardens?
Straw bales dry out faster than ground gardens and require frequent watering, especially in hot weather. Check daily by feeling the top of the bale—if it’s dry an inch down, water thoroughly. During peak summer, you may need to water once or even twice daily. Drip irrigation or soaker hoses make this much easier for multiple bales. Consistent watering is probably the single most important factor for success with straw bale gardening.
Q5: Can I reuse straw bales for a second growing season?
Yes, though second-year bales are much more decomposed and work better for different crops. Use heavily broken-down second-year bales for root vegetables like carrots, beets, and radishes, which prefer the softer, more soil-like medium. Otherwise, break apart spent bales and use them as compost, mulch, or soil amendment—they’re rich organic matter that benefits your entire garden.
Q6: Where can I buy straw bales and how much do they cost?
Farm supply stores, feed stores, agricultural co-ops, and some garden centers sell straw bales, especially in late summer through fall after harvest. Expect to pay $5-15 per bale depending on location. Make sure to verify they’re straw (not hay) and haven’t been treated with persistent herbicides that could damage your vegetables. Buying directly from farmers can sometimes get you better prices.
Q7: Do I need to add soil to straw bales before planting?
It’s optional but helpful. Adding a few handfuls of potting soil or compost into each planting hole gives transplants a richer medium to establish in before roots reach the conditioned straw. For direct-seeding crops, spread a 2-3 inch layer of potting soil across the top of the bale to provide better seed germination conditions. While not absolutely necessary, this extra step does improve success rates, especially for beginners.
Q8: What vegetables grow best in straw bales?
Tomatoes, peppers, squash, cucumbers, beans, lettuce, and herbs all thrive in straw bales. The warm, well-aerated, moisture-retentive environment is ideal for most vegetables. Root crops like carrots work better in second-year bales that are more decomposed. Basically, if it grows well in containers or raised beds, it’ll do great in straw bales.