
Last spring, I stood on my cramped apartment balcony staring at a collection of mismatched plastic pots, wondering why my tomatoes looked so pathetic. The plants were stunted, roots circled the pot edges like they were trapped in prison, and fruit production was embarrassingly low. Then my neighbor leaned over her railing and pointed at her lush, productive garden growing in what looked like oversized fabric sacks. “Grow bags,” she said with a knowing smile. “Best gardening decision I ever made.”
That conversation changed everything. Within weeks, I’d transformed my sad container garden into a thriving urban oasis using grow bags. My tomatoes exploded with growth, peppers produced like never before, and suddenly I had more herbs than I knew what to do with. If you’ve been struggling with traditional container gardening or simply want to maximize your growing space, grow bags might be exactly what your garden needs.
What Are Grow Bags and Why Do They Work?
Grow bags are flexible fabric containers designed specifically for growing plants. Unlike rigid plastic or ceramic pots, these bags are made from breathable materials like polypropylene fabric, jute, or natural coir fiber. They look deceptively simple—essentially fabric sacks with handles—but the science behind their effectiveness is fascinating.
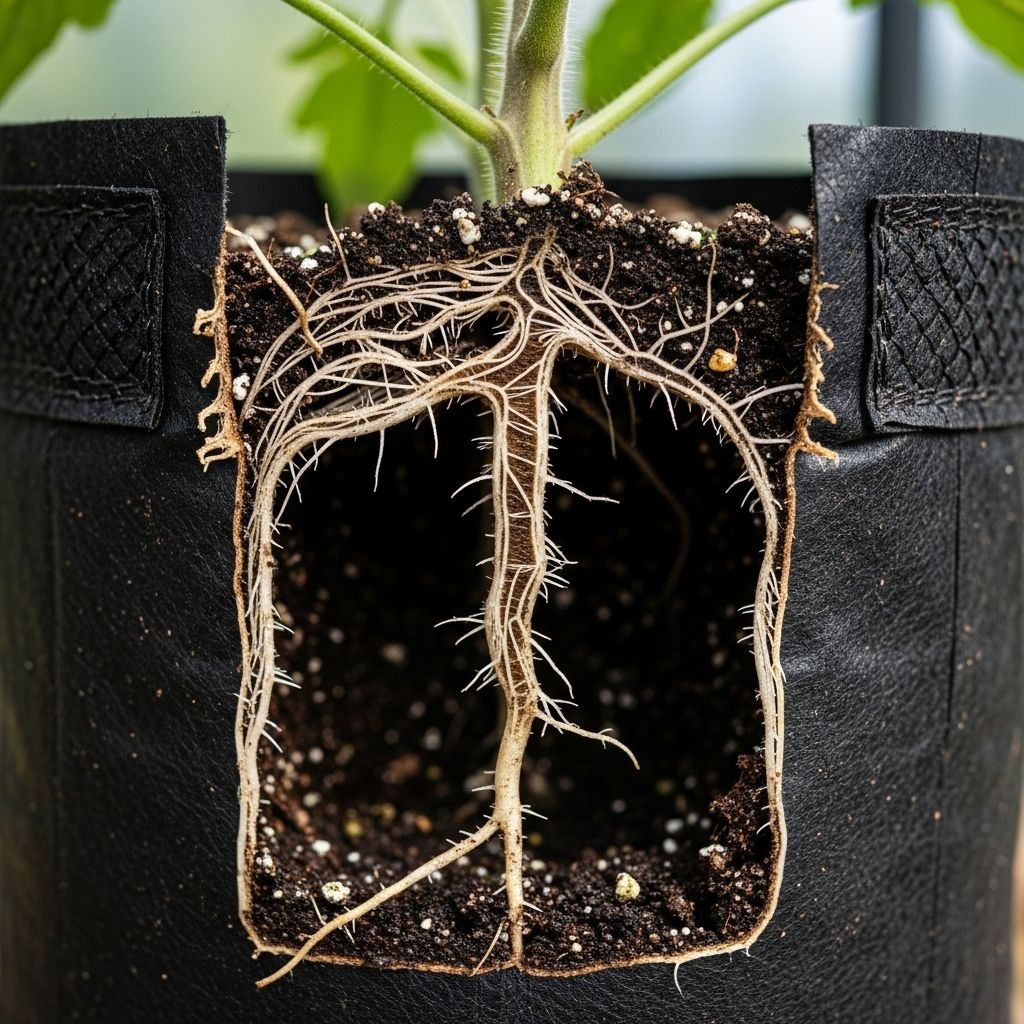
The magic happens at the root level. In traditional solid containers, roots grow outward until they hit the pot wall, then start circling around and around. This creates a tangled root mass called being “pot-bound” or “root-bound,” which severely limits plant growth and health. The plant essentially chokes itself, unable to efficiently absorb water and nutrients.
Grow bags solve this problem through a process called air pruning. When roots reach the breathable fabric sides, they encounter air and naturally stop growing at that point. Instead of circling, the plant responds by developing new feeder roots throughout the soil mass. The result is a dense, fibrous root system with countless small root hairs that efficiently absorb water and nutrients. This robust root system translates directly to healthier, more productive plants above ground.
The breathable fabric also regulates soil temperature better than plastic or ceramic. During hot summer days, plastic pots can turn into ovens, cooking delicate roots. Grow bags allow heat to dissipate through evaporation at the fabric surface, keeping roots significantly cooler. In winter, the same breathability prevents the freeze-thaw cycles that crack ceramic pots and damage roots in solid containers.
The Incredible Benefits of Grow Bags Gardening
After three seasons of growing exclusively in fabric grow bags, I’ve experienced firsthand why experienced gardeners rave about them. The benefits go far beyond just another container option.
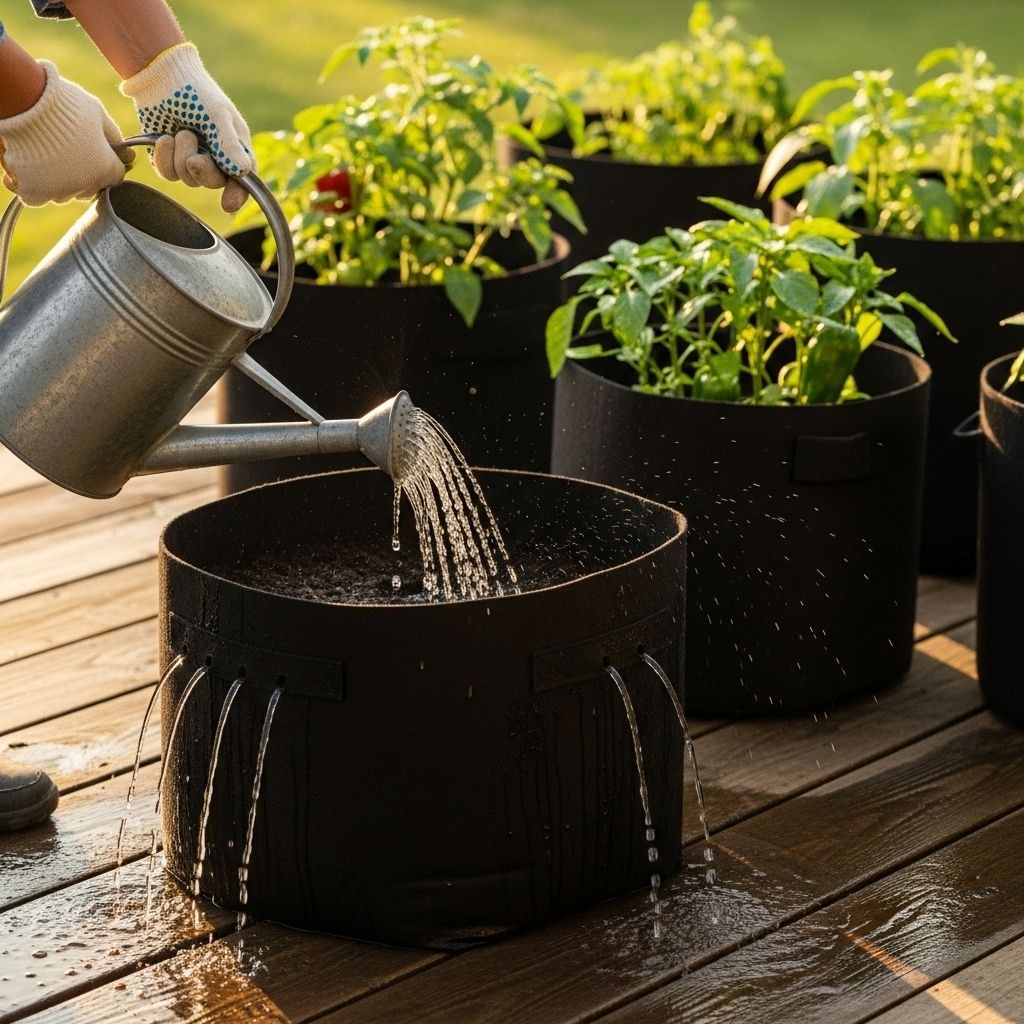
Superior Drainage sits at the top of my list. Overwatering kills more container plants than any other issue, but it’s nearly impossible to overwater grow bags. The porous fabric allows excess water to drain from all sides, not just bottom holes like traditional pots. This means roots never sit in waterlogged soil, virtually eliminating root rot. During heavy rain, my grow bags drain perfectly while neighboring plastic pots turn into swamps.
Portability transforms how you use your growing space. These grow bags weigh a fraction of ceramic or thick plastic containers. I can easily move my 10-gallon tomato bags to follow the sun throughout the day, shelter tender plants during storms, or rearrange my entire patio garden layout in minutes. Try doing that with heavy clay pots or wooden planters. The built-in handles make transport so easy that even my kids can help reposition plants.
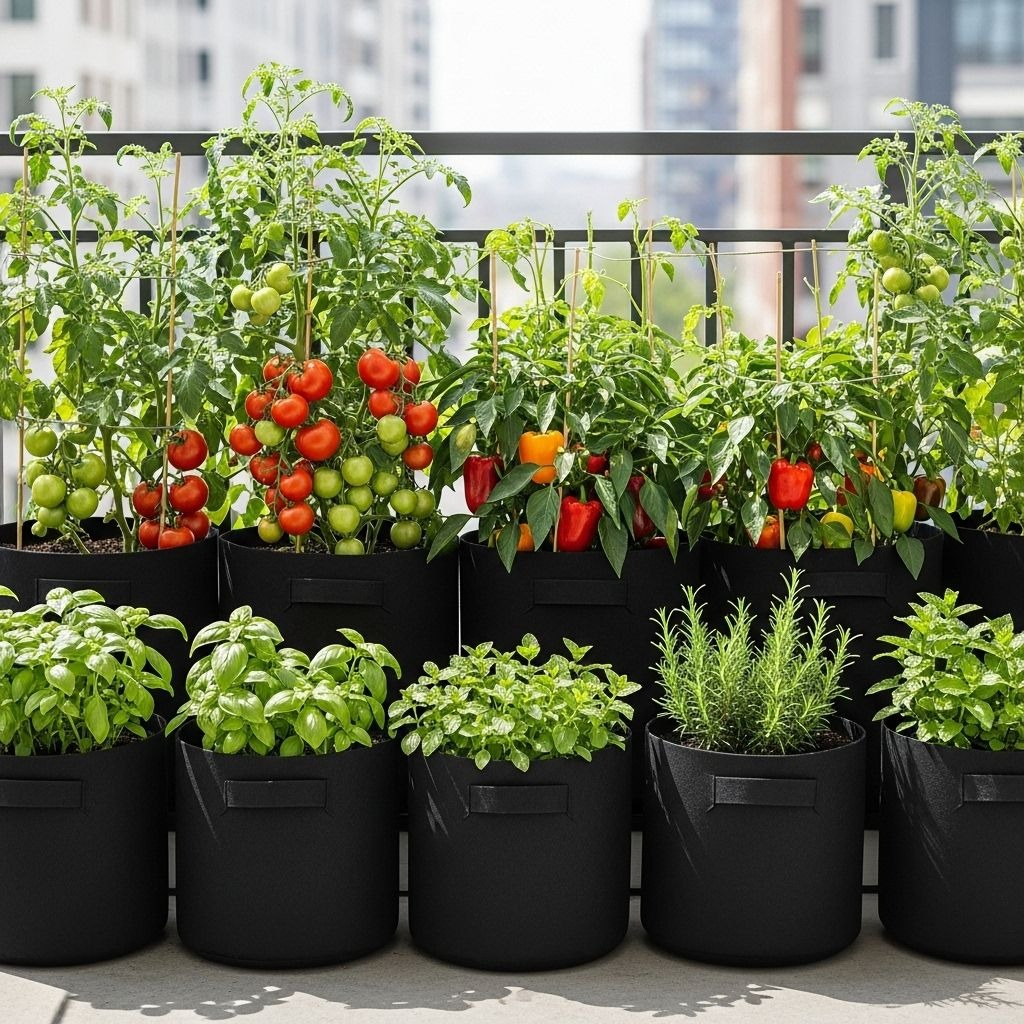
Space efficiency matters tremendously for small-space gardening. Grow bags can sit flush against walls, fit into awkward corners, and nestle together far more efficiently than round pots. I’ve increased my growing capacity by roughly 40% in the same physical space simply by switching from traditional containers to grow bags. They’re also perfect for balcony railing planters setups where every inch counts.
Cost-effectiveness makes grow bags accessible to everyone. A quality 5-gallon grow bag costs about one-third the price of an equivalent ceramic or decorative container. For the price of two fancy pots, I can outfit my entire balcony with professional-grade grow bags. They also last 3-5 seasons with proper care, making them an excellent long-term investment.
Storage convenience solves the off-season problem. Empty grow bags fold flat and stack in a shoebox-sized space. My entire collection of 20+ bags stores in a single plastic tote during winter. Compare that to the garage corner consumed by stacks of bulky plastic pots, and you’ll appreciate this advantage.
The environmental angle appeals to eco-conscious gardeners. Many grow bags are made from recycled materials and are themselves recyclable at end of life. Even better, because they promote healthier plants, you’ll use less water and fertilizer overall compared to traditional container gardening. Some premium bags are even biodegradable, though these typically last only one or two seasons.
Grow Bags vs. Traditional Pots: The Showdown
I ran a direct comparison test my second season using grow bags, and the results convinced me I’d never go back to solid containers for vegetables and herbs.
Root development showed the most dramatic difference. When I dumped out plants at season’s end, grow bag roots formed dense, fibrous networks throughout the entire soil volume. Traditional pot roots showed the classic circling pattern with most roots concentrated around the outer edge and relatively little penetration into the center soil mass.
Temperature regulation proved my grow bags averaged 8-12 degrees cooler on hot summer afternoons compared to black plastic pots in the same location. This temperature difference directly impacted plant stress levels and productivity. My grow bag tomatoes continued setting fruit during July heat waves while plastic pot tomatoes essentially shut down production.
Water management requires different approaches. Grow bags need more frequent watering—sometimes twice daily during peak summer—because of their superior drainage. However, this actually became an advantage once I understood it. The regular wet-dry cycles promote vigorous root growth and prevent the stagnant, anaerobic soil conditions that plague overwatered plastic pots. I now use these self-watering planters for crops that prefer consistent moisture, while grow bags handle everything else perfectly.
Durability concerns initially worried me. Would fabric bags fall apart after one season? After three years, my original bags show minimal wear. Yes, they look somewhat weathered with faded fabric and occasional small tears near the handles, but they remain completely functional. Quality matters here—I learned cheap grow bags disintegrate quickly, while premium bags like VIVOSUN or Smart Pots last many seasons.
Visual appeal remains plastic pots’ only real advantage. Traditional decorative containers come in endless colors, styles, and finishes that coordinate with patio decor. Grow bags are uniformly utilitarian—black, brown, or tan fabric sacks. For front-yard gardening or showcase displays, I still use decorative pots. For productive vegetable and herb gardens on my back balcony, grow bags win every time.
Best Plants for Grow Bags Gardening
Nearly any plant that grows in containers will thrive in grow bags, but some crops deliver particularly impressive results.
Tomatoes become absolute monsters in grow bags. The air-pruned root systems support vigorous top growth and heavy fruit loads. I grow cherry tomatoes in 7-gallon bags and beefsteak varieties in 10-gallon sizes. Production increased by roughly 30% compared to my previous plastic container tomatoes. The secret is matching bag size to plant size—don’t try growing indeterminate tomatoes in 5-gallon bags.
Peppers and eggplants thrive in 5-7 gallon grow bags. These solanaceous crops appreciate the excellent drainage and robust root systems that grow bags provide. I’ve successfully grown bell peppers, jalapeños, and shishito peppers with outstanding yields. The portability lets me move peppers to the hottest spots on my patio, maximizing production.
Herbs produce abundantly in smaller 3-5 gallon bags. Basil grows so vigorously I harvest handfuls twice weekly. Parsley, cilantro, oregano, and thyme all excel in grow bags. The superior drainage prevents the root rot that often plagues herbs in overwatered traditional pots. I keep a collection of small grow bags with different herbs positioned conveniently near my kitchen door. Similar to how you’d organize supplies for camping breakfast ideas, having fresh herbs within arm’s reach makes cooking infinitely easier.
Leafy greens like lettuce, spinach, kale, and chard grow beautifully in 5-gallon bags. The breathable fabric keeps roots cool during warm weather, extending the harvest season. I succession-plant lettuce in multiple bags every two weeks, ensuring continuous salad greens from spring through fall.
Root vegetables surprise many gardeners with their grow bag success. Carrots, potatoes, beets, and radishes all produce well. For potatoes, I use tall 10-gallon bags and employ the “hilling up” method, adding soil as plants grow. When harvest time arrives, I simply dump the bag and collect pounds of clean potatoes with zero digging required.
Cucumbers and squash work if you provide adequate support. I grow cucumbers in 7-gallon bags with bamboo trellises attached. The vines climb upward, and the bags’ stability prevents toppling even when loaded with fruit. Summer squash and zucchini grow well in 10-gallon bags, though their sprawling habit takes up considerable space.
Strawberries love the drainage grow bags provide. I use 5-gallon bags and plant three strawberry crowns in each. The bags’ flexibility allows me to move berries to follow the sun, and runners dangle attractively over the bag sides. For winter protection, these hanging plant baskets work well with smaller berry varieties.
Setting Up Your Grow Bags Garden
Getting started with grow bags requires minimal investment and preparation. Here’s my proven system developed through trial and error.
Choosing bag sizes matters more than you might think. Match container volume to expected plant size. Small herbs and lettuces: 3-5 gallons. Peppers, determinate tomatoes, and bush beans: 7 gallons. Large indeterminate tomatoes, squash, and potatoes: 10-15 gallons. Going too small severely limits growth, while oversized bags waste soil and space.
Quality varies dramatically between brands. I’ve used cheap bags that fell apart mid-season and premium bags still going strong after four years. Look for thick fabric (at least 200 GSM weight), reinforced stitching, and sturdy handles. My go-to brands are VIVOSUN, Smart Pots, and Root Pouch. These grow bags from my recommended list have proven reliable through multiple seasons.
Soil selection determines success or failure. Never use garden soil or topsoil in grow bags—they compact too densely and drain poorly. Use quality potting mix or create your own blend. My formula: 50% coconut coir or peat moss, 30% compost, 20% perlite or vermiculite. This provides excellent drainage while retaining adequate moisture. A 10-gallon bag requires roughly 35-40 pounds of soil mix.
Positioning bags requires thinking ahead. Once filled with moist soil, bags become heavy and difficult to move. Arrange them in their final positions before filling, leaving adequate space for plant growth and maintenance access. I group bags with similar watering needs together for efficiency.
Filling technique prevents settling issues. Fill bags about 80% full initially, then plant. As you water over the first week, soil will compact and settle. Top up with additional soil mix to maintain proper fill level. Leave 2-3 inches of space at the top to prevent water and soil spillage during watering.
Planting follows normal container methods. For transplants, dig a hole slightly larger than the root ball, position the plant at the same depth it was growing previously, then firm soil around roots. For direct seeding, follow seed packet instructions for depth and spacing. The breathable sides mean you can plant slightly closer than traditional containers since roots won’t compete as much.
Watering and Feeding Your Grow Bags Garden
Water management is the biggest adjustment when transitioning from traditional pots to grow bags. The superior drainage that makes grow bags excellent also means they dry out faster.
Watering frequency increases significantly. While plastic pots might need watering every 2-3 days, grow bags often require daily or even twice-daily watering during hot summer weather. The fabric sides allow evaporation from all surfaces, not just the top. I check bags every morning by feeling the soil 2-3 inches deep. If dry, I water thoroughly until excess runs from the bottom.
The finger test becomes second nature quickly. Stick your index finger knuckle-deep into the soil. Dry and crumbly means water now. Slightly moist means wait until evening to check again. If it feels wet and sticks to your finger, skip watering. This simple test prevents both overwatering and underwatering. For precision measurement, I use a soil pH and moisture meter on my most valuable plants.
Mulching dramatically reduces watering frequency. Apply 1-2 inches of organic mulch—straw, shredded leaves, or bark chips—over the soil surface in each bag. Mulch insulates soil, reduces evaporation, moderates temperature swings, and suppresses weeds. Since adding mulch, my watering frequency dropped by roughly 40%. The time savings alone makes mulching worth the small effort.
Drip irrigation or soaker systems work brilliantly with grow bags. I installed a simple drip system on a timer that automatically waters twice daily during summer. The system paid for itself in time savings within one season. You can create a basic setup with a garden watering hose and some inexpensive drip emitters from any hardware store.
Fertilizing requirements exceed traditional garden beds because of frequent watering. Nutrients leach out quickly through the drainage fabric. I feed weekly with diluted liquid fertilizer during active growth periods. My preferred approach mixes organic fertilizer into the soil mix at planting, then supplements with weekly liquid feedings.
The specific fertilizer ratio depends on crops. Leafy greens benefit from higher nitrogen (first number in NPK ratios). Fruiting crops like tomatoes and peppers need more phosphorus (middle number) and potassium (last number). I use a balanced 10-10-10 for most vegetables, switching to 5-10-10 once flowering begins.
Container feeding schedules differ from in-ground gardens. Start fertilizing about 2-3 weeks after planting, once transplants recover from shock and begin active growth. Continue weekly feedings through the growing season. I reduce to biweekly fertilizing as fall approaches and plants naturally slow production. Stop feeding entirely once frost threatens or you’re harvesting final crops.
Common Grow Bags Gardening Mistakes
I’ve made every possible grow bag mistake, so learn from my errors instead of repeating them.
Underwatering kills more grow bag plants than any other issue during the learning phase. Because bags drain so efficiently, they dry out much faster than gardeners accustomed to plastic pots expect. During my first season, I lost several plants to severe drought stress before adjusting my watering routine. Check bags daily during hot weather until you develop a feel for their specific needs.
Inadequate bag size dooms plants from the start. That tomato seedling looks tiny in a 10-gallon bag, but cramming it into a 5-gallon bag to “save space” guarantees disappointing results. Undersized containers restrict root growth no matter how magical grow bags are. When in doubt, size up rather than down.
Cheap bag quality seems like savings but costs more in the long run. I bought budget bags my first year that started falling apart mid-season. Handles tore off, seams split, and fabric degraded rapidly in sun exposure. Quality bags cost more initially but last 3-5 seasons. Calculate cost per season, and premium bags actually save money.
Poor soil choice undermines everything. I watched a neighbor fill beautiful grow bags with dense clay garden soil. The bags’ drainage advantages disappeared completely as water pooled on the compacted surface. She eventually dumped everything and started over with proper potting mix. Don’t make this expensive mistake—use quality container mix from the start.
Forgetting fertilizer leads to nutrient deficiencies. That gorgeous potting mix contains nutrients for roughly 4-6 weeks. After that, you’re feeding exclusively. I had mysteriously yellowing tomato plants my first year until realizing I hadn’t fertilized in over two months. Weekly feeding isn’t optional with grow bags—it’s essential.
Positioning bags on surfaces that stain creates frustrating cleanup. The constant drainage leaves mineral deposits and stains on wood decks, concrete patios, and stone surfaces. I learned this the hard way and now place decorative ceramic plant pots or drainage trays under bags on sensitive surfaces.
Neglecting off-season storage shortens bag lifespan. Leaving empty bags outside all winter exposes them to unnecessary UV degradation and weather damage. At season’s end, I empty and clean bags, then store them folded in a protected location. This simple step extends usable life by years.
Maximizing Grow Bags Garden Productivity
Once you master the basics, several advanced techniques push production to impressive levels.
Succession planting keeps bags productive continuously. Instead of planting all lettuce seeds simultaneously, I sow new seeds in bags every two weeks. This provides steady harvests rather than feast-or-famine cycles. When spring lettuce bolts in the heat, I’ve already transplanted summer basil in the same bags.
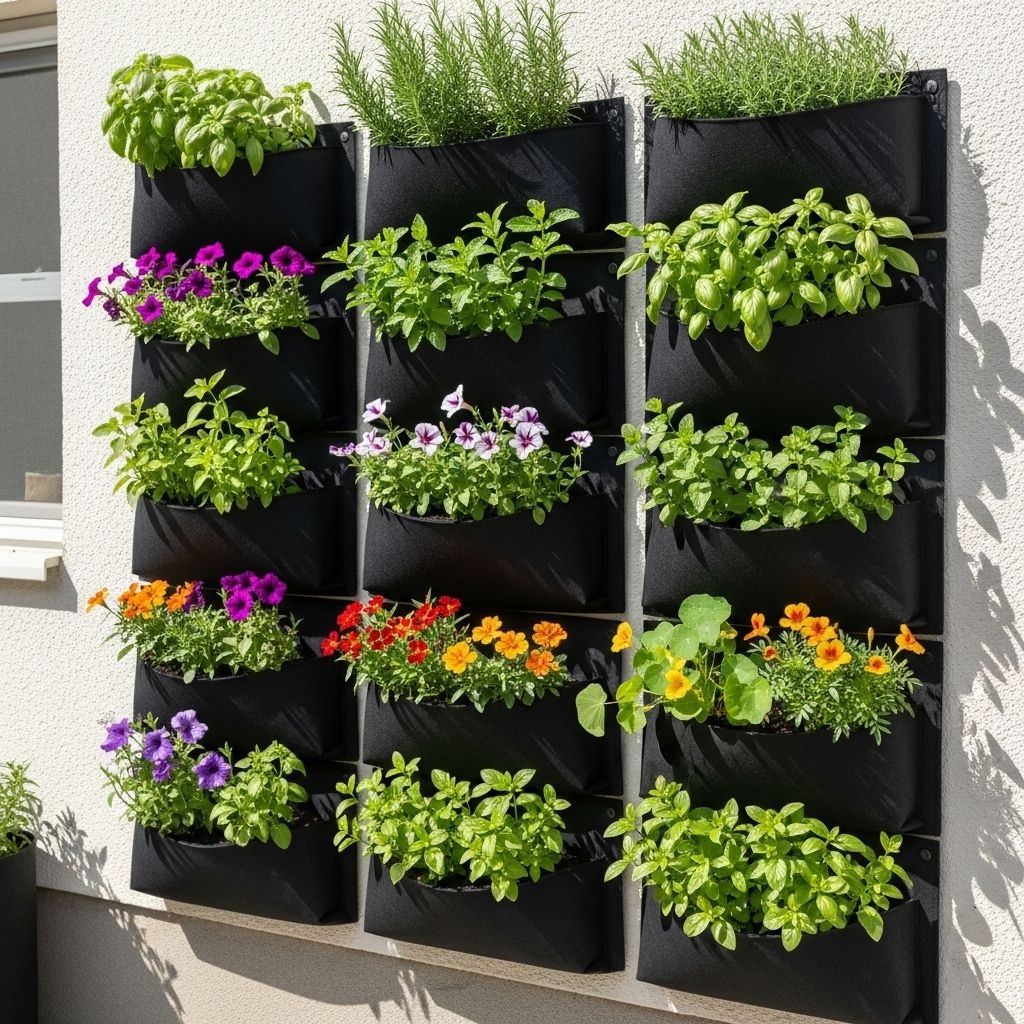
Vertical growing dramatically increases space efficiency. I attach simple bamboo trellises or tomato cages to bags and grow vining crops upward. Cucumbers, pole beans, and indeterminate tomatoes all appreciate vertical support. A 2-foot diameter bag might occupy 3 square feet of ground space but utilize 20 square feet of vertical growing area. This technique works beautifully for small balcony gardens where horizontal space is limited, similar to the space optimization strategies discussed in best camping cot setups.
Interplanting compatible crops in larger bags boosts productivity. I grow basil around the base of tomato plants in 10-gallon bags. The basil benefits from tomato shade during summer heat, while I harvest continuously from both plants. Fast-growing radishes planted with slower carrots work similarly—harvest radishes before carrots need the space.
Season extension techniques work exceptionally well with portable grow bags. As fall approaches and frost threatens, I simply move tender crops to protected locations—against the house, under roof eaves, or into an unheated garage during cold nights. This extends growing seasons by weeks compared to immobile garden beds.
Winter growing becomes surprisingly feasible with grow bags. I move cold-hardy vegetables like kale, chard, and spinach to south-facing walls where they benefit from reflected heat. During extreme cold, I huddle bags together and wrap the cluster with insulating blankets. Several bags fit easily in a mini greenhouse structure, protecting plants through remarkably cold weather.
Creative Grow Bags Garden Ideas
Beyond straightforward vegetable growing, creative applications showcase grow bags’ versatility.
Hanging gardens utilize vertical space dramatically. Smaller 3-5 gallon bags with reinforced handles can hang from hanging plant hooks on walls, fences, or overhead structures. I grow strawberries and trailing herbs in hanging bags along my balcony railing, saving valuable floor space for larger crops.
Potato towers exploit grow bags’ flexibility brilliantly. Start with partially filled 15-gallon bags and plant seed potatoes. As plants grow, add more soil mix, covering lower stems. This “hilling” process encourages potato formation along buried stems. At harvest, simply dump bags and collect pounds of clean potatoes.
Mobile herb garden on wheels transforms cooking convenience. I attached several grow bags to a small rolling cart that moves easily from storage to kitchen door as needed. Fresh herbs stay conveniently accessible for cooking, then roll back out of the way when not needed.
Kids’ gardens benefit from grow bags’ manageable scale. Each child gets their own bag to plant, water, and harvest. The clear ownership and achievable scope makes gardening more engaging than asking kids to care for a small corner of a large garden bed. Success rates and enthusiasm both increase dramatically.
Pollinator gardens on apartment balconies become possible with grow bags filled with flowering perennials. I created a small butterfly habitat using six 10-gallon bags planted with native wildflowers. Bees, butterflies, and hummingbirds visit regularly, bringing nature to my urban setting.
Seasonal Maintenance and Care
Proper maintenance keeps grow bags productive for multiple seasons and maximizes your investment.
Spring preparation starts with cleaning stored bags. I shake out any remaining soil, then scrub bags with a stiff brush and water. For bags that hosted diseased plants, I soak them in a 10% bleach solution for 30 minutes, then rinse thoroughly. Clean bags prevent carrying diseases from one season to the next.
Mid-season inspection catches small problems before they become major issues. I check bags monthly for wear, particularly examining handles and seams. A small tear caught early can be sewn shut, preventing total failure during harvest when bags are heaviest.
Summer challenges include heat stress and rapid soil drying. I combat this by moving bags to afternoon shade during extreme heat waves and sometimes double-wrapping high-value plants with a second grow bag. The air gap between bags provides surprising insulation. Mulch becomes absolutely critical during summer.
Fall transition involves cleaning up finished crops and deciding which bags will continue through winter. I dump annual vegetable crops onto my compost pile, then assess whether to replant with cool-season crops or empty and store bags until spring. For perennial herbs and overwintering vegetables, I ensure they’re positioned in protected locations.
Winter storage requires dry, protected conditions. I never store bags while still damp—they’ll develop mold and mildew. Once completely dry, I fold bags and store them in a covered location away from direct sun exposure. A plastic storage tote keeps everything organized and protected. Properly stored bags last many times longer than those left outdoors year-round.
Environmental Benefits of Grow Bags Gardening
Beyond personal gardening success, grow bags offer legitimate environmental advantages.
Water conservation becomes easier with grow bags despite their need for frequent watering. The efficient drainage prevents waterlogging and allows precise watering amounts. I waste far less water compared to my previous plastic pot gardens where excess water pooled in saucers, eventually dumping liters of water when I moved containers. The complete drainage system means every drop goes directly to plant roots or drains away cleanly.
Reduced plastic waste accumulates over years. A single quality grow bag replaces dozens of disposable plastic nursery pots. I haven’t purchased a plastic pot in three years, and my original grow bags continue serving perfectly. Many grow bags are made from recycled materials, further reducing environmental impact.
Healthier plants mean less chemical intervention. The superior root health that air pruning provides creates naturally vigorous, resilient plants. I’ve dramatically reduced pest and disease problems compared to root-bound plastic pot plants. Healthier plants need fewer chemical treatments, reducing your environmental footprint.
Composting end-of-life bags closes the loop. When grow bags finally wear out after multiple seasons, some biodegradable options can go directly into compost. Even non-biodegradable fabric bags can often be recycled through textile recycling programs rather than ending up in landfills like broken ceramic pots.
FAQ: Your Grow Bags Gardening Questions Answered
How long do grow bags last?
Quality grow bags typically last 3-5 growing seasons with proper care and storage. Premium brands like Smart Pots and VIVOSUN often exceed this lifespan, while budget options may only survive one or two seasons. Lifespan depends heavily on fabric thickness, UV exposure, and off-season storage practices. I protect my bags from unnecessary sun exposure when not in use and store them clean and dry during winter, which maximizes longevity. Handles and seams usually fail first, so inspect these areas regularly and repair small tears immediately before they enlarge.
Do grow bags need saucers underneath?
Saucers aren’t necessary outdoors where drainage can freely exit onto patios, decks, or soil. However, indoors or on sensitive surfaces that could stain, using saucers or drainage trays makes sense. Unlike rigid pots where water pools in saucers, grow bags continue wicking moisture from saucers back into the soil through capillary action. Empty any accumulated water in saucers after 30 minutes to prevent waterlogging. I use decorative ceramic plant pots as saucers for my indoor grow bags, which catches drainage while adding visual appeal.
Can you reuse soil from grow bags?
Absolutely, and I do this regularly to save money. After harvesting crops, I dump grow bag soil into a large container and pick out old roots and debris. I then refresh this used soil by mixing in 25-30% fresh compost or potting mix along with organic fertilizer. This rejuvenates depleted nutrients and restores soil structure. However, if plants showed disease symptoms during the previous season, I discard that soil entirely rather than risk spreading pathogens to new crops. For healthy crops, reusing soil for 2-3 seasons works perfectly fine with proper amendment between plantings.
What’s the best size grow bag for tomatoes?
Determinate (bush) tomato varieties perform well in 7-gallon grow bags, while indeterminate (vining) varieties need at least 10-gallon capacity, with 15-gallon being even better for particularly vigorous varieties. Cherry tomatoes can sometimes succeed in 5-gallon bags, but I’ve found 7-gallon produces better results. The correlation between bag size and tomato productivity is direct—larger bags support more extensive root systems, which directly translate to more vigorous plants and heavier fruit production. When in doubt, size up rather than down. The slight extra cost for larger bags pays back many times over in increased harvest.
Do grow bags drain too quickly?
This is the most common concern from gardeners transitioning from traditional pots. Yes, grow bags drain much faster than solid containers, which requires adjusting your watering routine. However, this isn’t a flaw—it’s actually a feature. The excellent drainage prevents root rot and creates the wet-dry cycles that promote robust root growth. I initially worried about rapid drainage but learned to appreciate it after seeing the dramatic difference in plant health. To reduce watering frequency, I mulch heavily, use larger bags that hold more moisture, and group bags together so they shade each other. For plants requiring consistently moist soil, self-watering planters work better than grow bags.