

The aroma of freshly brewed coffee wafting through your home – it’s one of life’s simple pleasures, a comforting signal that the day is beginning or a well-deserved break is at hand. For millions, the trusty automatic drip coffee maker is the go-to appliance for this daily ritual. But are you truly unlocking the full flavor potential of your beans? Knowing how to make coffee in a coffee maker properly can transform your standard cup into a café-quality experience, right in your own kitchen.
It might seem straightforward – add water, add grounds, press a button. While the basics are indeed simple, a few key details in your technique can dramatically elevate your brew. If you’re ready to move beyond just “making coffee” and start crafting exceptional coffee, this guide is for you. Let’s dive in!
Getting Started: Know Your Machine & Gather Your Tools
Before we embark on our brewing journey, let’s get acquainted with the workhorse: your drip coffee maker. Most standard machines share a few common components:
- Water Reservoir: This is where the magic begins with fresh water.
- Filter Basket: Home to your coffee filter and precious grounds.
- Showerhead: The part that evenly distributes hot water over the grounds for extraction.
- Carafe (or Pot): The vessel that lovingly collects your brewed coffee.
- Warming Plate: Keeps your coffee warm if you have a glass carafe (though with caveats we’ll discuss!).
Now, let’s gather the essentials for our brew:
- Your Automatic Drip Coffee Maker: Make sure it’s clean!
- Quality Coffee: Whole beans are best, but good quality pre-ground coffee works too.
- Coffee Filter: The correct size and type (paper or permanent) for your machine.
- Fresh, Cold Water: This is a non-negotiable for great coffee.
With your tools and machine ready, let’s prep for perfection.
The Foundation: Prepping for the Perfect Brew
Great coffee isn’t an accident; it’s the result of good preparation. Here’s what to focus on before you even think about pressing that “brew” button.
Water Matters More Than You Think
Your brewed coffee is approximately 98% water. If your tap water has off-flavors (like chlorine) or is very hard, your coffee will reflect that.
- Use Fresh, Cold Water: Always start with cold water. Your coffee maker is designed to heat it to the optimal temperature.
- Filtered is Best: Using filtered water (from a pitcher, faucet filter, or fridge dispenser) is one of the easiest ways to significantly improve your coffee’s taste.
Choosing Your Coffee: Beans vs. Grounds
The heart of your brew lies in the coffee itself.
- Whole Bean Coffee: Offers the freshest flavor. Coffee beans begin to lose their aromatic compounds quickly after grinding. Buying whole beans and grinding them just before brewing is a game-changer.
- Pre-Ground Coffee: Super convenient! If you choose pre-ground, buy it in smaller quantities to ensure it’s as fresh as possible. Store it in an airtight container away from light, heat, and moisture.
- Freshness is Key: Look for a “roasted on” date on the packaging if possible. Coffee is best brewed within a few weeks of roasting.
The Grind Size Secret: Medium is Your Mantra
If you’re grinding your own beans, the grind size is crucial for drip coffee makers.
- Aim for a Medium Grind: Think of the consistency of coarse sand or granulated sugar.
- Too Fine: If your grind is too fine (like powder for espresso), it can lead to over-extraction (bitter coffee) and may even cause your filter basket to overflow.
- Too Coarse: If your grind is too coarse (like breadcrumbs), the water will pass through too quickly, resulting in under-extraction (weak, sour, or watery coffee).
- Consistency is Crucial: A burr grinder will give you a much more consistent grind than a blade grinder, leading to a more balanced extraction.
Filters – Paper or Permanent?
- Paper Filters: These are convenient and provide a very clean cup by trapping most of an_oils and fine particles (micro-fines). Make sure you get the right shape (cone or basket-style) and size for your machine. Some aficionados rinse paper filters with hot water before adding grounds to remove any papery taste.
- Permanent Filters (Gold-Tone or Mesh): These are reusable and eco-friendly. They allow more oils and some micro-fines into the carafe, which can result in a fuller-bodied coffee. Ensure they are cleaned thoroughly after each use.
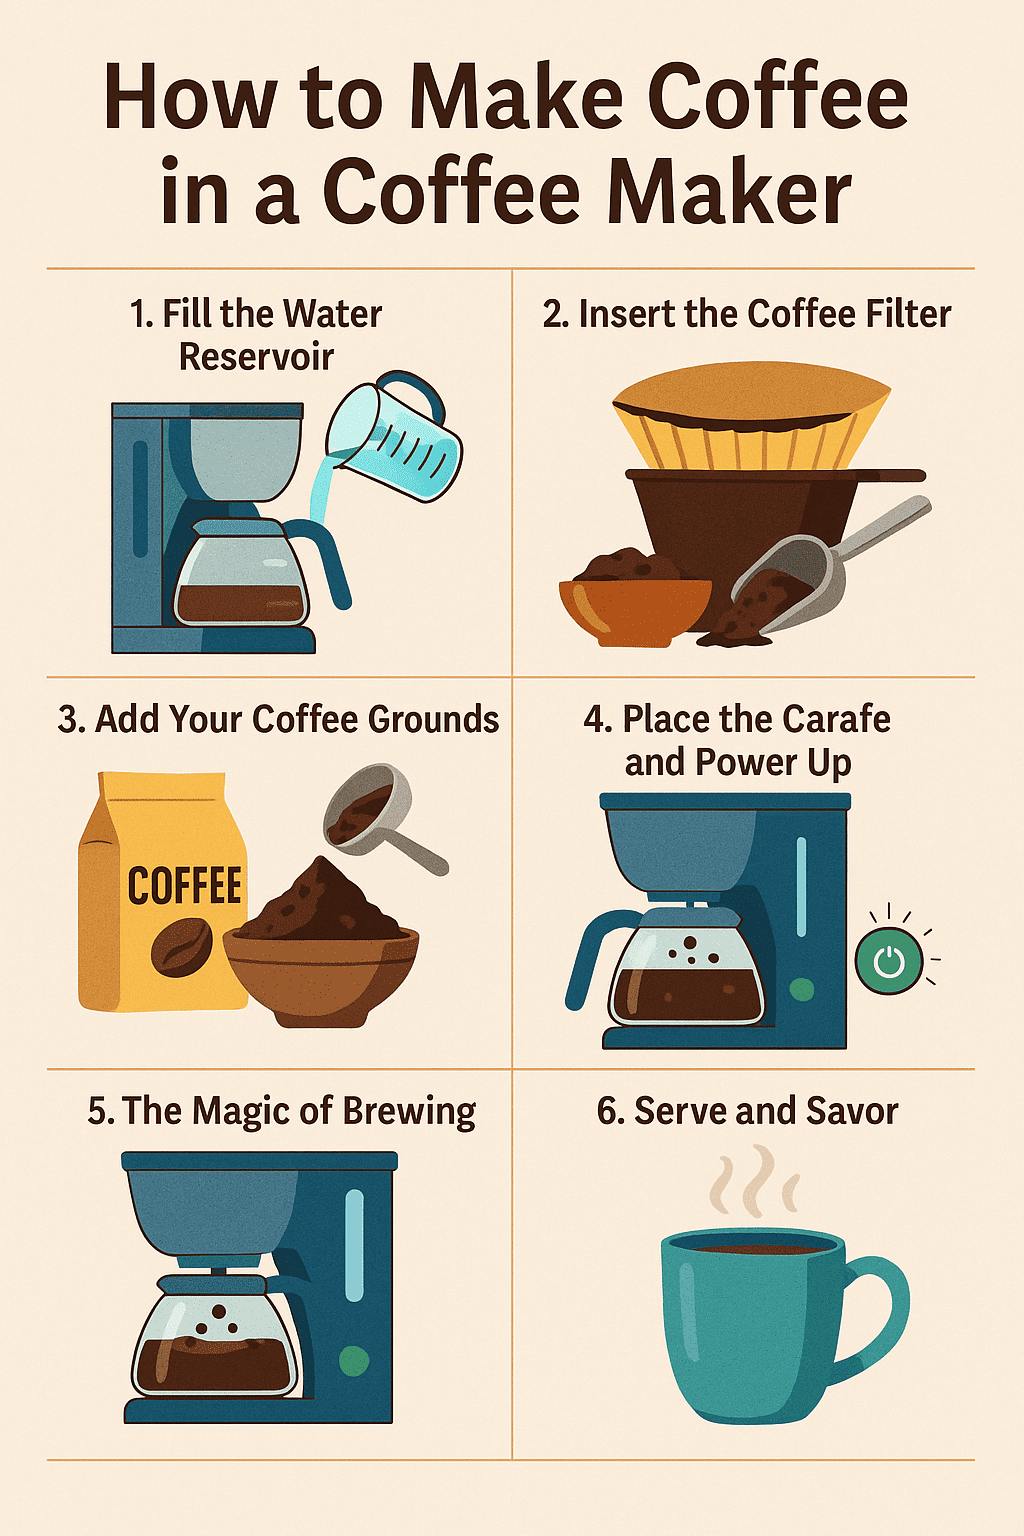
Step-by-Step: How to Make Coffee in a Coffee Maker Like a Barista
Alright, prep work done! Let’s walk through the process of brewing an exceptional pot of coffee.
Step 1: Fill the Water Reservoir
Open the lid of your coffee maker and pour your fresh, cold, filtered water into the reservoir.
- Accuracy is Your Ally: Use the measurement lines on your coffee carafe or reservoir. Remember, a “cup” indicated on a coffee maker is typically 5 or 6 fluid ounces, not the standard 8-ounce measuring cup. So, if you want two large 12-ounce mugs of coffee, you’ll aim for the 4 or 5 “cup” mark on your machine (24-30 ounces total).
Step 2: Insert the Coffee Filter
Place your chosen coffee filter into the filter basket.
- Ensure Proper Fit: If using a paper filter, make sure it’s opened fully and sits snugly against the walls of the basket. A collapsed filter can lead to grounds in your coffee or an overflow.
Step 3: Add Your Coffee Grounds – The Golden Touch
Now, for the star of the show – the coffee! Add your freshly ground (ideally) coffee to the filter.
- The Golden Ratio: A widely accepted guideline for optimal flavor is the “golden ratio.” This is generally 1 to 2 tablespoons of ground coffee for every 6 fluid ounces of water.
- For a milder cup, start with 1 tablespoon per 6 ounces.
- For a stronger, more robust cup, use 2 tablespoons per 6 ounces.
- Example: If you used 30 ounces of water (equivalent to five 6-ounce “coffee maker cups”), you’d use 5 to 10 tablespoons of coffee grounds.
- Level the Grounds: Gently shake the filter basket or use a spoon to ensure the bed of coffee grounds is level. This promotes even water distribution and extraction.
Step 4: Place the Carafe and Power Up
Close the filter basket lid. Position the coffee carafe securely on the warming plate, ensuring it’s directly under the drip spout.
- Proper Placement is Key: If the carafe isn’t seated correctly, the “pause-and-serve” mechanism (if your machine has one) might not engage properly, or worse, coffee could drip onto the hot plate. Plug in your machine (if it isn’t already) and press the “Brew” or “Start” button.
Step 5: The Magic of Brewing – Let it Flow!
You’ll hear the coffee maker spring to life, heating the water and starting the drip process. Now, patience is your virtue.
- Allow the Full Cycle: Resist the temptation to pull the carafe out mid-brew, even with a “pause-and-serve” feature. Letting the entire brew cycle complete ensures all the coffee is properly extracted and the flavor is balanced. This typically takes 5-10 minutes.
- Enjoy the Aroma: This is one of the best parts!
Step 6: Serve and Savor – The Perfect Finish
Once the coffee maker has finished its gurgling and sputtering, your delicious brew is ready.
- A Gentle Stir (Optional but Recommended): Before pouring your first cup, especially if you’ve brewed a full pot, give the coffee in the carafe a gentle swirl or a quick stir with a spoon. This helps to evenly distribute the coffee concentrate, as the strength can vary slightly from the beginning to the end of the brew. Pour yourself a cup and enjoy the fruits of your (minimal) labor!
Elevate Your Brew: Tips for Coffee Maker Excellence
Mastered the basics? Here are a few extra tips to take your coffee from great to truly exceptional:
- Bean Freshness is King (and Queen!): Coffee is a perishable product. Buy freshly roasted beans in smaller quantities that you’ll use within a week or two. Store them in an airtight, opaque container at room temperature – not in the freezer or fridge.
- Grind Just Before Brewing: This is often cited as the single most impactful step for improving coffee flavor. Invest in a decent burr grinder if you’re serious about your coffee.
- Pre-Infusion or “Bloom” (If Your Machine Has It, or You’re Adventurous): Some higher-end coffee makers have a pre-infusion or bloom cycle. This wets the grounds with a small amount of hot water for about 30-60 seconds before the main brew cycle begins. This allows CO2 to escape from the freshly roasted coffee, leading to better extraction and a more nuanced flavor. You can mimic this manually on some machines by starting the brew, letting a little water saturate the grounds, then briefly turning it off or pausing before restarting.
- Don’t Scald Your Coffee on the Hot Plate: If your coffee maker has a glass carafe and a warming plate, try to consume the coffee within 30-60 minutes. Leaving it on the hot plate for too long will “cook” the coffee, leading to a burnt, bitter taste. If you need to keep coffee hot for longer, transfer it to a pre-heated thermal carafe.
- Experiment and Take Notes: Coffee preference is personal. Don’t be afraid to slightly adjust your coffee-to-water ratio, grind size, or even try different beans to find what tastes best to you. Keep a small notebook if you want to track your results. You can find excellent resources and guides on coffee brewing from organizations like the National Coffee Association (NCA USA), which offers insights into coffee trends and consumption.
Keeping it Clean: The Unsung Hero of Great Coffee
A clean coffee maker is essential for consistently great-tasting coffee and for the longevity of your machine.
Daily Rinse & Wipe:
- After each use, discard the used coffee grounds and filter.
- Wash the carafe and filter basket with hot, soapy water. Rinse them thoroughly.
- Wipe down the exterior of the coffee maker and the warming plate (once it has cooled).
- It’s a good idea to leave the lid of the water reservoir open for a while after use to allow it to air dry completely, preventing any musty smells or potential mold growth.
Deep Clean (Descaling) Regularly:
Over time, minerals from your water (limescale) can build up inside the internal workings of your coffee maker. This buildup can affect the machine’s performance, brewing temperature, and, ultimately, the taste of your coffee.
- How Often? Descale your coffee maker every 1 to 3 months, or more frequently if you have very hard water or use your machine multiple times a day.
- How to Descale:
- Create a Cleaning Solution: Fill the water reservoir with a mixture of equal parts white vinegar and water. Alternatively, use a commercial descaling solution specifically designed for coffee makers (follow the product’s instructions).
- Run a Partial Brew Cycle: Place a clean paper filter in the filter basket (to catch any dislodged particles). Start a brew cycle and let about half of the cleaning solution run through into the carafe.
- Let it Soak: Turn off the coffee maker and let the remaining solution sit in the reservoir and the portion in the carafe for about 30 to 60 minutes. This allows the acidic solution to break down mineral deposits.
- Complete the Brew Cycle: Turn the coffee maker back on and let the rest of the cleaning solution brew through.
- Discard the Solution: Pour the vinegar/water solution out of the carafe.
- Flush with Fresh Water: This is crucial! Fill the reservoir with fresh, cold water and run 2-3 full brew cycles (using only water, no coffee grounds). This will thoroughly rinse out any residual vinegar taste or descaling solution. Smell the last brew of water – if it still smells like vinegar, run another rinse cycle.
Read more: How to Clean Coffee Maker: The Ultimate Guide for Fresh Brews
Troubleshooting Common Coffee Calamities
Encountering a coffee hiccup? Here are some quick fixes:
- Coffee Tastes Weak or Watery:
- Solution: Increase your coffee-to-water ratio (more grounds). Check if your grind is too coarse. Ensure your coffee beans are fresh.
- Coffee Tastes Bitter or Burnt:
- Solution: Decrease your coffee-to-water ratio (fewer grounds). Your grind might be too fine. Don’t let coffee sit on the hot plate too long. Your machine might desperately need descaling.
- Coffee Maker is Overflowing:
- Solution: You may have used too many coffee grounds. Your coffee grind might be too fine, preventing water from flowing through quickly enough. Ensure you’re using the correct size and type of filter and that it hasn’t collapsed. The drip mechanism might be clogged (time to descale!).
- Coffee Isn’t Hot Enough:
- Solution: Pre-heat your carafe and mug with hot water before brewing. Your coffee maker might have significant scale buildup affecting the heating element (descale thoroughly). If it’s an older machine, the heating element could be wearing out.
Your Perfect Cup Awaits
Learning how to make coffee in a coffee maker with a bit more intention doesn’t require a barista certificate, just a few simple adjustments. By paying attention to water quality, coffee freshness, grind size, the right ratios, and regular cleaning, you can transform your everyday coffee routine into a truly delightful experience. That perfect, satisfying cup is well within your reach.
FAQ: How to Make Coffee in a Coffee Maker
Q1: How many scoops of coffee do I need for 12 cups in a coffee maker?
A: Assuming a “coffee maker cup” is 6 ounces, 12 “cups” would be 72 ounces of water. Using the 1-2 tablespoons per 6 ounces rule:
* For a milder brew (1 tbsp per 6 oz): You’d need 12 tablespoons of coffee.
* For a stronger brew (2 tbsp per 6 oz): You’d need 24 tablespoons of coffee.
Many coffee scoops are equivalent to 2 tablespoons. So, for 12 “cups,” you might use 6 to 12 standard coffee scoops. Start in the middle and adjust to your taste.
Q2: Should I use hot or cold water to make coffee in a coffee maker?
A: Always use cold, fresh water. Coffee makers are designed to heat the water to the optimal brewing temperature (typically between 195-205°F or 90-96°C). Starting with hot water can interfere with this process and potentially affect the final taste.
Q3: Can you put milk in a coffee maker instead of water?
A: No, do not put milk in the water reservoir of your coffee maker. Milk can scald, clog the internal components, and create a breeding ground for bacteria that is very difficult to clean. Add milk to your coffee after it has been brewed.
Q4: How long does it take to make coffee in a coffee maker?
A: For most standard drip coffee makers, brewing a full pot (8-12 “cups”) typically takes about 5 to 10 minutes. Smaller amounts will brew faster.
Q5: Why does my homemade coffee not taste like coffee shop coffee?
A: Coffee shops often use high-quality, freshly roasted beans, precise burr grinders for consistent grind size, commercial-grade brewing equipment that ensures optimal water temperature and extraction, and filtered water. You can get closer by focusing on fresh beans, grinding them yourself just before brewing, using filtered water, and ensuring your coffee-to-water ratio is correct. Also, make sure your machine is very clean!