
Your hiking boots. They’ve carried you over rocky ridges, through muddy trails, and across sun-drenched meadows. But after all that adventure, are they looking a bit… well, experienced? Learning how to clean hiking boots isn’t just about making them look good; it’s about extending their lifespan and ensuring they perform optimally on your next journey. Neglected boots can lead to premature wear, reduced waterproofing, and even discomfort. Ready to give your boots the TLC they deserve?
Think about it: those caked-on layers of mud and grime aren’t just unsightly. They can actually break down the boot materials over time, especially leather. Moisture trapped by dirt can also invite unwanted guests like mold and mildew. So, how do you transform your mud-caked boots back into trail-ready warriors? Let’s dive in.
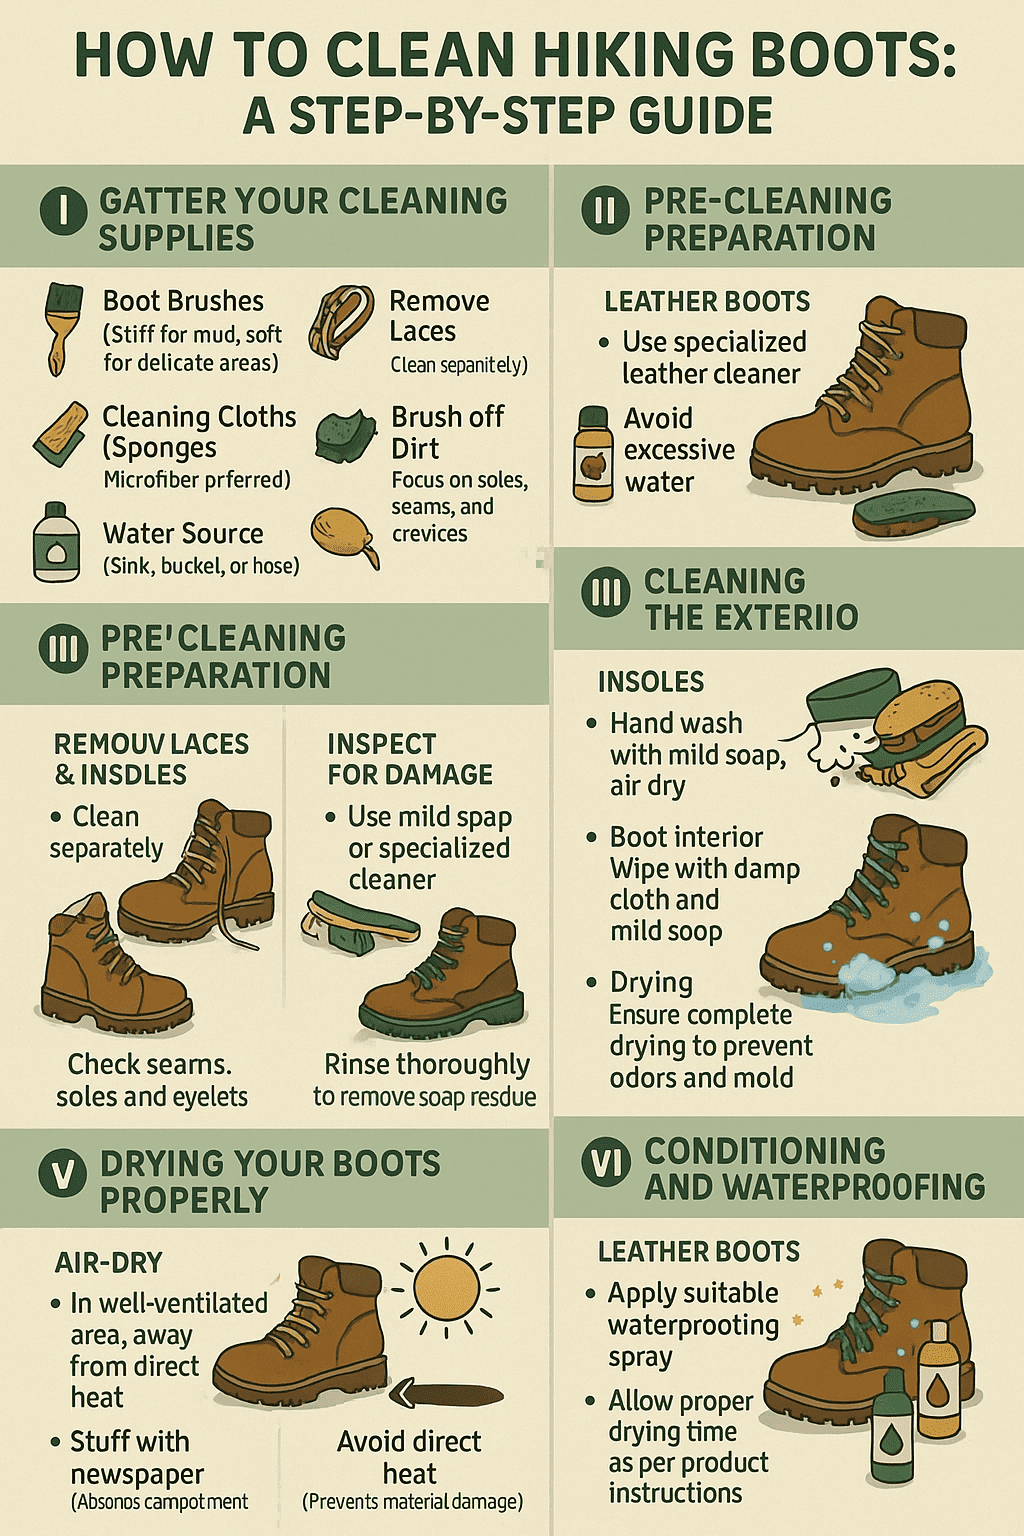
I. Gather Your Cleaning Supplies
Before you even think about touching your boots, let’s get your toolkit ready. Having everything on hand makes the process smoother and more effective. You don’t need a professional setup, just a few key items:
- Boot Brushes: A stiff brush for caked-on mud and a softer brush for more delicate materials or finer cleaning. An old toothbrush is great for nooks and crannies.
- Cleaning Cloths or Sponges: Microfiber cloths work well.
- Mild Soap or Specialized Boot Cleaner: For most synthetic boots, a mild dish soap (like Dawn) diluted in water works fine. For leather, especially full-grain, consider a specialized leather cleaner. Using specific cleaners tailored to your boot material is crucial to avoid damage.
- Water Source: A sink, bucket, or outdoor hose.
- Old Newspapers: For stuffing and drying.
- Boot Laces (Optional): If your current ones are frayed, now’s a good time to replace them.
- Insole Cleaner (Optional): Or just mild soap and water.
- Conditioner (for leather boots): To keep leather supple.
- Waterproofing Treatment: Appropriate for your boot material.
Choosing the Right Cleaning Agents:
As mentioned, the material of your boot dictates the best cleaning agent.
- Full-grain leather: Use a cleaner specifically designed for leather. Harsh detergents can strip natural oils.
- Suede or Nubuck: These require special brushes and cleaners. Avoid water saturation.
- Synthetic/Fabric: Mild soap and water are usually sufficient. You can find cleaners specifically designed for technical fabrics too.
Always test any new cleaning product on a small, inconspicuous area of your boot first.
II. Pre-Cleaning Preparation
Alright, supplies gathered? Let’s prep those boots. This stage is all about removing the easy stuff and getting a good look at what you’re dealing with.
- Remove Laces and Insoles: Take out the laces completely. This allows you to clean the tongue area thoroughly and wash the laces separately (they get surprisingly dirty!). Pull out the insoles as well; they need their own cleaning and drying time. This step is crucial because dirt and moisture love to hide under insoles.
- Brush Off Loose Dirt and Debris: Head outside or lay down some newspaper to catch the mess. Use your stiff brush to knock off as much loose mud, dust, and trail gunk as possible. Pay attention to the lugs on the soles – an old screwdriver or a pointed stick can help dislodge stubborn rocks and packed mud. Don’t forget the welts and seams.
- Inspect Boots for Damage: With the worst of the dirt gone, give your boots a once-over. Look for:
- Fraying seams or stitches
- Cuts or gouges in the leather or fabric
- Soles beginning to separate from the upper
- Excessive wear on the soles
- Eyelets that are loose or damaged
Noting these now means you can address them after cleaning or decide if it’s time for a professional repair or even new boots.
III. Cleaning the Exterior
Now for the main event: washing the outside of your boots. The approach here varies slightly depending on whether you have leather or synthetic boots.
A. Leather Boots
Leather is a natural material and needs a bit more care to maintain its integrity.
- Use Specialized Leather Cleaners: Avoid harsh detergents. Saddle soap or a cleaner specifically formulated for hiking boot leather is your best bet. Apply the cleaner with a damp cloth or soft brush.
- Avoid Excessive Water: While you need water to clean, try not to saturate the leather completely. Too much water can dry out leather and cause it to crack over time if not conditioned properly.
- Gently Scrub: Work the cleaner into the leather in small, circular motions. Use a soft brush or an old toothbrush for stubborn spots and around seams and hardware. Wipe away excess cleaner and grime with a clean, damp cloth.
B. Synthetic and Fabric Boots
Synthetic materials and fabrics are generally more forgiving but still benefit from proper technique.
- Use Mild Soap or Specialized Cleaners: A small amount of mild dish soap mixed with lukewarm water is often effective. Alternatively, use a cleaner designed for technical outdoor fabrics or synthetic hiking boots. Remember, gentle cleaning is key to preventing material breakdown.
- Scrub with an Appropriate Brush: A nylon brush or a soft-bristled brush works well. Focus on dirty areas, but clean the entire boot surface for an even result.
- Rinse Thoroughly: This is key. Soap residue can attract more dirt and can also affect the breathability of waterproof membranes. Rinse well with clean water, ensuring all suds are gone. You can do this under a tap or with a wet sponge, squeezing it out frequently.
IV. Cleaning the Interior
Don’t forget the inside! Your feet sweat, and that moisture, combined with dead skin cells, can create a less-than-fresh environment.
- Wash Insoles Separately: Your insoles likely absorbed a lot of sweat and odor. Hand wash them with mild soap and water. Use a soft brush to gently scrub them. Rinse thoroughly and lay them flat to air dry completely. Do not put them in a dryer.
- Clean the Inside of the Boots: For the boot’s interior lining, use a damp cloth with a very small amount of mild soap or a specialized boot interior cleaner. Wipe down the inside as best you can. Ensuring the interior is clean and thoroughly dry is vital for preventing odors and mold.
- Ensuring Complete Drying: After wiping, make sure the interior gets a chance to dry fully. This might mean propping the boots open in a well-ventilated area. Trapped moisture is a breeding ground for bacteria and fungi.
V. Drying Your Boots Properly
This step is just as important as cleaning. Improper drying can ruin your boots faster than a thorny bush.
- Air-Dry in a Well-Ventilated Area: Patience is key. Place your boots in a spot with good air circulation, away from direct sunlight (which can degrade materials and fade colors) and direct heat sources. A spot indoors near a fan or an open window (if it’s not too humid) is ideal.
- Stuff Boots with Newspaper: Loosely crumple up old newspaper and stuff it inside your boots. The newspaper will help absorb excess moisture from the inside and also help the boots maintain their shape as they dry. Change the newspaper every few hours or when it feels damp. This widely effective tip helps absorb moisture and maintain shape.
- Avoid Direct Heat Sources: This is a cardinal sin of boot care! Never place your boots near a radiator, fireplace, campfire, or use a hairdryer on high heat. Intense, direct heat can cause leather to crack, adhesives to melt (leading to delamination), and synthetic materials to warp. Slow and steady wins the drying race.
VI. Conditioning and Waterproofing
Once your boots are squeaky clean and bone dry, it’s time to protect them for future adventures.
A. Leather Boots
- Apply Leather Conditioner: Leather needs its natural oils replenished after cleaning to stay supple and prevent cracking. Apply a leather conditioner specifically designed for hiking boots while the leather is still slightly damp (but not wet). This helps the conditioner penetrate better. Work it in with a soft cloth, paying attention to seams and flex points. Wipe off any excess.
- Use Waterproofing Treatments for Leather: After conditioning (and allowing it to absorb), apply a waterproofing treatment. It’s important to choose the right waterproofing product specifically designed for your type of leather (e.g., wax-based for full-grain, spray for nubuck/suede). This restores the DWR (Durable Water Repellent) finish.
B. Synthetic and Fabric Boots
- Apply Appropriate Waterproofing Sprays: Synthetic boots also benefit from a fresh coat of DWR. Use a waterproofing spray designed for synthetic fabrics and footwear.
- Ensure Even Application and Proper Drying Time: Spray evenly from the recommended distance, ensuring you cover all surfaces. Let the treatment cure completely according to the product instructions, usually for 24 hours, before heading out.
VII. Reassembling and Storage
The final touches before your boots are officially mission-ready again.
- Reinsert Dry Insoles and Laces: Once everything is completely dry – insoles, laces, and the boots themselves – put them back together. If you washed your laces, they should be clean and fresh. If they were worn, perhaps you opted for new ones.
- Store Boots in a Cool, Dry Place: Avoid attics, basements that are damp, or car trunks, where temperatures can fluctuate wildly and humidity can be an issue. A closet or a gear rack in a temperature-controlled room is best. Keep them away from direct sunlight.
- Use Boot Trees or Stuffing (Optional): For long-term storage, especially for leather boots, consider using cedar boot trees. They help maintain shape and absorb residual moisture and odors. Alternatively, lightly stuffing them with newspaper also helps maintain their shape during storage.
VIII. Maintenance Tips
Keeping your boots in prime condition is an ongoing process, not a one-time fix.
- Regular Cleaning Schedule: How often should you clean your boots? It depends on usage. After every muddy or very dusty hike, a quick brush-down and spot clean is a good idea. A full deep clean like the one described here might be necessary every few months or after a particularly grueling trip.
- Inspect Boots for Wear and Tear: Each time you clean your boots, give them that quick inspection we talked about. Catching small issues early can save you a lot of trouble (and money) down the line.
- Promptly Address Minor Damages: A loose lace eyelet? A bit of fraying seam? See if you can fix it yourself with appropriate gear glue (like Seam Grip or Shoe Goo) or take it to a cobbler. Don’t let small problems become big ones.
Read more: How to Use Trekking Poles: A Hiker’s Guide
IX. Frequently Asked Questions (FAQ)
Q1: Can I put my hiking boots in the washing machine?
A: Generally, no. It’s not recommended. The tumbling action can damage the boots, especially leather ones, and the detergents can be too harsh. Some very lightweight, all-synthetic trail runners might tolerate a gentle cycle in a pillowcase, but for sturdy hiking boots, stick to handwashing.
Q2: How often should I clean my hiking boots?
A: A light cleaning (brushing off dirt) after every hike is ideal. A deep clean should be done whenever they are heavily soiled or a few times per hiking season, depending on how often you use them and in what conditions. Waterproofing should be reapplied when you notice water is no longer beading off the surface.
Q3: What should I do if my boots start to smell?
A: First, ensure they are drying completely between uses and after cleaning. Wash the insoles regularly. You can also use odor-absorbing sprays or powders designed for footwear. Sprinkling baking soda inside and letting it sit overnight before vacuuming it out can also help. Stuffing with newspaper or using cedar boot trees also helps absorb odor-causing moisture.
Q4: Is it necessary to waterproof my boots after every cleaning?
A: Not necessarily after every single light cleaning, but definitely after a thorough deep cleaning. A good rule of thumb is to reapply a waterproofing treatment when you notice that water no longer beads up and rolls off the boot’s surface but instead starts to soak in (this is called ‘wetting out’). For heavily used boots, this might be every few weeks or months.
Taking the time to properly how to clean hiking boots will pay dividends in comfort, performance, and longevity. Your feet carry you through incredible places; treat the gear that protects them with the respect it deserves. Happy trails!