
Ever watched someone breeze past you on a steep trail, hiking poles in hand, and wondered, “Am I missing out?” Or maybe you’ve tried poles but felt awkward, clumsy, or just plain confused. Learning how to use hiking poles can transform your hikes—giving you more power, stability, and confidence on any terrain.
Ready to unlock their full potential? Let’s break it down step by step.
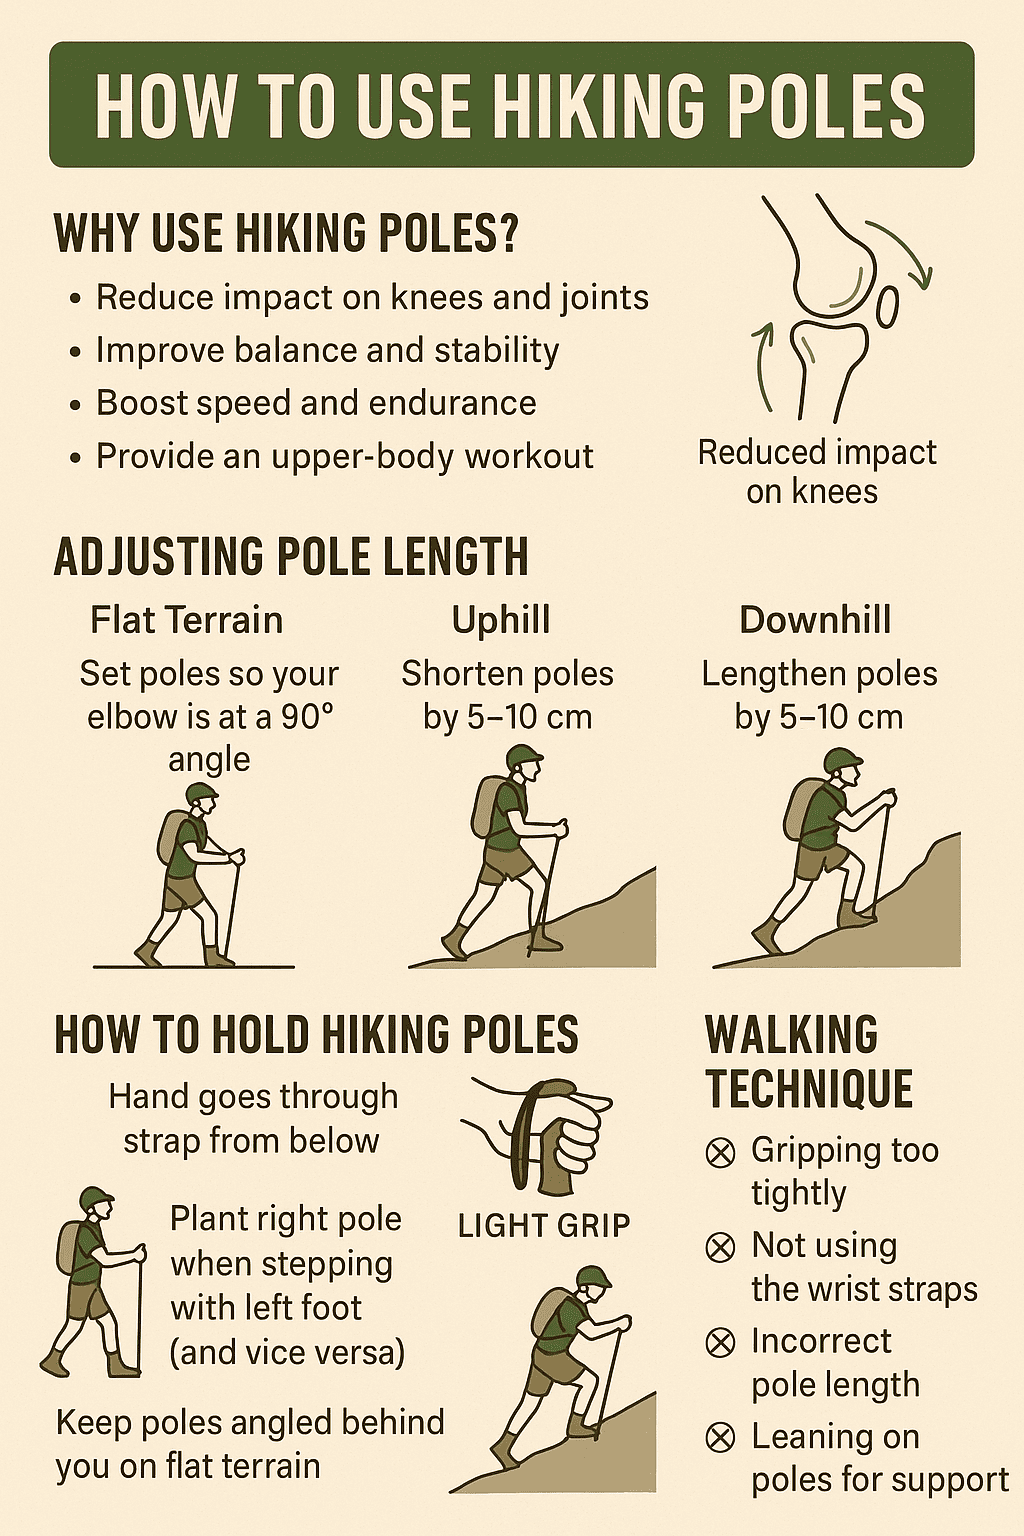
Why Use Hiking Poles?
Before we get technical, let’s answer the big question: Why bother with hiking poles?
- Reduce impact on knees and joints, especially on descents
- Improve balance on tricky terrain—mud, snow, rocks, or river crossings
- Boost your hiking speed and endurance by distributing effort to your arms
- Add an upper-body workout to your hike
- Test water depth, clear brush, or even pitch a trekking pole tent
If you want to hike longer, safer, and with less fatigue, hiking poles are your secret weapon.
How to Choose and Adjust Hiking Poles
Single or Double?
Most hikers use two poles for maximum stability, but a single hiking staff works for lighter, flatter walks.
Adjusting Pole Length
- Flat Terrain: Adjust your poles so your elbows form a 90-degree angle when holding the grips with tips on the ground
- Uphill: Shorten poles by 5–10 cm (2–4 inches) for better leverage and easier climbing
- Downhill: Lengthen poles by 5–10 cm to stay upright and reduce knee strain
- Traversing Slopes: Shorten the uphill pole and lengthen the downhill pole for comfort and balance
Pro Tip:
Set your pole’s top adjustment in the middle of its range. Use the lower section to fine-tune length, so you can quickly tweak the top adjustment on the go.
How to Hold Hiking Poles
Mastering the Strap
- Put your hand up through the bottom of the strap, then grip the handle. This supports your wrist and lets you relax your grip
- Adjust the strap so it’s snug but not tight. The strap should take the weight, not your fingers
- Never put your hand through the strap from the top—this can lead to wrist injuries if you fall
The Grip
- Hold the handle lightly, letting the strap carry most of the load
- Keep your wrists straight and relaxed to avoid fatigue
Walking Technique: Step-by-Step
Find Your Rhythm
- Walk naturally—let your arms swing as if you weren’t holding poles
- Plant the pole opposite your leading foot: right pole with left foot, left pole with right foot
- On steep climbs or descents, you can “double plant”—put both poles down together for extra stability
Flat Terrain
- Keep poles angled slightly behind you, planting them in time with your stride to propel yourself forward
- Don’t overgrip or stab the poles into the ground—use them as a springboard, not a crutch
Uphill
- Shorten your poles
- Plant poles ahead of you, using your arms to help lift your body up each step
- Keep the rhythm: opposite pole to leading foot
Downhill
- Lengthen your poles
- Place poles slightly ahead and wider for stability
- On steep slopes, lead with your poles—plant them first, then step down once you’re sure of your footing
- For very steep or rocky descents, use both poles together in front of you for maximum support
Side Slopes
- Shorten the uphill pole and lengthen the downhill pole to stay level
Read more: How Should Hiking Boots Fit? The Ultimate Guide for Hikers
Common Mistakes to Avoid
- Gripping too hard: Let the strap do the work
- Incorrect strap use: Always insert your hand from the bottom
- Wrong pole length: Adjust for terrain and your height—don’t “set and forget”
- Leaning all your weight: Poles are for balance and support, not for bearing your full body weight
- Using rubber tips on all surfaces: Use metal tips on dirt and rock, rubber tips only on pavement or delicate surfaces
Pro Tips for Efficient Hiking
- Start slow: If you’re new to hiking poles, practice on short walks before hitting tough trails
- Pace yourself: Let your arms and legs work together—don’t rush the rhythm
- Stow poles when scrambling: On rocky or technical sections, pack poles away and use your hands
- Check your gear: Make sure pole locks are secure, and don’t over-tighten twist-locks
- Use baskets: Attach snow or mud baskets for soft terrain to prevent sinking
Real-World Example
Imagine you’re tackling a steep section of the Appalachian Trail. You shorten your poles for the climb, plant them ahead, and push up with your arms—taking pressure off your legs. At the top, you lengthen the poles for the rocky descent, leading with your poles to test footing before each step. You keep your grip relaxed, letting the straps support your wrists, and find your rhythm: left foot, right pole—right foot, left pole.
Suddenly, a stream crossing appears. You use both poles for balance, testing the depth before stepping on slippery rocks. You cross safely, knees and ankles happy.
More Resources
Want to see these techniques in action? Check out this detailed video guide on how to use trekking poles for practical demonstrations and extra tips.
FAQs: How to Use Hiking Poles
How do I know if my hiking poles are the right length?
Stand with the pole tip on the ground and your arm at your side. Your elbow should form a 90-degree angle.
Do I need to adjust my poles for every hill?
Not every small bump, but for long, steep climbs or descents, yes. Shorten for uphills, lengthen for downhills.
Should I use the wrist straps?
Yes—insert your hand from the bottom, and let the strap carry the load. This prevents hand fatigue and improves control.
Can hiking poles help with knee pain?
Absolutely. Poles reduce impact on your knees, especially on descents.
What’s the best way to carry poles when not in use?
Most backpacks have side straps or loops designed for stowing hiking poles.
Are hiking poles worth it for flat trails?
They can help with balance and rhythm, but their biggest benefits show on steep, uneven, or long-distance hikes.
Mastering how to use hiking poles isn’t just about gear—it’s about moving smarter, hiking farther, and protecting your body for years of adventure.
Try these tips on your next hike and feel the difference with every step.